1. Oxblood Micro-Glaze Tips
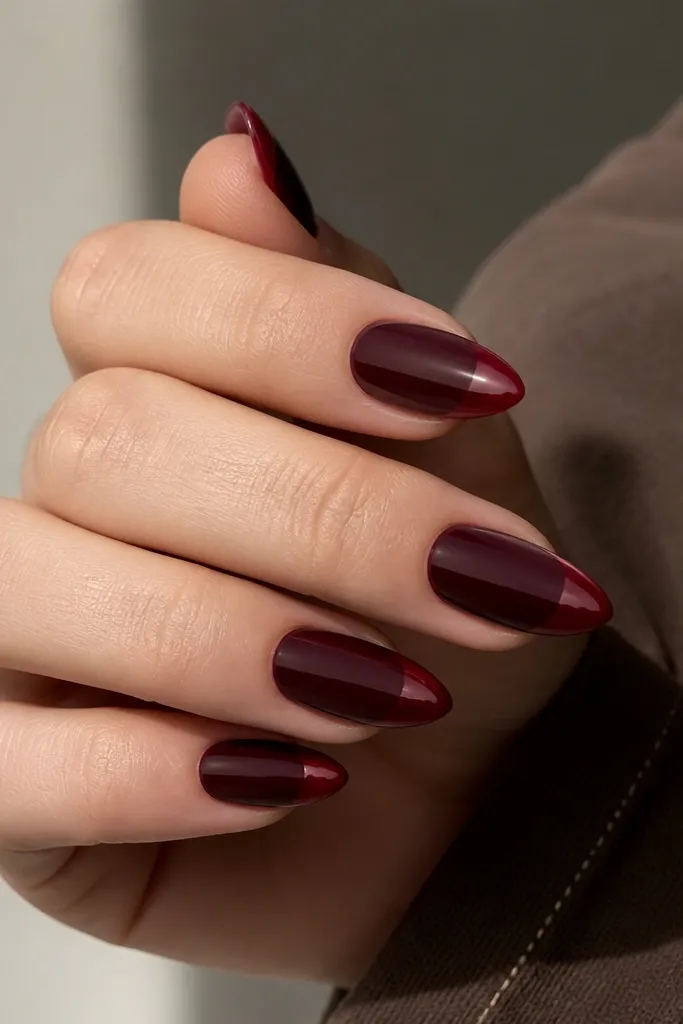
This look is all about the tip line. The oxblood base hides tiny wear, while the micro-glaze band makes the short stiletto shape read longer without adding length. The glaze is a slightly brighter oxblood (think wine with a hint of brown) that reflects light like a wet finish. It looks expensive because the edges are clean, not because the design is busy.
Start with a full oxblood coat (two thin layers). Add the glaze band only on the free edge - keep it around 1 mm and follow the nail taper. Use a striping brush to draw the line, then fill with the glaze color. Finish with a thick, glassy top coat.
Editor's noteAfter top coat, cap the glaze line with a second thin top coat so the edge stays sharp longer.
Watch outDon't smear the glaze band up the sides - fuzzy edges make short tips look uneven.
2. Milky Nude With Peach Fade Stiletto
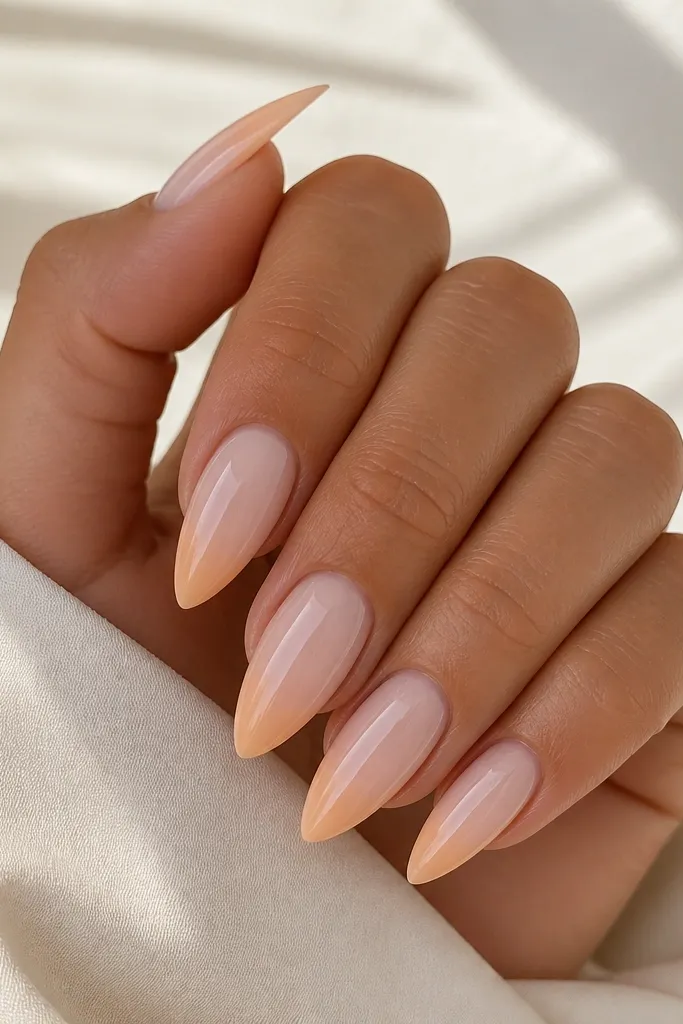
This is my go-to when you want stiletto without harsh lines. The milky nude base makes the nail look clean and even, even as it grows. The peach fade creates a warm glow at the tip, so the taper looks intentional instead of sharp. The gradient reads flattering on short nails because it gives dimension without adding bulk.
Paint milky nude as the base (two coats). With a makeup sponge or a small blending brush, dab pale peach at the tip and blend upward 1-2 mm. Keep the widest part near the free edge and taper toward the point. Seal with a glossy top coat.
Editor's noteUse a slightly damp sponge for the gradient so it blends without streaks.
Watch outSkip straight peach stripes - they look like a harsh French tip on short stiletto.
3. Black Cherry Gloss With One Tiny Gem
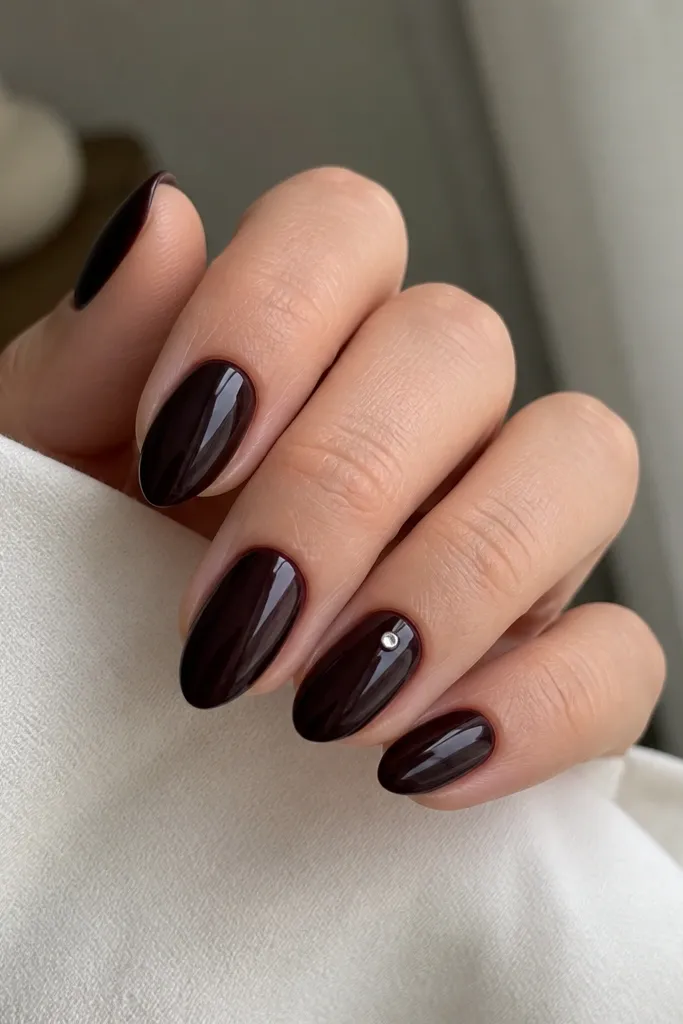
Black cherry looks richer than plain black on short nails. The one gem adds sparkle where the eye naturally lands without turning the set into "too much." Because the base is dark, any tiny imperfections in the gem placement are less noticeable. This set looks sharp in photos and still wearable to everyday.
Apply black cherry gel or polish in two thin coats for depth. Choose one nail per hand (I usually pick ring finger). Place a single 1.5-2 mm clear gem slightly above the middle, then top coat around it carefully. Finish with full coverage top coat.
Editor's notePress the gem gently with a silicone tool so it sits flat and doesn't snag.
Watch outDon't add gems to every nail - short stiletto gets heavy-looking fast.
4. Butter Yellow One-Line Stiletto
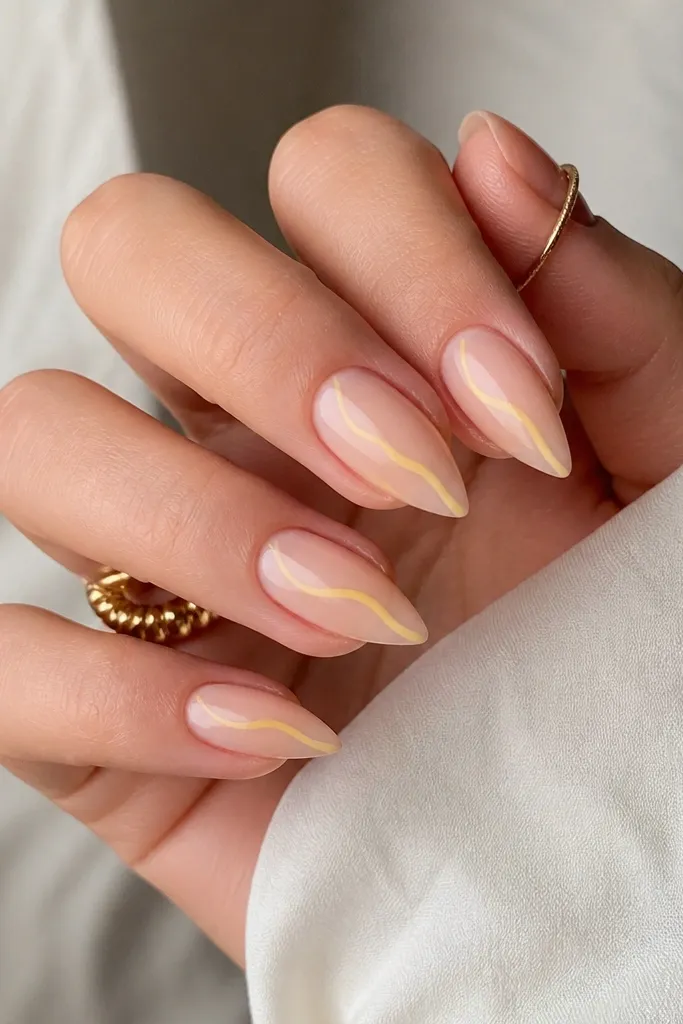
This is the cleanest way I know to make short stiletto look graphic. The sheer nude keeps it light and wearable, while the butter yellow line defines the taper. A single line is also beginner-friendly because your goal is accuracy, not filling a big design. It catches light and looks crisp even after minor growth.
Start with a sheer nude base (one to two coats). Use a striping brush to paint a thin butter-yellow line that follows the nail taper to the point. Leave the rest of the nail bare except for nude. Top coat with a smooth, glossy layer.
Editor's noteUse a striping brush that's slightly stiff; soft brushes wobble and thicken the line.
Watch outDon't make the line too thick - thick lines on short nails look cartoonish.
5. Satin Rose With Glossy Tip Cap
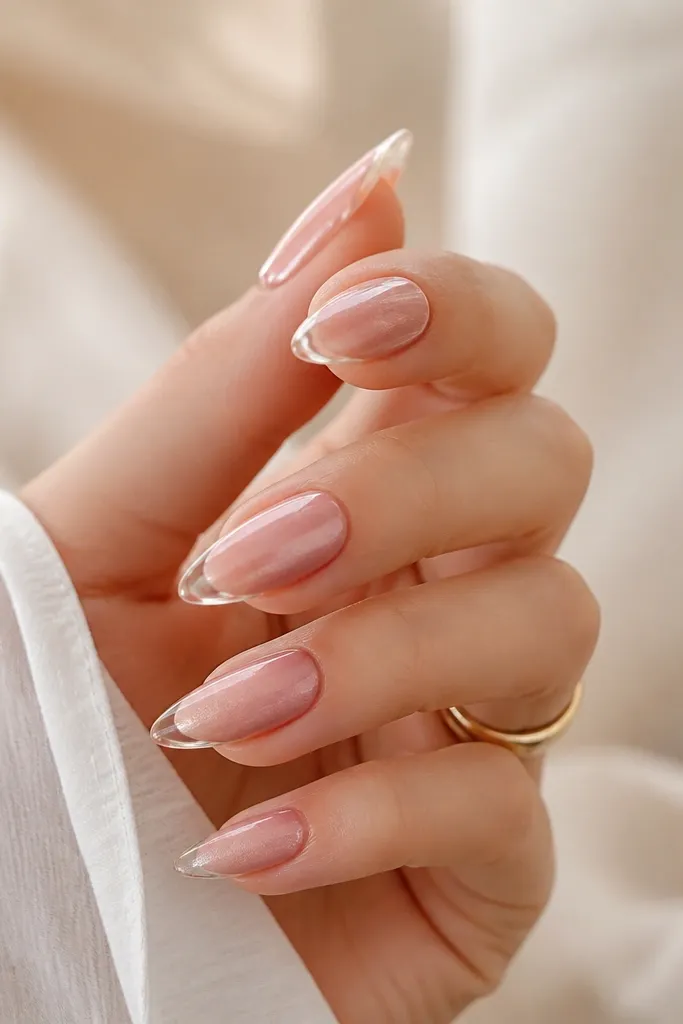
Two textures make short stiletto feel designer. The satin finish hides tiny surface flaws, so your nails look smooth even between appointments. The glossy tip cap pulls the eye to the free edge and makes the taper look sharper. This combo also looks amazing in daylight because the satin doesn't glare.
Paint a satin rose base in two thin coats. Keep the tip area slightly cleaner than the rest so the glossy cap looks like a separate layer. Apply a thick glossy top only on the free edge and cap the sides. Cure fully if using gel.
Editor's noteWipe the brush with alcohol before the glossy cap so you don't drag satin into the shine.
Watch outDon't put satin over a fully glossy nail - it will peel at the edges.
6. White Cloud Base With Nude Reverse French
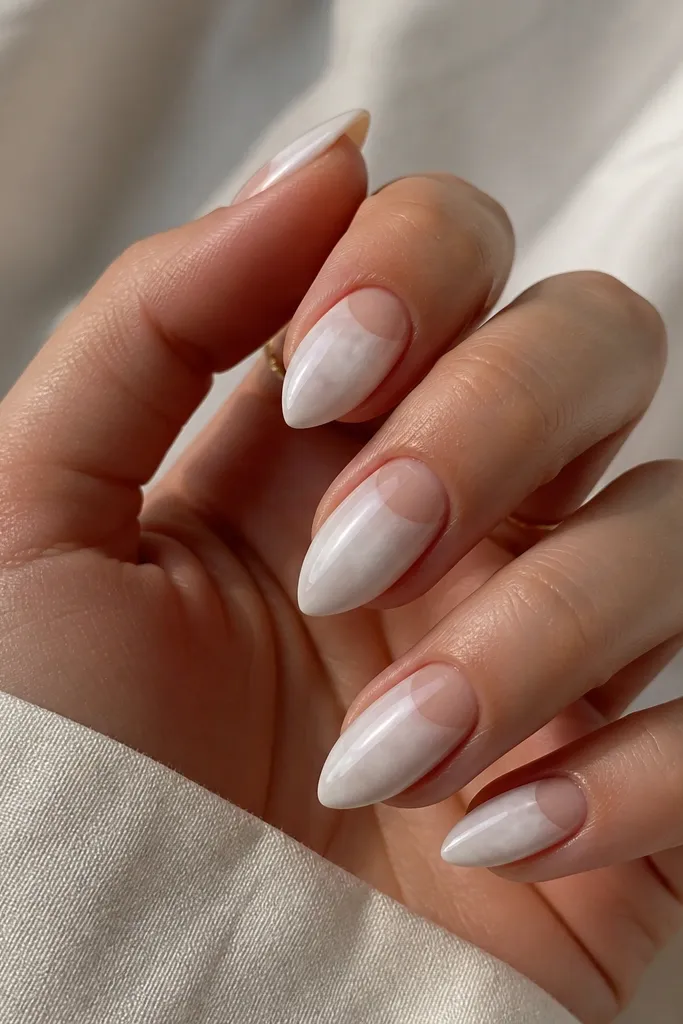
Reverse French makes short stiletto look longer because the eye is drawn to the cuticle shape. The milky white base reads soft instead of stark, and it pairs well with nude. The nude crescent also hides cuticle growth lines better than a full-color repaint. It looks polished even when you're not doing nail art.
Apply milky white in two coats, then check for streaks under a lamp. For the reverse French, paint a nude crescent right under the cuticle line, keeping it thin and centered. Use a small curved brush or a French stencil if you need help. Top coat everything glossy.
Editor's noteLet the white base cure a full minute longer before you paint the crescent so it doesn't smear.
Watch outSkip a thick crescent - it makes the nail look shorter.
7. Sea Glass Teal With Clear Side Lines
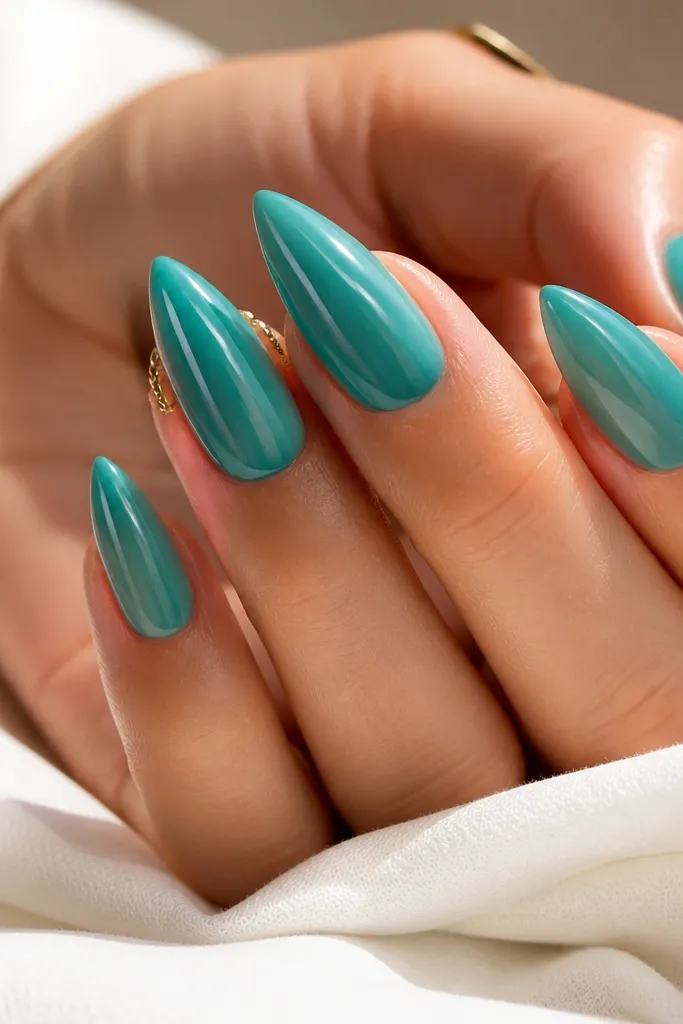
Clear side lines give the illusion of extra structure on a short stiletto. The sea-glass teal is soft enough for everyday but still looks bold in photos. The transparent lines reflect light and make the taper look more defined. This design is also forgiving because the lines don't need to be perfect - they just need to be straight-ish.
Paint sea-glass teal as the base (two coats). With a fine liner brush, draw two thin lines using clear gel or clear builder gel along the side edges, stopping a few millimeters below the tip. Cure, then add top coat. Keep the lines about 0.5-1 mm thick.
Editor's noteOutline with clear gel first, then fill the line with the same clear gel so it stays raised and crisp.
Watch outDon't let clear gel flood under the tip - it can look cloudy.
8. Chrome Cocoa Tips
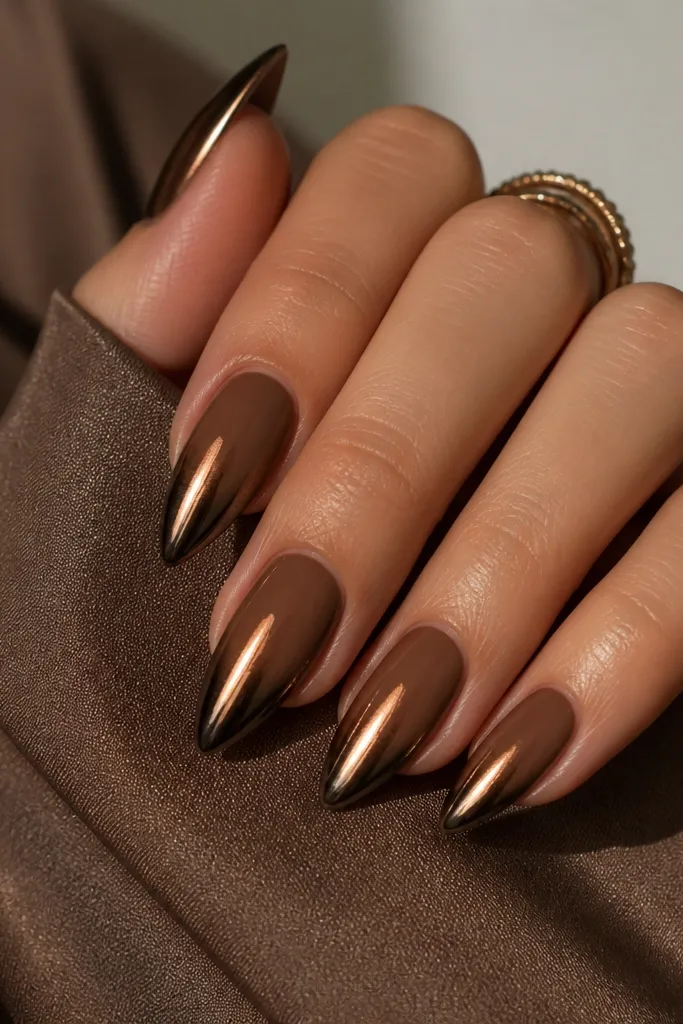
Dark chrome looks best when it's placed where the nail is already narrow - the tip. Cocoa brown makes the chrome look more wearable than silver, and it hides micro-chips better than light nudes. The fade effect keeps it from looking like a sticker tip. It gives that "sharp but cozy" look.
Do a cocoa brown base in two coats. Apply dark bronze chrome powder or chrome gel on the free edge only, then tap a little toward the sides for a natural fade. Clean up around the cuticle with a small brush and alcohol wipe. Seal with a high-shine top coat made for chrome.
Editor's noteUse a sponge applicator for the chrome so you control how far it fades up the nail.
Watch outDon't rub chrome too hard - it can smear and dull the finish.
9. Pearl Pink With Micro Glitter Cuticle Dot
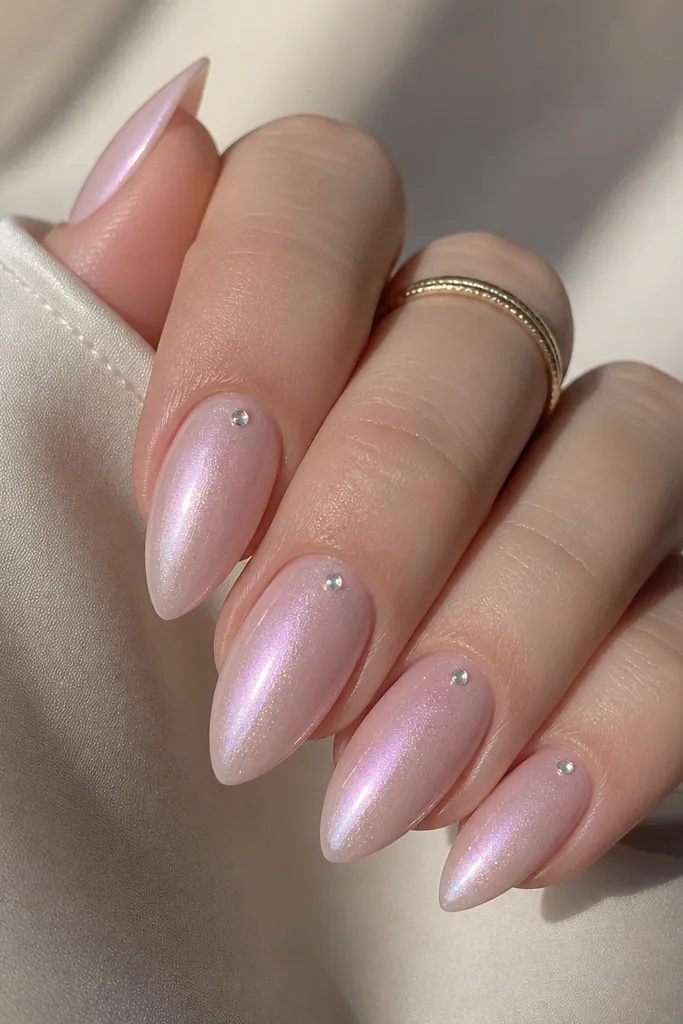
Pearl pink is pretty on short stiletto because it has depth without needing long lines. The single micro glitter dot adds sparkle without taking over the nail. It also helps hide any slight unevenness near the cuticle because your eye goes to the dot. This set looks sweet but still polished.
Apply pearl pink shimmer in two coats. Use a dotting tool to place a tiny amount of fine micro glitter gel near the center cuticle area. Keep dots small - about the size of a rice grain. Top coat over everything, but avoid drowning the dot so it still catches light.
Editor's noteIf glitter lifts, add a second thin top coat after curing so it locks in.
Watch outDon't place dots too low - they'll look messy as the nail grows.
10. Clear Jelly Strawberry Tips
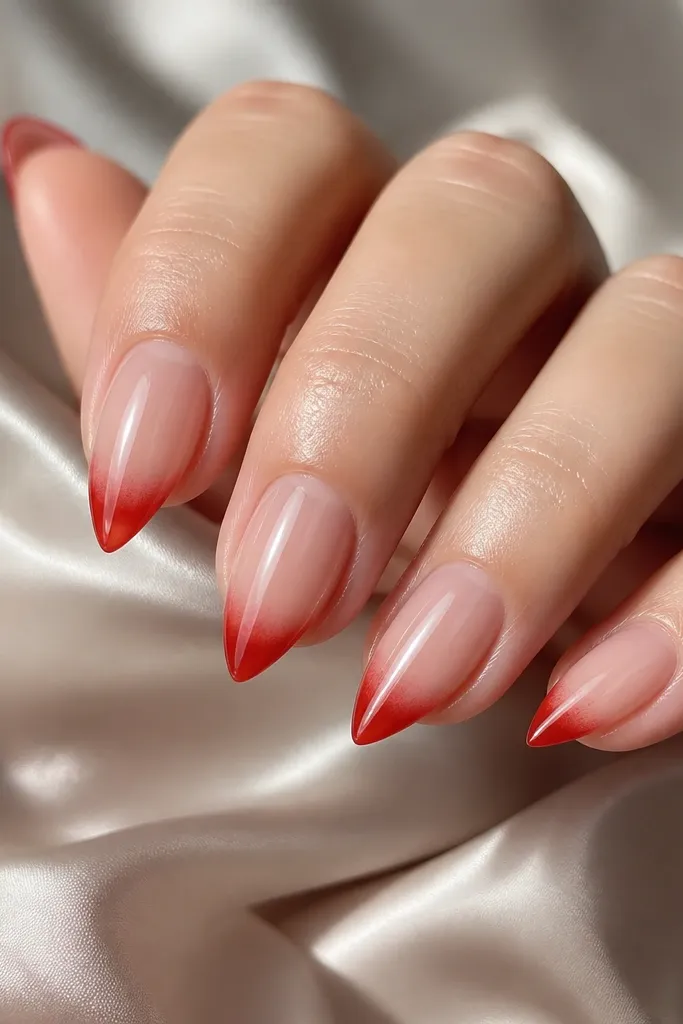
Clear jelly bases make short nails look fresh and light. The strawberry red jelly tip creates color that looks juicy instead of heavy. Because the tip is translucent, small growth lines are less noticeable. It's also great if you like that "natural nail but better" vibe.
Paint a clear jelly base (or sheer pink jelly if your nails stain). Sponge or brush a strawberry red jelly only at the tip, blending 1-2 mm upward. Keep the color densest at the tip point and let it fade toward the sides. Finish with a thick glossy top coat.
Editor's noteWipe the brush on a lint-free pad before blending so the gradient stays clean.
Watch outSkip opaque red - it looks too solid and short on stiletto tips.
11. Nude Base With Thin Chocolate Chevron
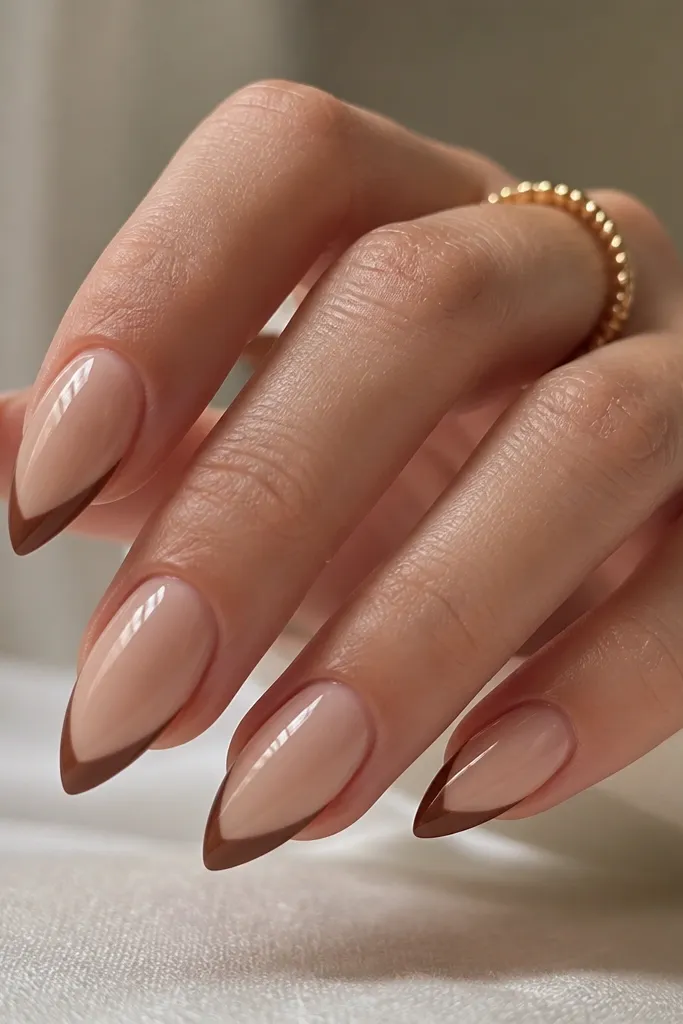
A chevron on the free edge makes the taper look intentional and adds structure. Nude keeps it classy, and chocolate brown looks richer than basic brown. Because the chevron is thin, it doesn't bulk up short nails. The pattern also hides minor tip wear because the lines draw attention.
Apply nude base in two coats. Use a striping brush to draw a V shape starting from each side of the free edge and meeting at the tip point. Keep the lines thin and symmetrical. Seal with glossy top coat, making sure to cap the chevron edges.
Editor's noteUse gel striping that self-levels; regular polish lines can crack on short stiletto corners.
Watch outDon't make the chevron too wide - it shortens the visual length.
12. Emerald Green Velvet Matte With Glossy Edge
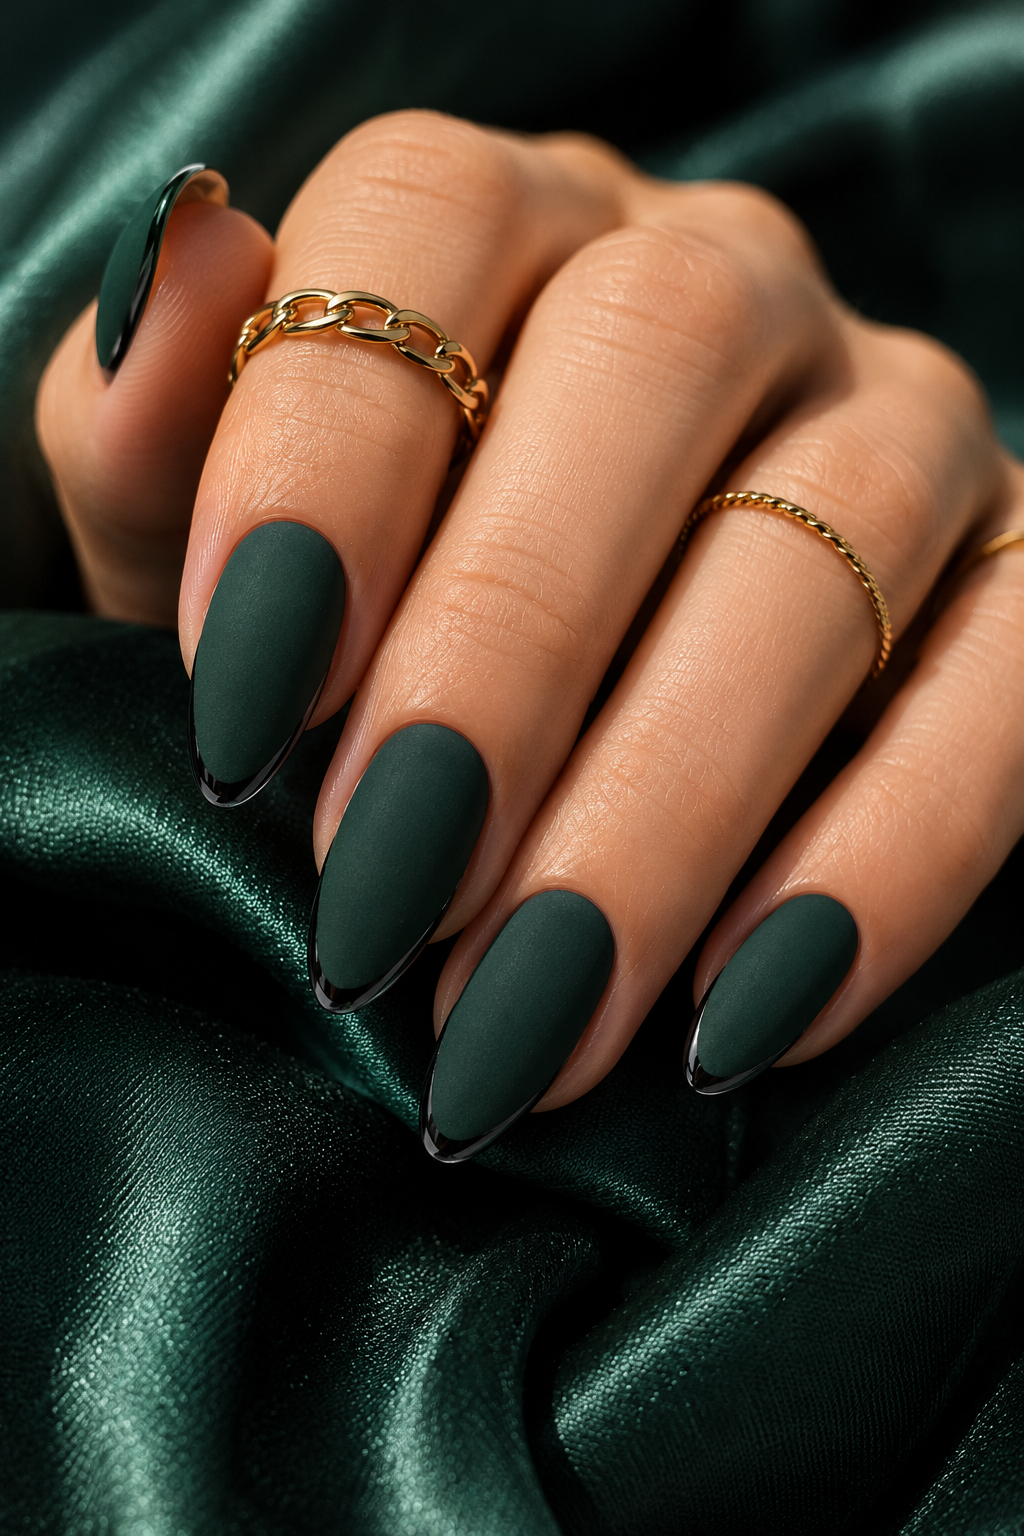
Velvet matte looks expensive on short stiletto because it hides texture issues. The emerald color stays bold without needing long tips. The glossy edge outline adds the "stiletto" definition by tracing the taper. It's a striking look that still feels wearable for day or night.
Paint emerald green and cure. Apply velvet matte top coat across the nail, then leave a thin margin at the free edge. Paint a narrow glossy outline along the tip with a fine brush, then top coat lightly over the outline only. Cure fully.
Editor's noteUse a nail art liner brush and steady your hand on a table - tiny outlines need a stable grip.
Watch outDon't cover the whole nail with glossy - you'll lose the velvet effect.
13. Sky Blue French With Clear Tip Point
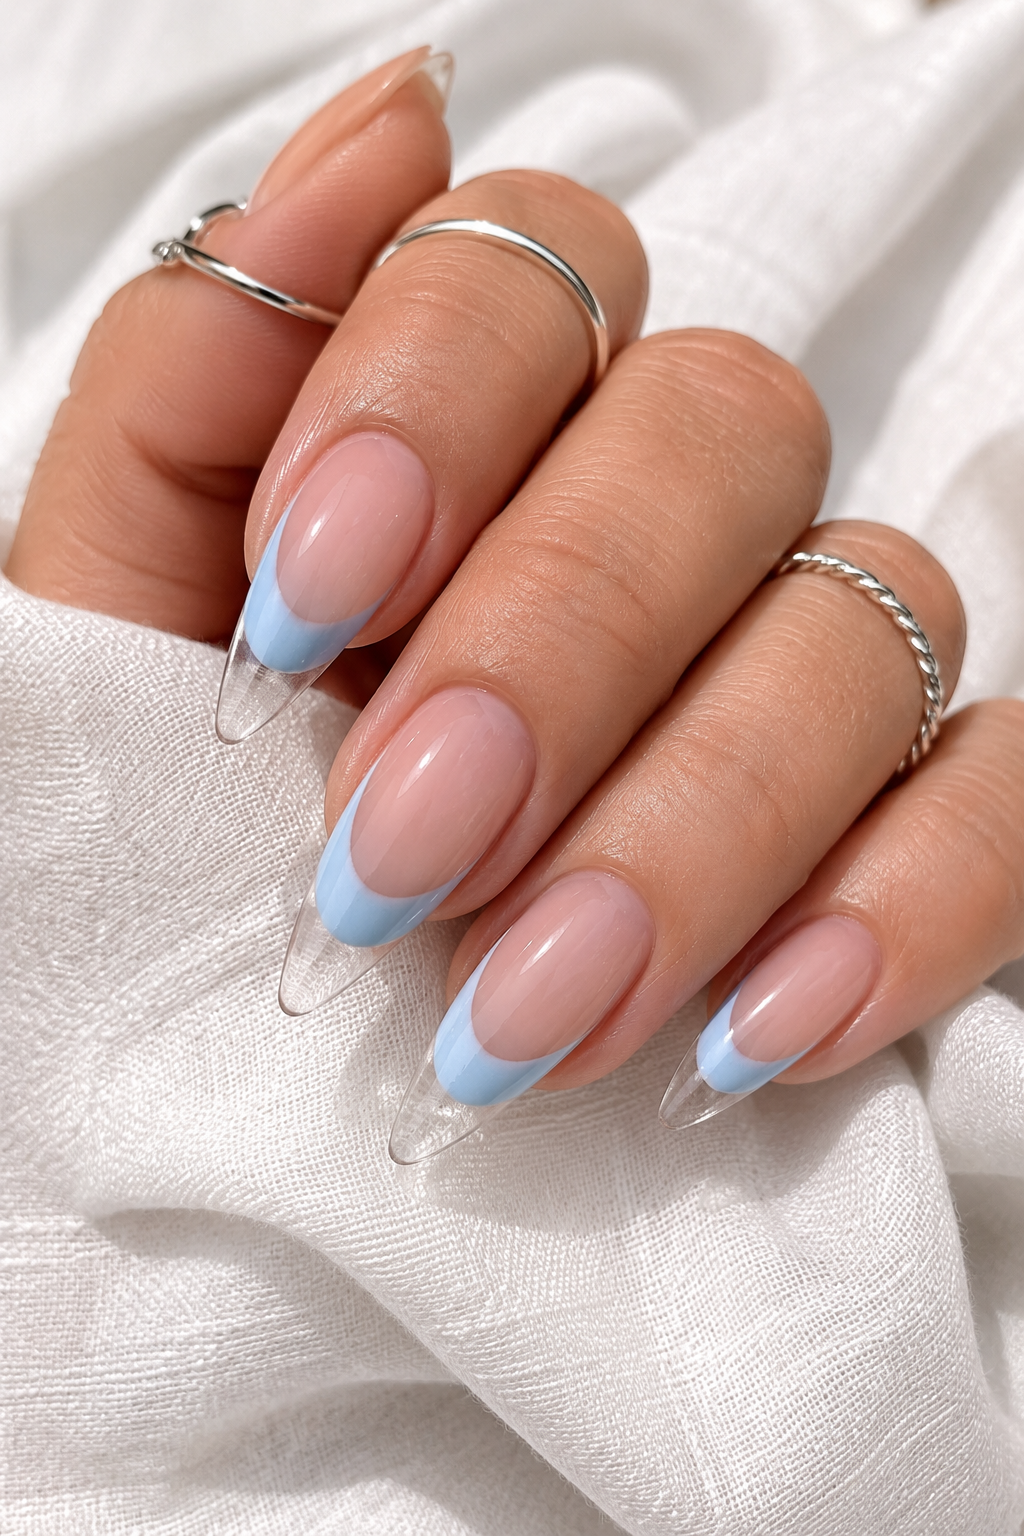
This is a clever trick to make short stiletto look longer: leave a clear triangle at the tip. The sky-blue French band gives color, while the clear point keeps the shape crisp. Nude makes it wearable, and the design stays clean even as it grows out. It also photographs really well because the negative space is sharp.
Apply sheer nude base. Paint a sky-blue French band that covers most of the free edge but stop slightly before the tip point. Use a small brush to define the clear triangle. Top coat glossy, then cap the sides so the clear point doesn't peel.
Editor's noteUse a French stencil for the band, then freehand only the triangle tip.
Watch outDon't overfill the tip point with blue - it kills the negative-space effect.
14. Rose Quartz Marble With Clear Gel Veins
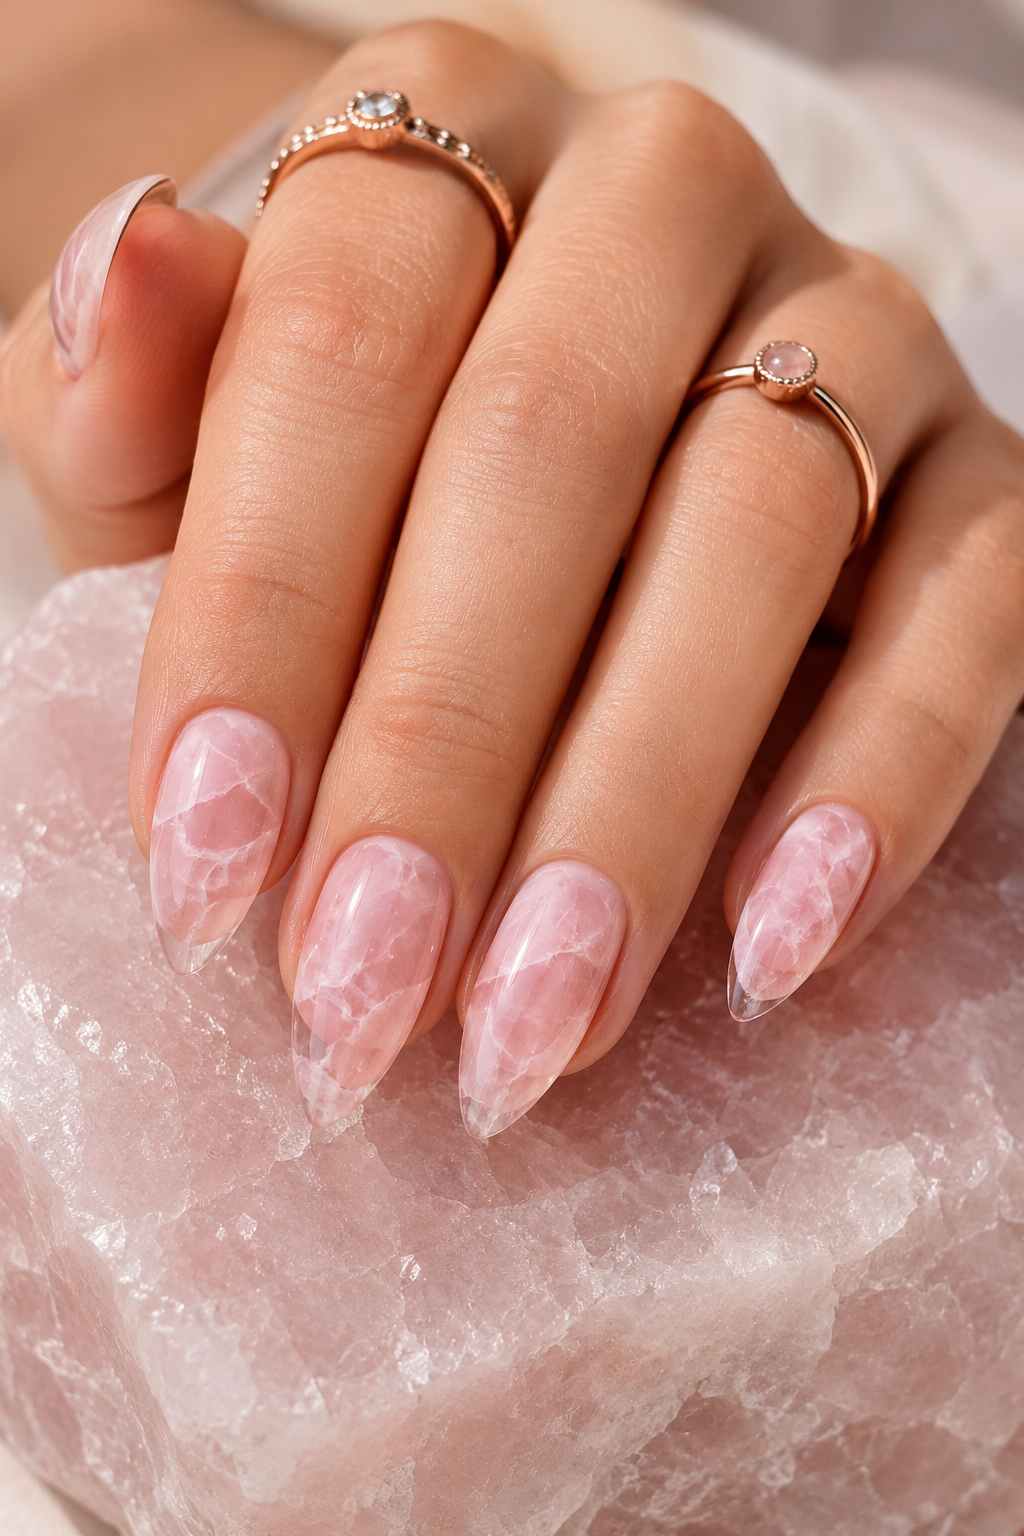
Marble looks good on short stiletto when the veins are thin and spaced. The rose quartz base is soft, and the clear gel veins catch light like glass cracks. This gives dimension without needing long art lines. It also grows out better than bold block designs because the pattern is spread across the nail.
Start with a pale rose base (milky pink works). Use a thin brush to drag darker pink lines in random directions. Add clear gel lines on top of a few veins so they look raised. Cure and seal with glossy top coat.
Editor's noteWipe your brush after every two lines; dirty brushes make veins look muddy.
Watch outSkip thick marble blobs - they look chunky on short tips.
15. Black Lace Dot Fade
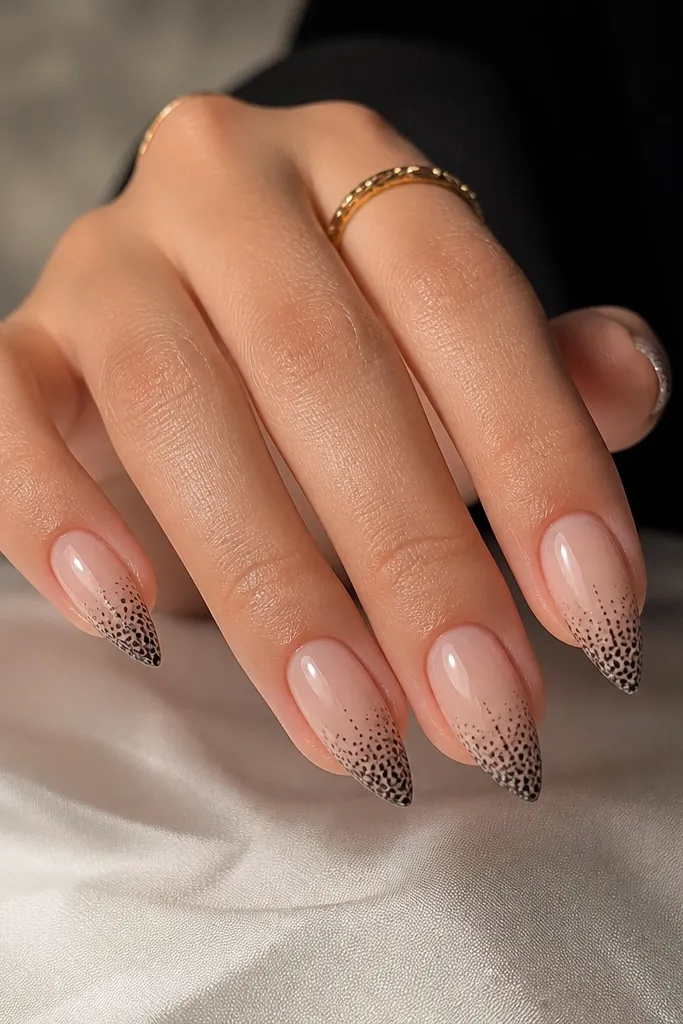
Dot lace is one of the easiest ways to look detailed without heavy stamping. The nude base keeps the set light, and the dot fade keeps it classy on short stiletto. Dense dots at the tip make the taper pop, while the fade hides wear and minor unevenness. It also looks delicate without needing long nails.
Paint nude base. With a dotting tool, place small black dots starting at the free edge, then pull some dots upward lightly so the pattern fades. Keep dots irregular - lace looks better that way. Top coat glossy, and cap over the densest dot area so it stays smooth.
Editor's noteUse a dotting tool with a smaller tip than you think; big dots look like polka spots.
Watch outDon't outline the entire nail with dots - it crowds the short shape.
16. Champagne Nude With Side Sweep Luster
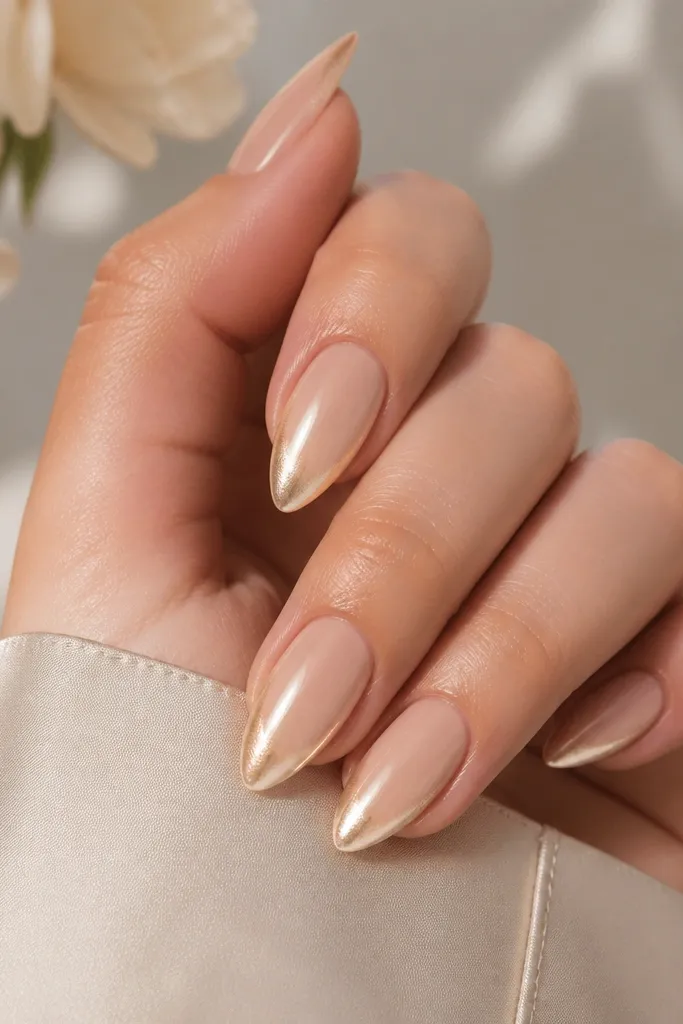
This look uses light like makeup. The champagne nude base flatters every skin tone, and the diagonal luster sweep makes the nail look longer and slimmer. The highlight is subtle, so it doesn't look overdone even with short length. It also hides minor chips because the shimmer blends them into the base.
Apply champagne nude in two coats. Use a fine sponge to dab pale gold shimmer powder or gel on the diagonal path from mid-nail to the tip. Blend lightly so it looks like a highlight, not a stripe. Seal with glossy top coat.
Editor's noteKeep the highlight off the center line; a side sweep elongates more than a straight beam.
Watch outDon't make the sweep too bright - high-contrast stripes look harsh on short stiletto.
17. Teal Line Art Stars on Clear Jelly
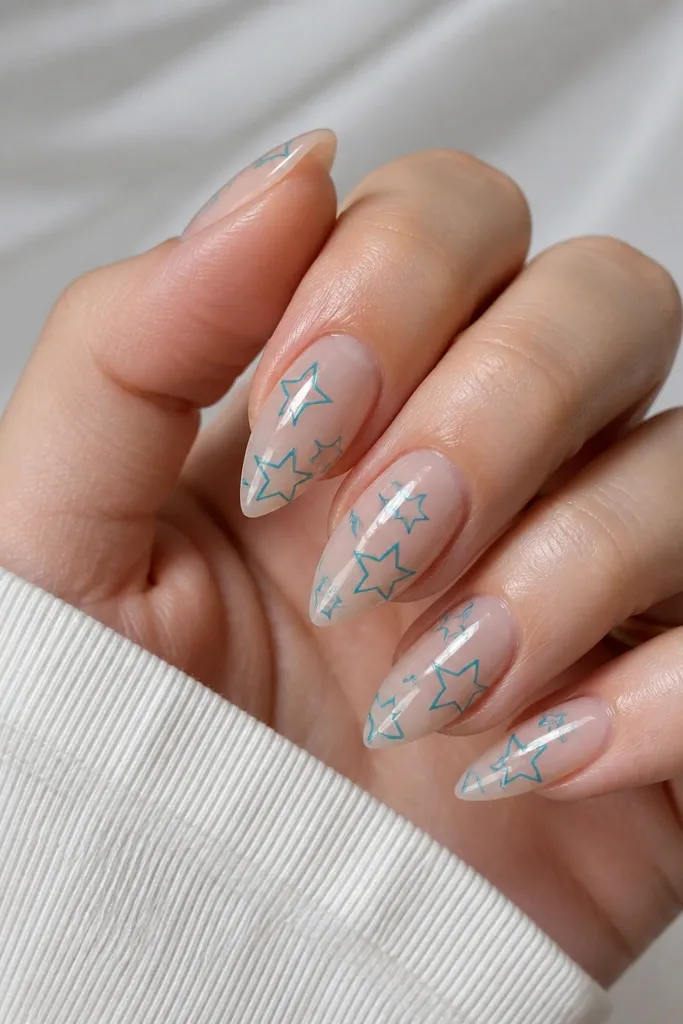
Line art looks crisp on short stiletto because it stays light and doesn't add bulk. The teal color pops against clear jelly and makes the nail look fresh. Stars near the tip help the stiletto point read clearly. It's also easy to repeat - once you draw one star, the rest match.
Apply clear jelly base. Use a fine liner brush with teal gel to draw simple five-point stars on each nail, keeping them small and spaced. Put one slightly larger star on the ring or middle finger. Cure and top coat glossy.
Editor's noteDraw stars with a single smooth motion, then touch up with the brush tip instead of repainting the whole shape.
Watch outDon't thicken the lines - thick line art makes short nails look heavy.
18. Creamy Beige With Brown Tortie Tips
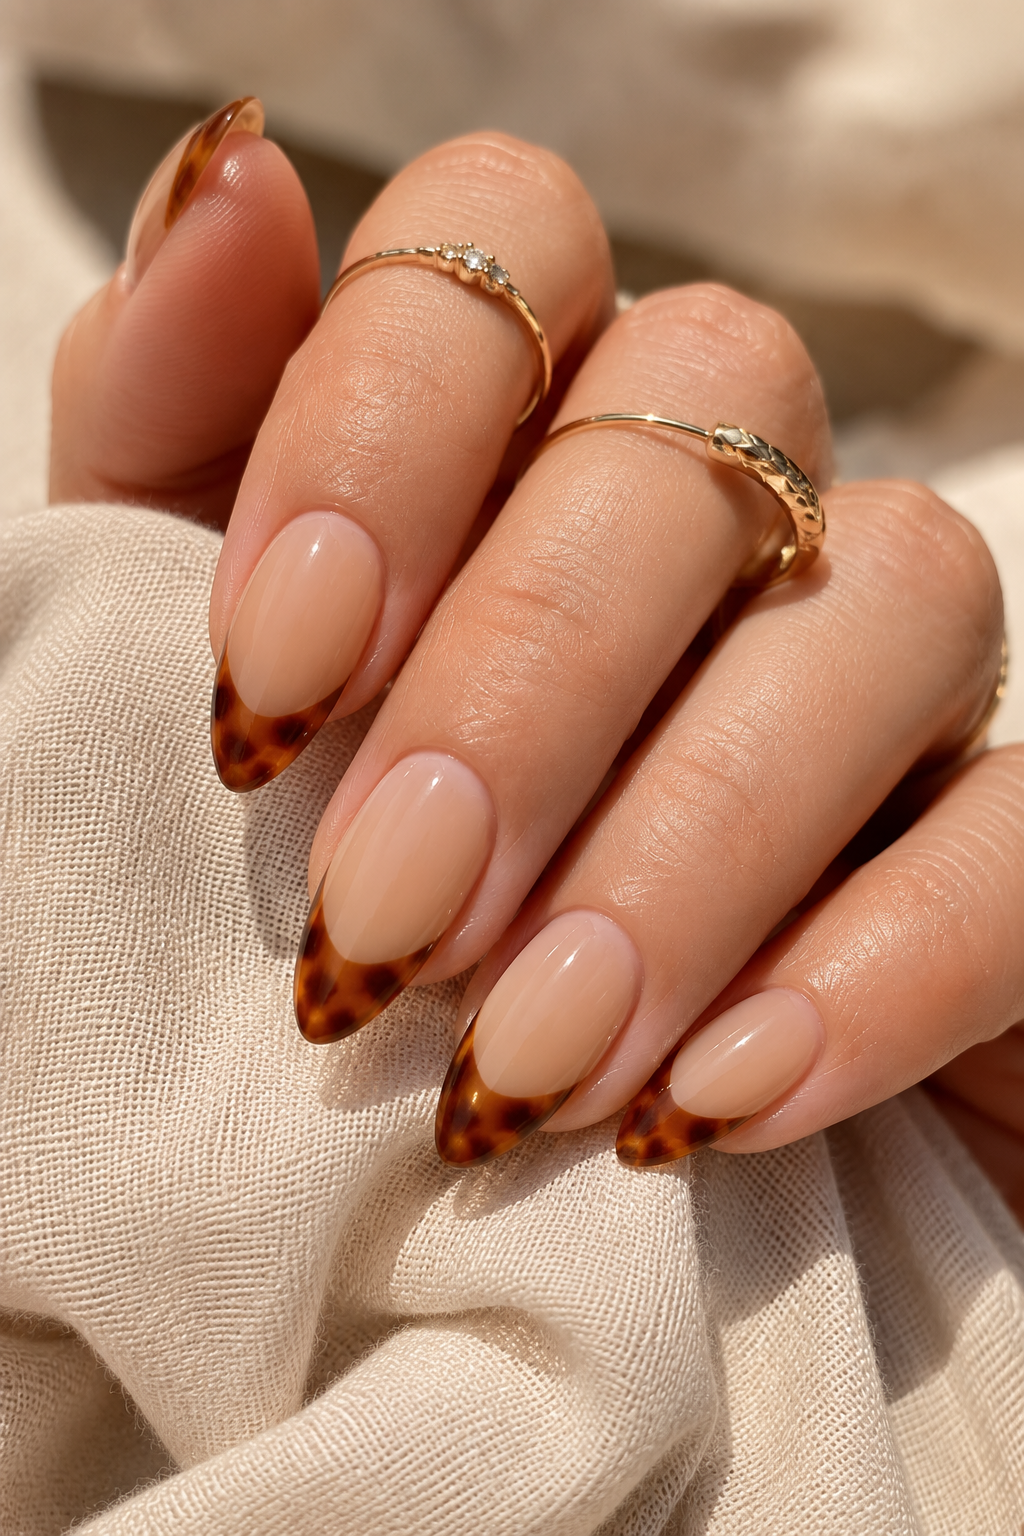
Tortie tips look like you did real nail art, but they're actually easy if you keep it to the free edge. Beige makes it wearable, while the tortie swirls add depth and pattern. Concentrating the design near the tip makes short stiletto feel intentional and keeps the base clean. It also hides minor tip wear because the pattern breaks up the surface.
Paint creamy beige as the base. On the free edge, sponge or brush dark brown and caramel in thin patches, then drag a toothpick through to create tortie swirls. Keep the densest swirls right at the tip point. Top coat glossy and cap the edges.
Editor's noteUse a toothpick for swirls; gel spreads less than polish when you drag it.
Watch outDon't fill the entire nail with tortie - it overwhelms short length.
19. Red Velvet Gloss With Thin Gold Arc
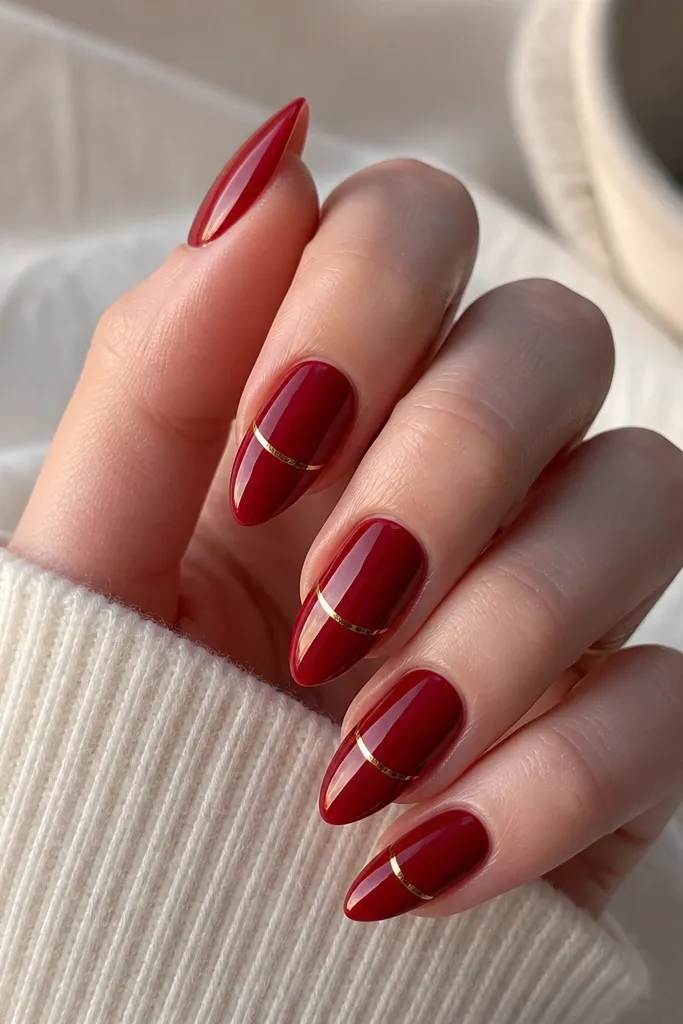
A gold arc gives the classic "jewelry" look without needing stones. Deep red stays bold, and the arc defines the taper like a frame. The thin line keeps it elegant on short stiletto. This is one of those sets that makes even plain outfits look dressed.
Apply deep red gel polish in two coats. Use a fine brush with gold gel to draw a smooth arc across the free edge, stopping before the sidewalls so it doesn't flood. Cure and then apply glossy top coat over the whole nail, keeping the arc smooth and centered.
Editor's noteIf your arc wobbles, wipe the brush with alcohol and correct immediately before curing.
Watch outSkip thick gold bands - thick lines look like tape on short nails.
20. Lavender Lilac Fade With Clear Outline
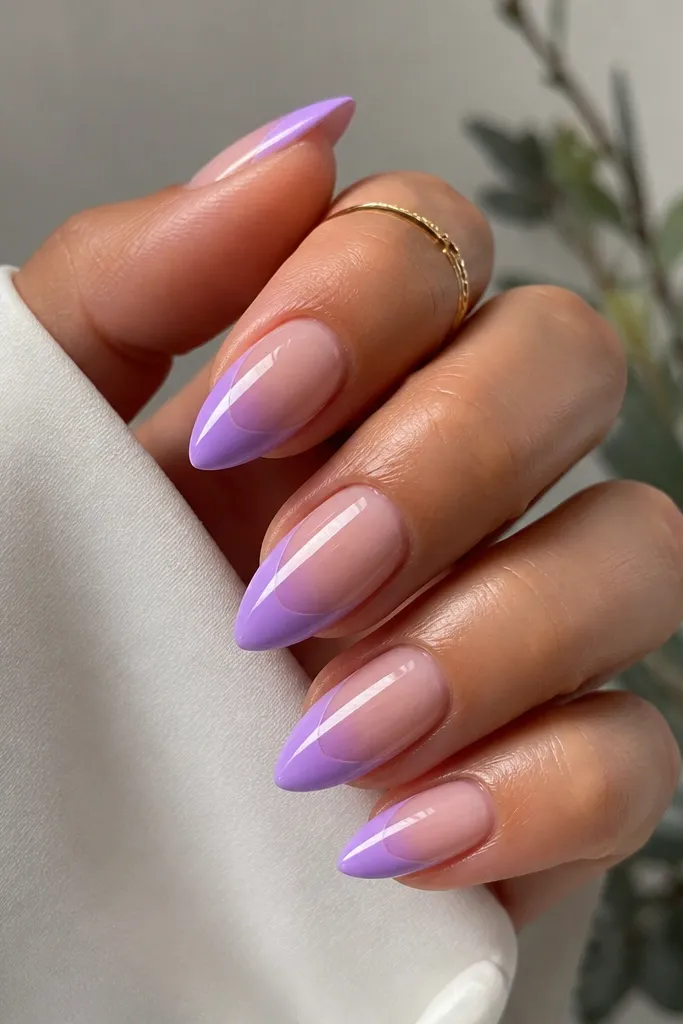
The clear outline makes the nail look "built," like a structured extension. Lavender fades look soft and romantic, but the outline keeps the shape sharp. This combo makes short stiletto feel longer because the eye follows the outline. It's also forgiving if your gradient isn't perfectly even; the outline reads the design.
Start with a sheer lavender nude base. Sponge or brush lilac at the tip and blend upward slightly. Add clear builder gel along the outer edges of the nail taper, then cure. Top coat glossy to make everything smooth.
Editor's noteOutline after the color cures; it prevents color from bleeding into the clear lines.
Watch outDon't outline both sides too thick - it can make nails look bulky.
21. Gray Smoke With Black Cloud Cuticle
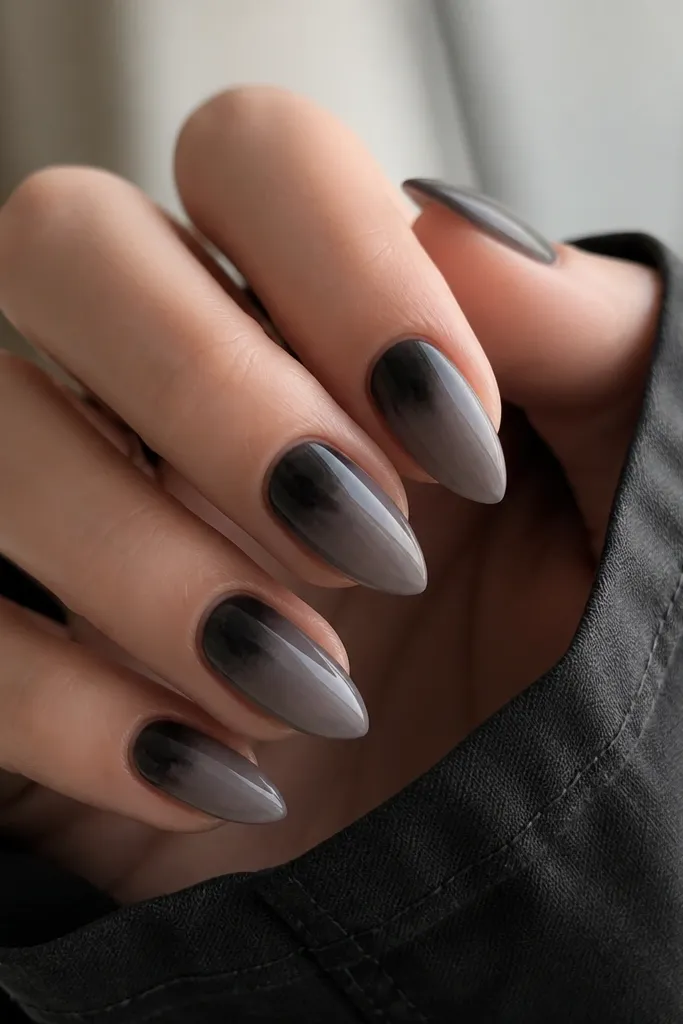
Smoke nails look cool on short stiletto because the gradients mimic natural shadows in a nail. The black cloud at the cuticle adds drama without needing long art. Gray also hides minor surface imperfections. This set looks best in cooler lighting and gives a moody "sleek" vibe.
Paint a smoky gray base in two coats. With a small sponge, dab black near the cuticle and blend outward so it fades into the gray. Keep the cloud centered and not too high. Top coat glossy and cap the edges.
Editor's noteBlend with a clean sponge edge to keep the cloud soft, not streaky.
Watch outDon't put black all the way to the cuticle line - it looks harsh and messy.
22. Sparkly Nude With Single Side Rhinestone
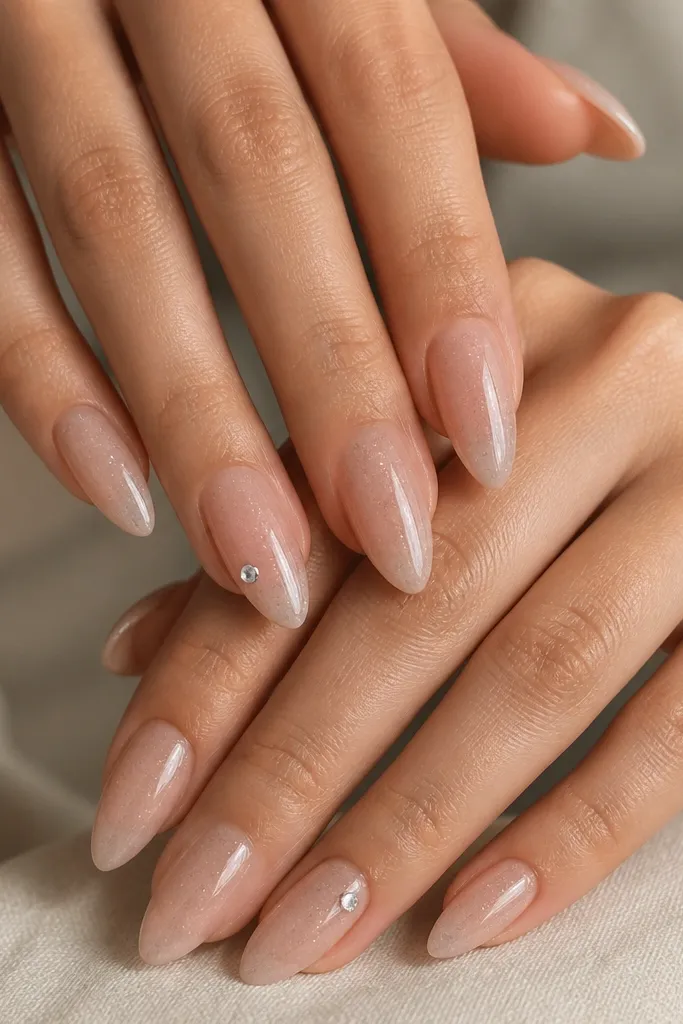
Sparkly nude keeps short stiletto classy and hides growth because the shimmer blends transitions. One rhinestone on the side looks like jewelry on a ring finger, not a craft project. The placement near the side draws attention to the taper point. It also works for weddings, dinners, and any time you want "pretty" without big art.
Apply nude shimmer (fine silver) in two coats. Choose one nail per hand and place a small rhinestone near the sidewall around mid-nail, angled toward the tip. Cure if using gel adhesive, then top coat over carefully to lock it in. Keep the rest of the nails plain except for the shimmer.
Editor's noteUse rhinestones with flat backs; they sit better on short stiletto curves.
Watch outDon't add multiple stones - the nails start to snag and look crowded.
23. White Outline Hearts on Blush
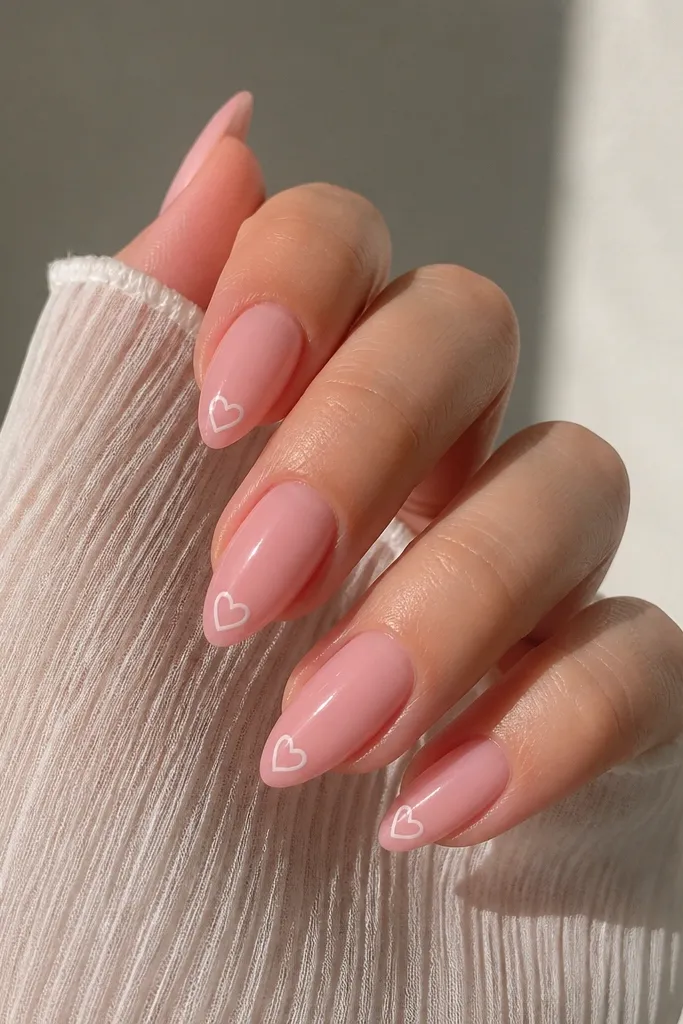
Outlined hearts are cute without looking childish because the hollow center keeps the design light. Blush pink is flattering, and white lines stay crisp when your brush is steady. Placing the hearts near the tip makes the stiletto point look intentional. This set looks adorable with sweaters and also clean enough for work.
Paint blush pink base in two coats. Use a fine liner brush with white gel to draw a small heart near the tip point. Keep hearts about the size of a pencil eraser tip. Cure and top coat glossy.
Editor's noteDraw one side of the heart first, cure for a few seconds if needed, then finish the other side for symmetry.
Watch outSkip filled-in hearts - solid white blocks look heavy on short stiletto.
24. Black Base With Tiny Gold Studs at the Tip
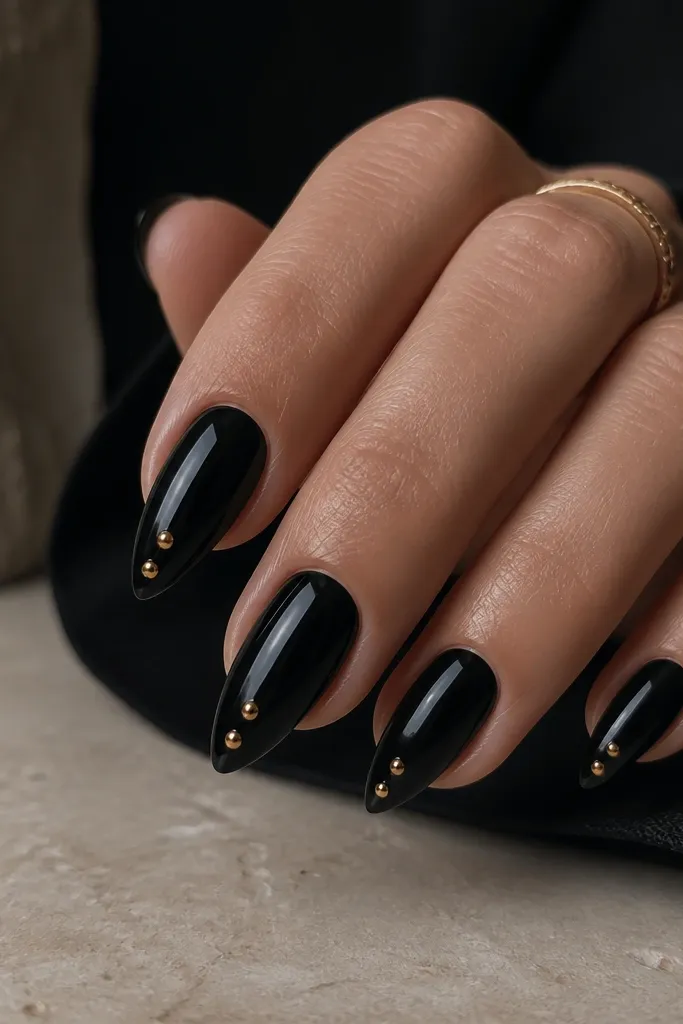
Studs at the tip make short stiletto look edgy and expensive. Black is the best background for gold because it makes the studs pop instantly. Keeping the studs clustered near the center maintains the sleek stiletto line. You get texture and sparkle, but only where the nail is already narrow.
Apply deep black base in two coats. Place 2-3 tiny flat-back gold studs near the center of the free edge, following the taper. Press them in with a tool and cure if using gel. Top coat carefully around the studs, then cap with a second thin top coat so edges feel smooth.
Editor's noteIf you feel studs snag when you run your finger, add a thicker top coat only over the studs.
Watch outDon't put studs on the sidewalls - they catch on sleeves and hair.
25. Peach Nude With Micro French Dots
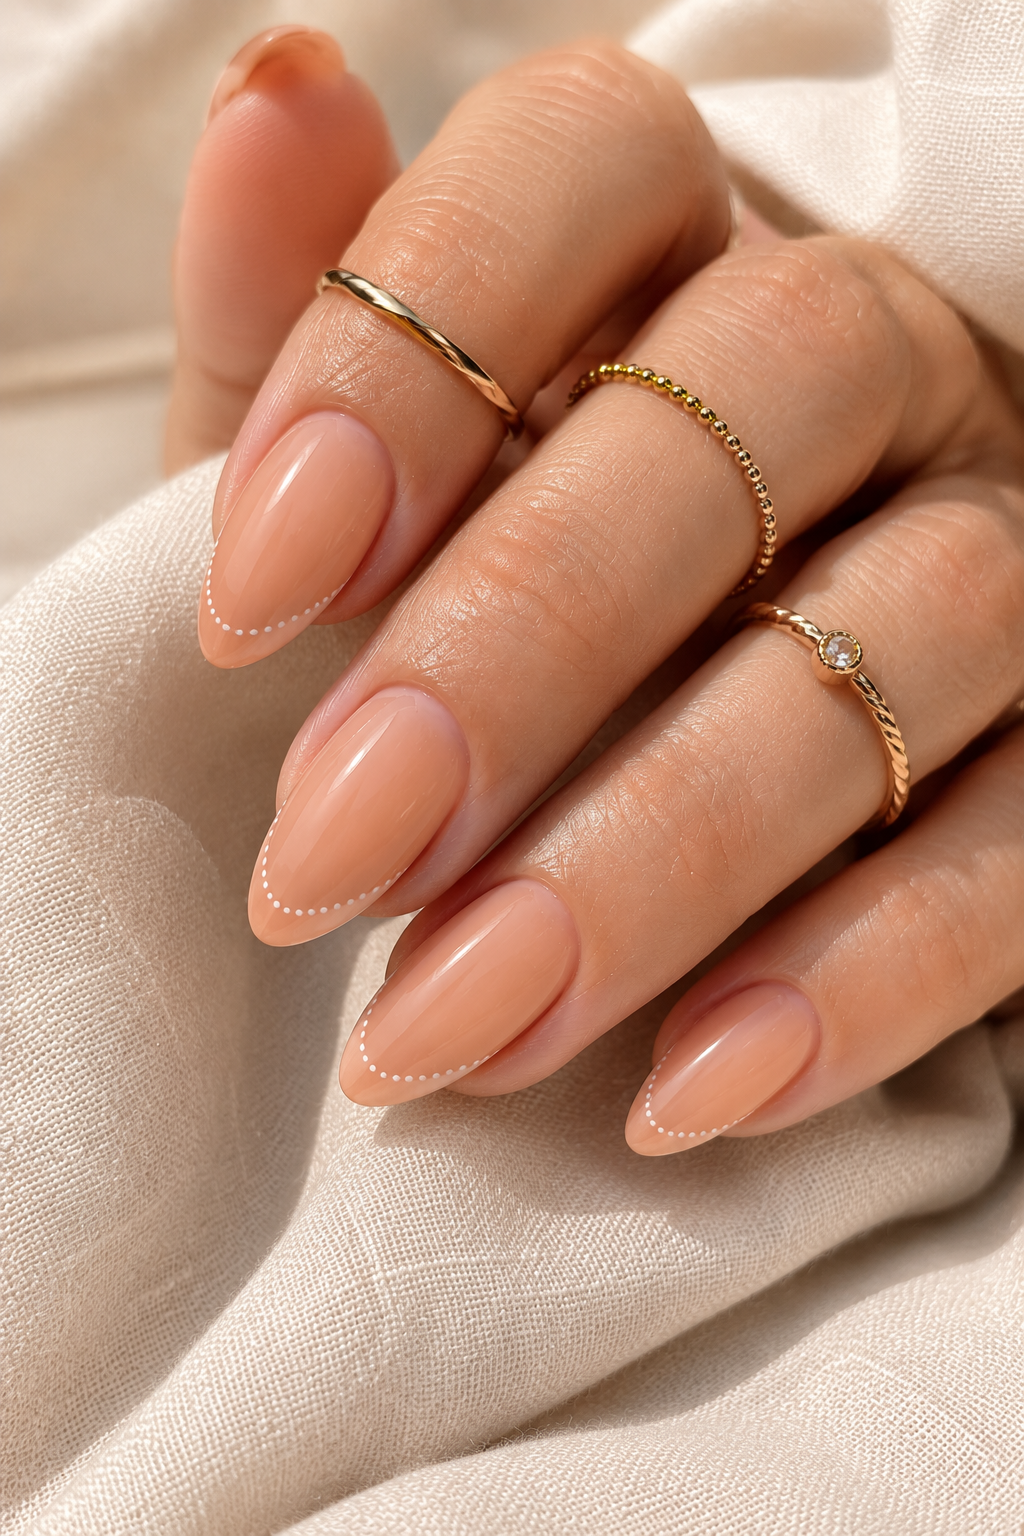
Micro French keeps the look clean, and the dot beads give it a handmade jewelry feel. Peach nude is forgiving and looks healthy, especially on shorter nails. The dot line also hides slight unevenness in the French edge because the dots break up the straight line. This one is perfect when you want "nails done" without a full pattern.
Paint peach nude base in two coats. With a striping brush, draw a thin micro French line at the free edge. Then place tiny dots on top of or next to the line using a dotting tool. Seal with glossy top coat and cap the dots so they don't lift.
Editor's noteUse a dotting tool that matches your French line thickness; too big dots look clumpy.
Watch outDon't make the micro French line thick - it turns into a short, chunky band.