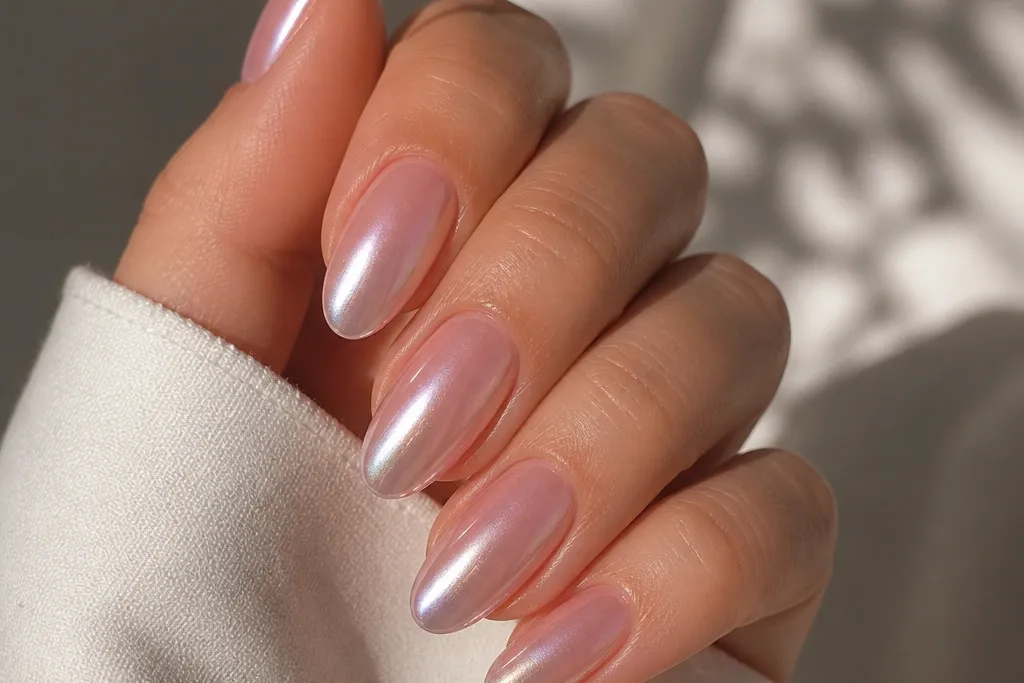
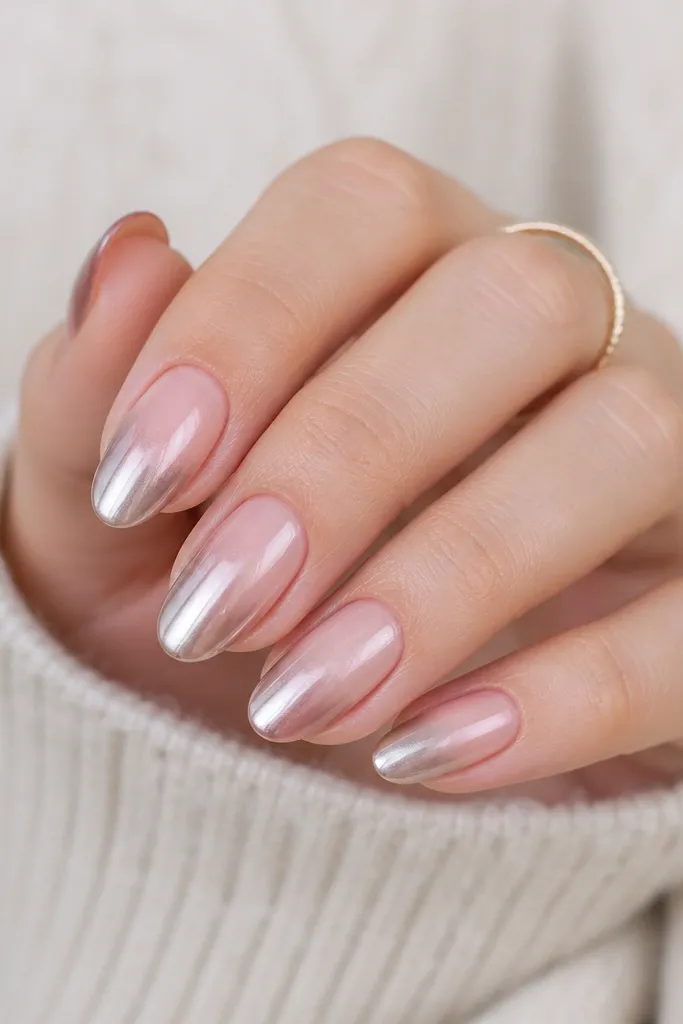
1. Champagne Nude to Peach Tip Mirror
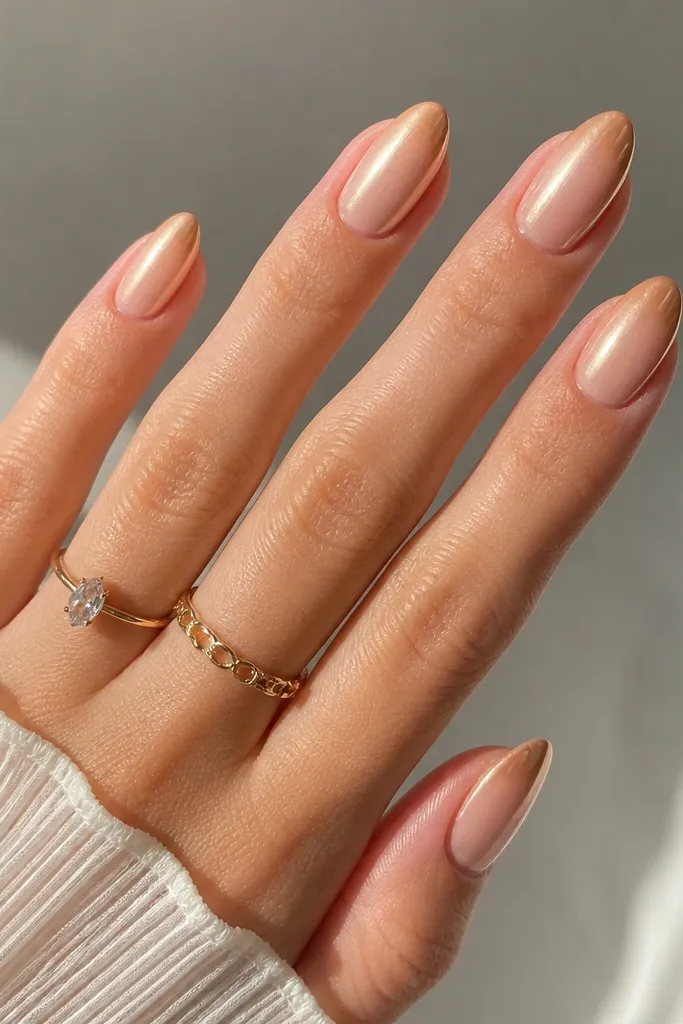
This is the ombre chrome combo I reach for when I want a natural manicure that still photographs like jewelry. The nude base keeps your nail bed looking longer, while the peach tip gives warmth that flatters most skin tones, especially light to medium with golden undertones. Apply pearl-champagne chrome over the ombre area so the shine intensifies where the color is stronger. The result reads soft in real life but still sharp in close-up.
Start with a sheer nude base gel and cure fully. Sponge or brush an ombre using nude and a peach gel, keeping the blended zone about 2-3 mm tall and centered. Add chrome powder only over the blended area (not the very base) - press it in with a dry chrome applicator. Tap off excess, then seal with a glossy top coat in two thin coats, curing each time.
Editor's noteIf your chrome looks gray, your tack dried out - reapply chrome quickly right after curing the tack layer.
Watch outSkipping a glossy top coat over chrome makes the finish look dull and chalky.
2. Icy Pink to Milky White Chrome Fade
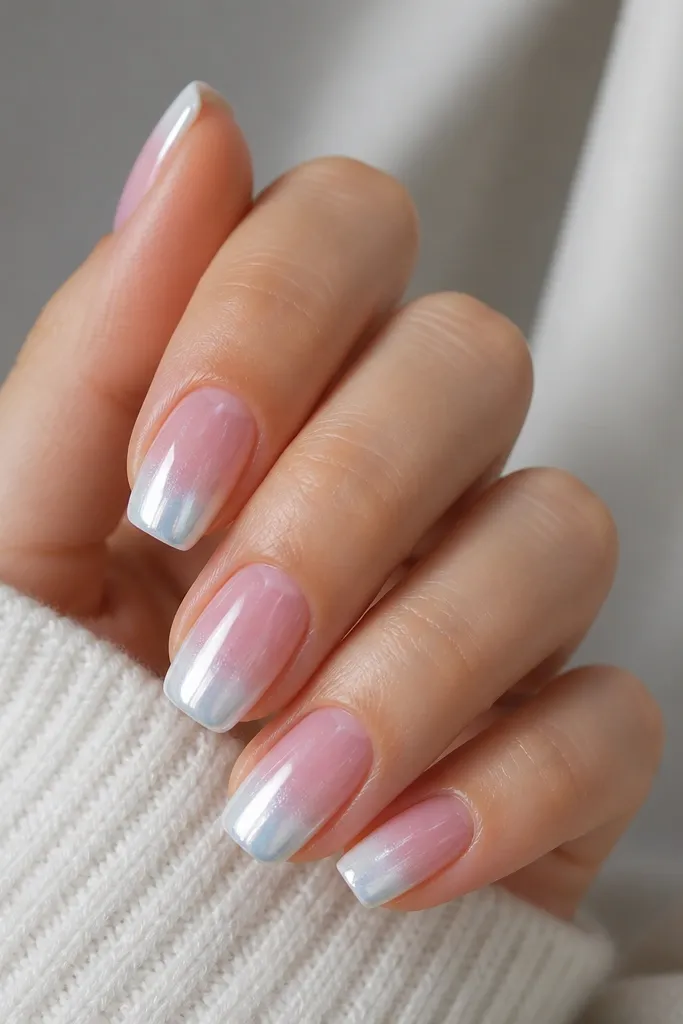
This one looks like winter light on your nails. The icy pink to milky white gradient gives a clean, airy transition that flatters fair to medium skin and makes hands look instantly brighter. Silver-ice chrome over the milky white portion creates that crisp, reflective highlight without turning the entire nail into a mirror plate. It's gorgeous for weddings, cold-weather outfits, and any time you want "clean" more than "loud."
Use a milky nude base gel, cured. Create the ombre with icy pink at the tip and milky white closer to the cuticle, blending upward so the fade covers roughly 1/2 the nail length. Apply a tacky gel layer over the ombre, then dust chrome powder mostly on the milky white area, leaving the pink side slightly less reflective. Seal with glossy top coat, then wipe the tack residue if your top coat requires it.
Editor's noteFor a smoother blend, sponge the ombre with a makeup sponge cut into a small triangle instead of swiping with a wide brush.
Watch outPutting chrome over wet gel makes it sink and look patchy.
3. Rose Quartz to Nude Pink with Soft Pearl Chrome
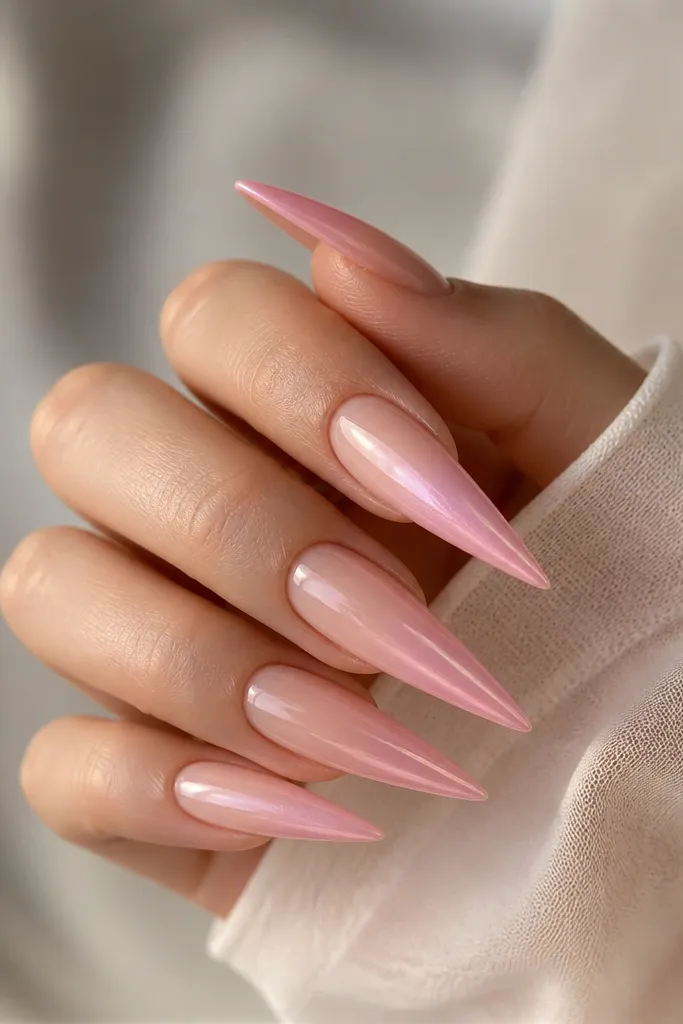
This design is for when you want ombre chrome that doesn't scream. Rose quartz pink flatters a wide range of skin tones because it sits between warm and cool - it just looks "healthy" on hands. Pearl chrome keeps the shine gentle and diffused, so the gradient stays the star. If you like your nails to look romantic instead of flashy, this is the one.
Start with a nude pink sheer base gel and cure. Sponge a rose quartz ombre at the tip down to the mid-nail, blending until there's no hard line. Add a thin tack layer over the ombre zone and dust pearl chrome powder lightly, then brush off excess with a soft fan brush. Finish with two glossy top coats to lock the shine and smooth any powder texture.
Editor's noteUse a lighter hand with pearl chrome - you want shimmer, not full mirror, so it doesn't overpower the pink.
Watch outCuring too long after the tack layer can dry it and make chrome cling in spots.
4. Plum Ombre to Smoky Taupe Mirror
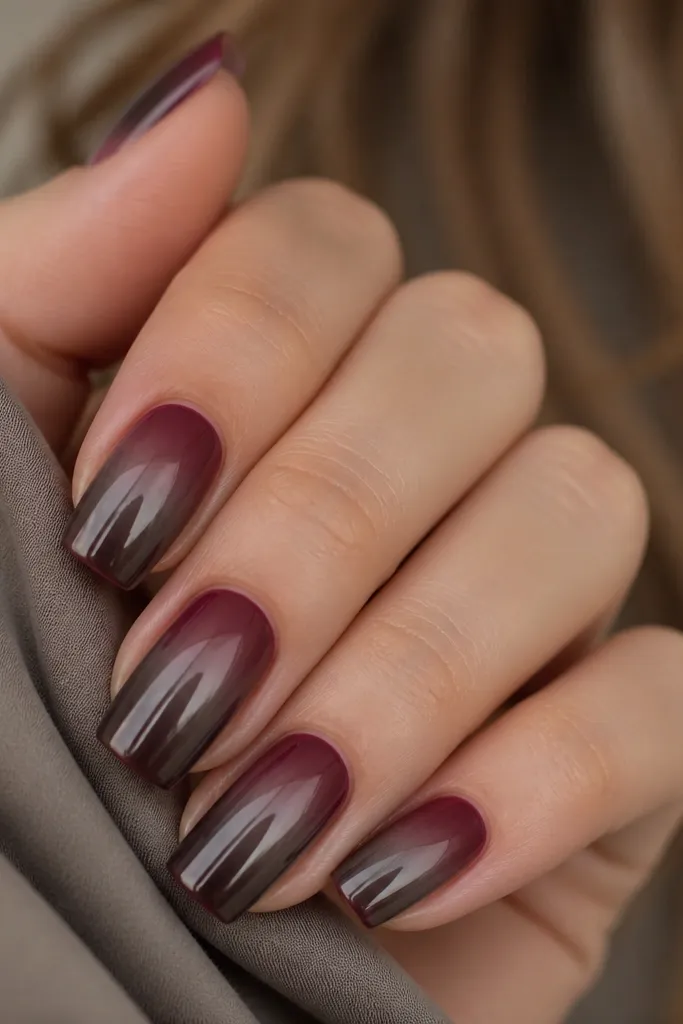
Plum to taupe is a clean way to make ombre chrome look moody instead of sweet. The darker tip gives definition, and the smoky taupe keeps it wearable for everyday wear. Dark mirror chrome over the taupe makes the reflection feel like glass, not glitter. This flatters medium to deep skin tones especially well, but it also looks striking on fair skin when paired with warm jewelry.
Apply a sheer nude base and cure. Paint plum gel at the tip and blend into taupe using a flat brush, keeping the gradient width about 3 mm. Add a tack layer over the taupe portion only, then press chrome powder so it concentrates on the smoky mid-to-tip area. Seal with a glossy top coat, and cap the free edge so the chrome doesn't lift.
Editor's noteCap the sides with thin top coat - chrome edges lift first on this color combo.
Watch outUsing cool gray taupe with plum can make it look muddy instead of smoky.
5. Emerald Fade to Gold Chrome Edge
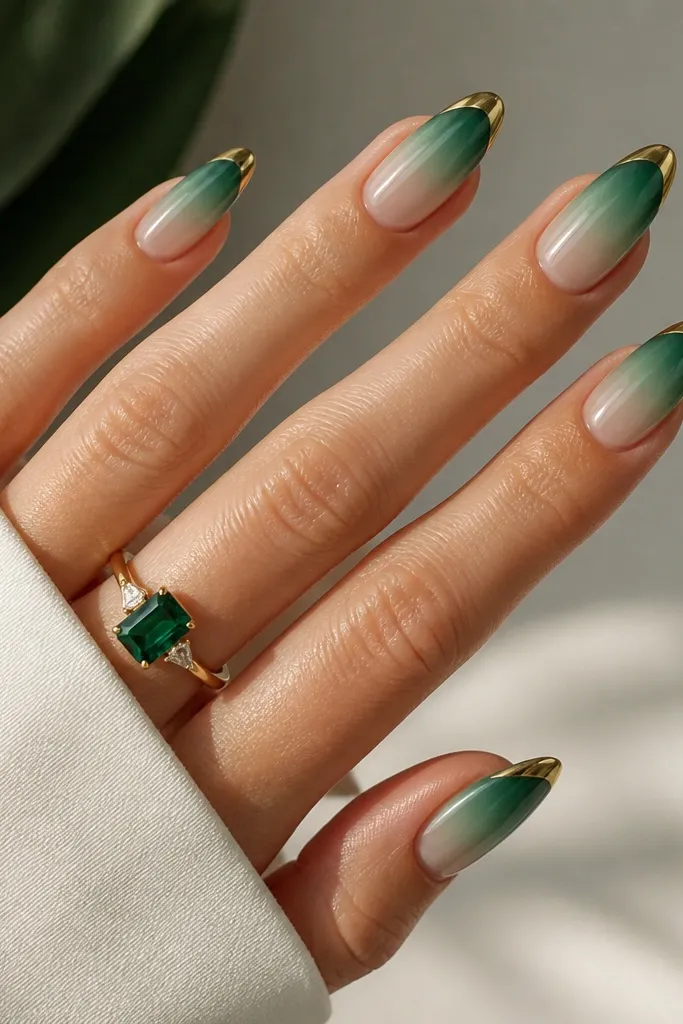
This is the "luxury accent" version of ombre chrome nails. Emerald is rich and looks expensive, and the sheer fade keeps it from looking heavy. Gold chrome on only the tip band gives the reflective pop without turning your whole nail into a mirror block. It looks amazing on warm and neutral undertones and pairs perfectly with gold rings.
Start with a sheer green nude base gel and cure. Create an emerald ombre at the tip blending upward halfway to the mid-nail. Apply a tacky gel layer only on the last 2-3 mm of the nail, then press gold chrome powder right there. Tap off, cure, and finish with glossy top coat on the entire nail, keeping the chrome area capped.
Editor's noteIf you want a sharper tip band, use a thin strip of sponge to apply the chrome area - it keeps the edge straight.
Watch outDusting gold chrome over the whole nail makes emerald look darker than intended.
6. Cobalt Ombre to Silver Mirror Highlight
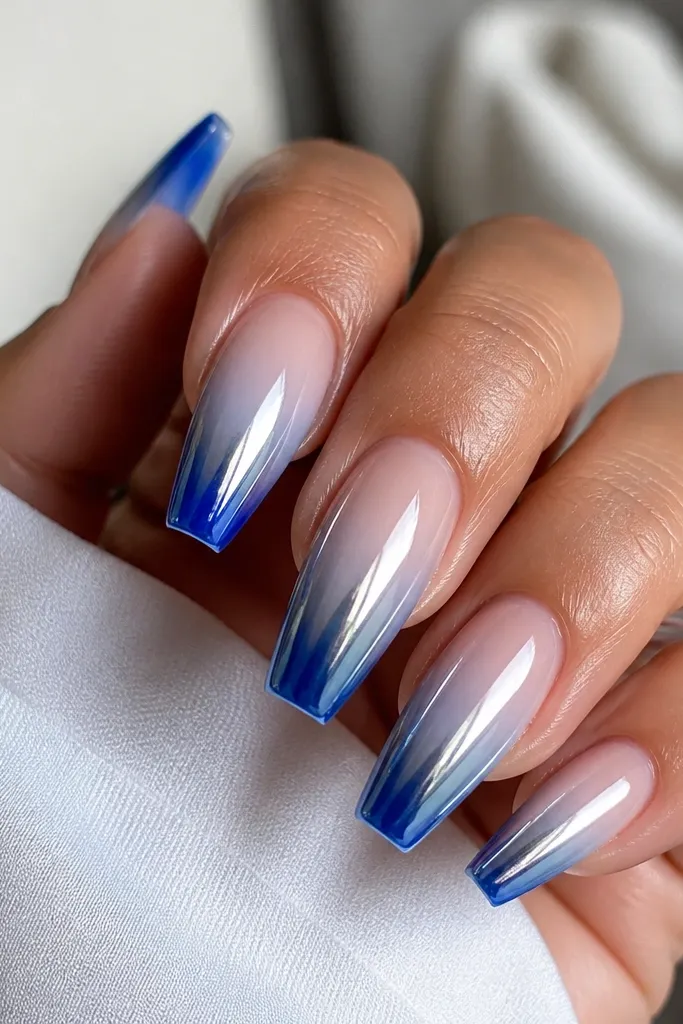
Cobalt and silver chrome is a high-contrast combo that reads bold without looking chaotic. The clear-to-baby blue transition makes your nail bed look clean and long, and the silver chrome adds a bright "flash" in photos. This flatters cool undertones and makes blue eyes pop. It's also a great choice if you want ombre chrome for parties because the color holds its punch.
Use a clear jelly base or a sheer baby blue base, cured. Ombre cobalt into baby blue using two colors with a sponge - blend until the transition is smooth, about 1/3 of the nail length. Add tack gel over the mid-to-tip zone, then dust silver chrome so it concentrates where the cobalt is strongest. Seal with glossy top coat, then clean up cuticle edges with a brush dipped in alcohol.
Editor's noteDo the chrome in smaller sections - press, tap off, then move on so you don't over-dust.
Watch outApplying chrome too close to the cuticle can flood and look messy.
7. Lavender to Clear Jelly with Prism Chrome
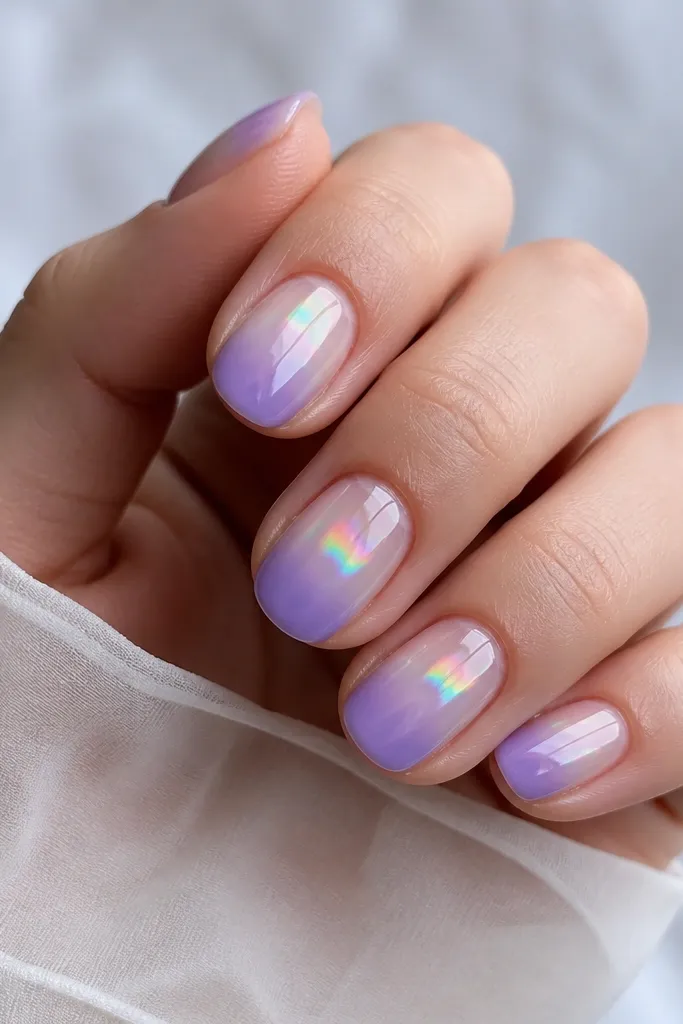
This is the "see-through" ombre chrome look that feels modern. Lavender flatters cool and neutral undertones, and the clear jelly middle keeps the nail airy instead of heavy. Prism chrome throws tiny flashes of color across the gradient, so the nails look like they shift when you move your hands. It's perfect for spring events and anyone who loves chrome but hates full mirror.
Start with a clear jelly base gel and cure. Paint lavender at the tip and blend it into clear using a thin brush, keeping the ombre soft and narrow. Add tack gel over the lavender-to-jelly blend, then apply prism chrome powder lightly so it catches the gradient rather than covering everything. Finish with a glossy top coat in one smooth layer, then a second thin layer if you see any dull patches.
Editor's noteUse a smaller chrome puff - a wide puff over-prisons the look and can make it feel too dense.
Watch outThick jelly layers under chrome can make the gradient look uneven.
8. Black Cherry Ombre with Gunmetal Chrome Veil
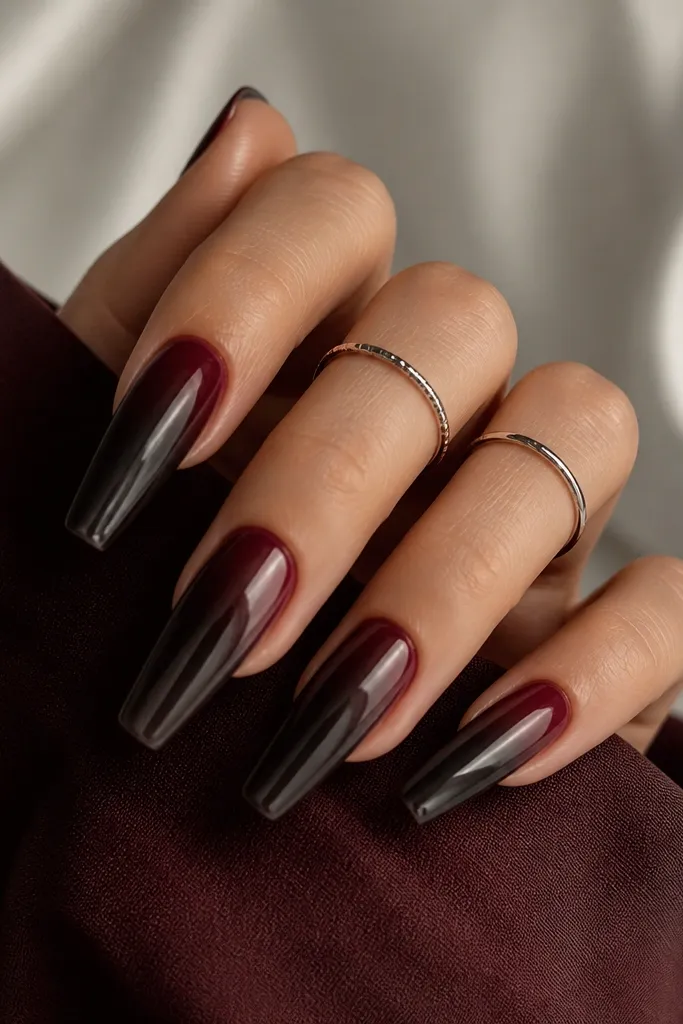
If you like your nails dark but still polished, this is the setup. Black cherry gives depth, and the ombre into dark wine keeps it cohesive instead of stripey. Gunmetal chrome adds a smoky steel shine that looks sharp under indoor lighting. This combo looks especially good on medium to deep skin and also works on fair skin when you wear cool-toned jewelry.
Apply a sheer berry base gel and cure. Blend black cherry at the tip into dark wine at mid-nail, leaving the cuticle area semi-sheer. Add a tack layer over the mid-to-tip and press gunmetal chrome in a thin, even layer. Seal with glossy top coat twice, and cap the tip edges so the chrome doesn't wear down fast.
Editor's notePress chrome with a gentle rocking motion - it evens out the veil without over-pressing into the gel.
Watch outUsing regular silver chrome instead of gunmetal can make the dark cherry look flat.
9. Peach Ombre to Rose Gold Chrome Center Stripe
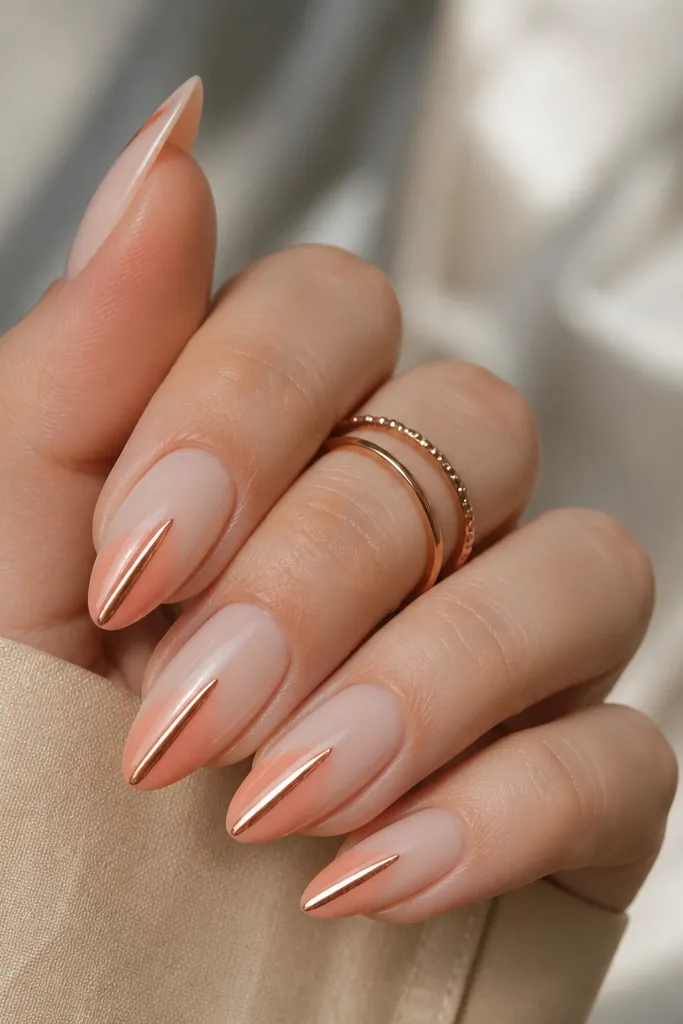
This design is for people who want chrome but not full coverage. Peach ombre keeps it flattering and soft, while a rose gold center stripe gives that "designer" look that draws the eye down the nail. Rose gold chrome warms up the gradient and looks great with gold-toned rings. It's also forgiving if your blend isn't perfect because the stripe adds structure.
Start with a nude-peach sheer base and cure. Create a peach ombre at the tip, blending upward so the tip is about 1/3 of the nail length. Apply a thin tack gel strip down the center, then press rose gold chrome powder only on that strip. Clean the sides with a small brush, then seal the whole nail with glossy top coat.
Editor's noteUse nail striping tape to mark your center line before you add tack, then pull it off right after application.
Watch outSpreading tack gel too wide makes the stripe blur and look like smudged chrome.
10. Milk Tea Brown Ombre with Mocha Chrome Tips
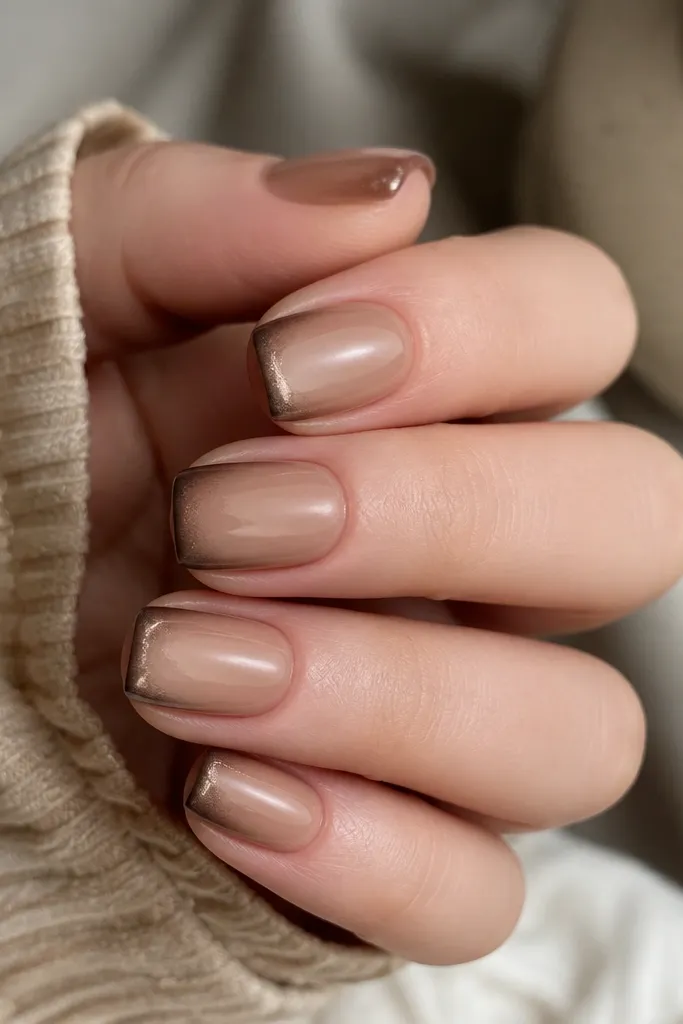
Milk tea brown is one of the easiest ombre bases because it looks good even when your blend is slightly imperfect. The creamy beige transition keeps it soft, and mocha chrome on the tips gives a warm reflective edge. This combo flatters almost every skin tone because it sits close to natural nail color. It's also perfect for fall outfits and everyday wear.
Use a creamy beige base gel and cure. Sponge milk tea brown at the tip and blend upward about 2-4 mm. Apply tack gel only on the very tip and dust mocha chrome powder, then press lightly to set. Seal with glossy top coat in two thin layers, making sure the free edge is fully capped.
Editor's noteIf your brown looks too dark, mix a tiny bit of nude gel into the brown before ombre.
Watch outOver-applying mocha chrome can make beige look yellow.
11. Cherry Red Ombre to Silver Chrome Spark Edge
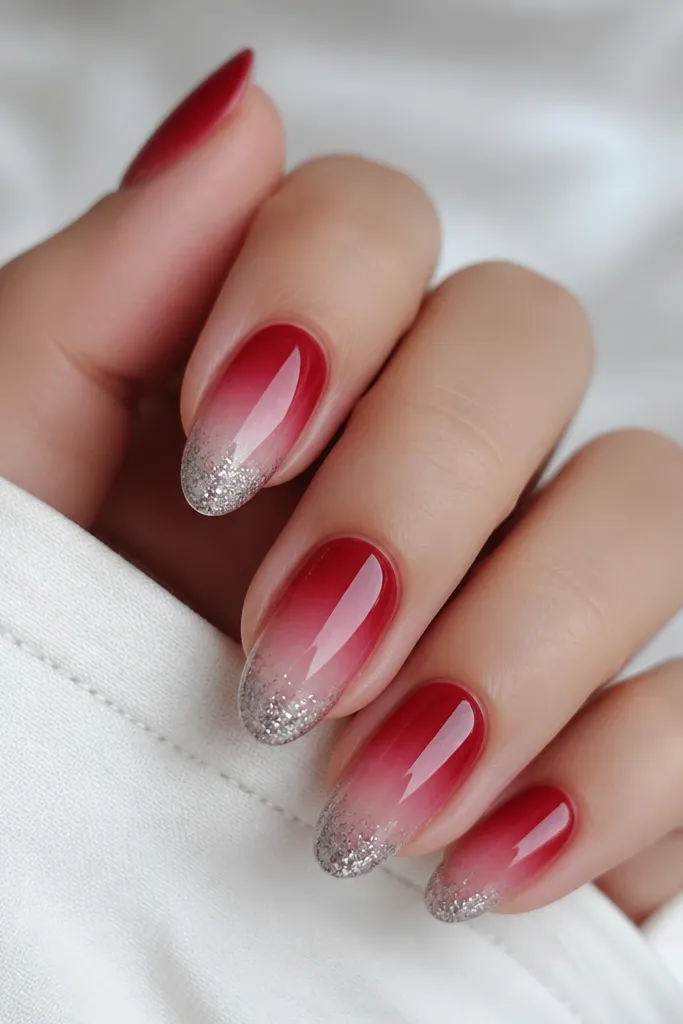
This is the "date night" ombre chrome look. Cherry red at the tip gives instant polish, and the sheer pink transition makes it feel lighter. Silver chrome at the edge adds that crisp sparkle that catches flash photography. It looks great on fair to medium skin and makes your hands look extra bright with red lipstick.
Start with a sheer pink base and cure. Ombre cherry red into the pink using a thin brush or sponge, keeping the blend smooth and the gradient area about 1/3 of the nail. Apply tack gel at the tip only, then dust silver chrome and press gently. Finish with glossy top coat, and add a second thin coat to smooth the chrome texture.
Editor's noteDust off excess chrome over a paper towel so you can reuse the leftover powder safely.
Watch outApplying chrome too high on the nail makes it look like a sticker instead of an ombre.
12. Sand Beige to Copper Chrome Sunset Fade
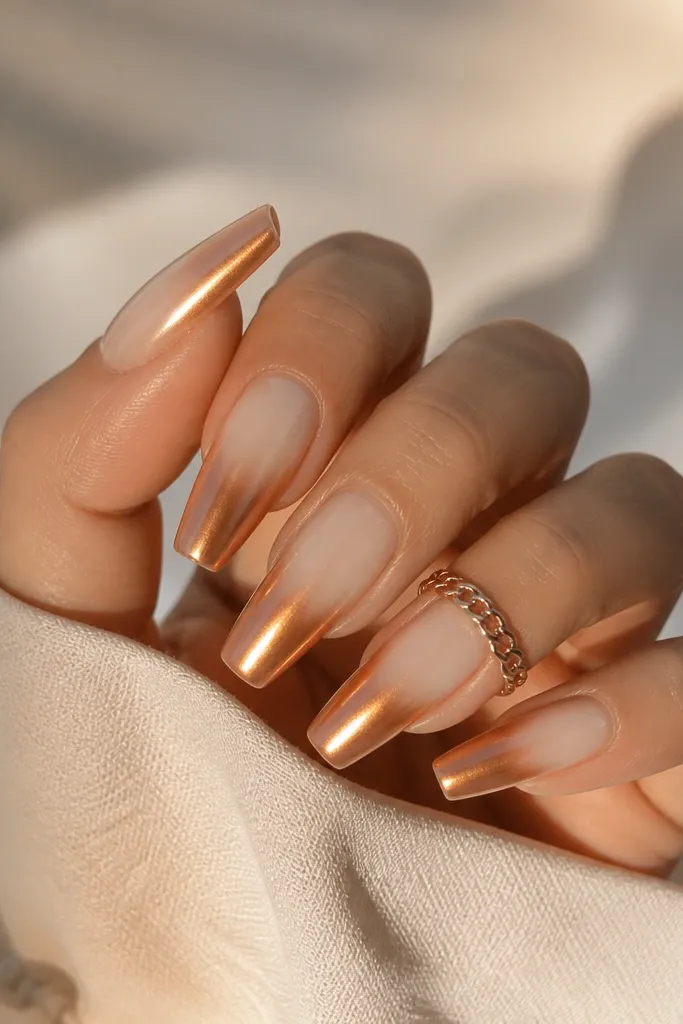
Copper chrome over a sand beige ombre looks like sunset light on skin. The beige base is neutral, so it flatters cool and warm undertones, and copper adds the warmth. The mid-to-tip placement keeps the shine where it looks dimensional. This is my pick for summer evenings when you want warm nails that still look clean.
Apply a sheer beige base and cure. Sponge sand beige at the tip and blend upward until the gradient reaches the mid-nail. Add a tack layer over the mid-to-tip, then press copper chrome powder evenly. Tap off excess and seal with glossy top coat twice, keeping the shine consistent across all nails.
Editor's noteIf copper looks too orange, mix in a tiny amount of nude gel and re-layer the base color before ombre.
Watch outSkipping a glossy top coat after chrome makes copper look dull and flat.
13. Teal Ombre to Silver Chrome Waterline
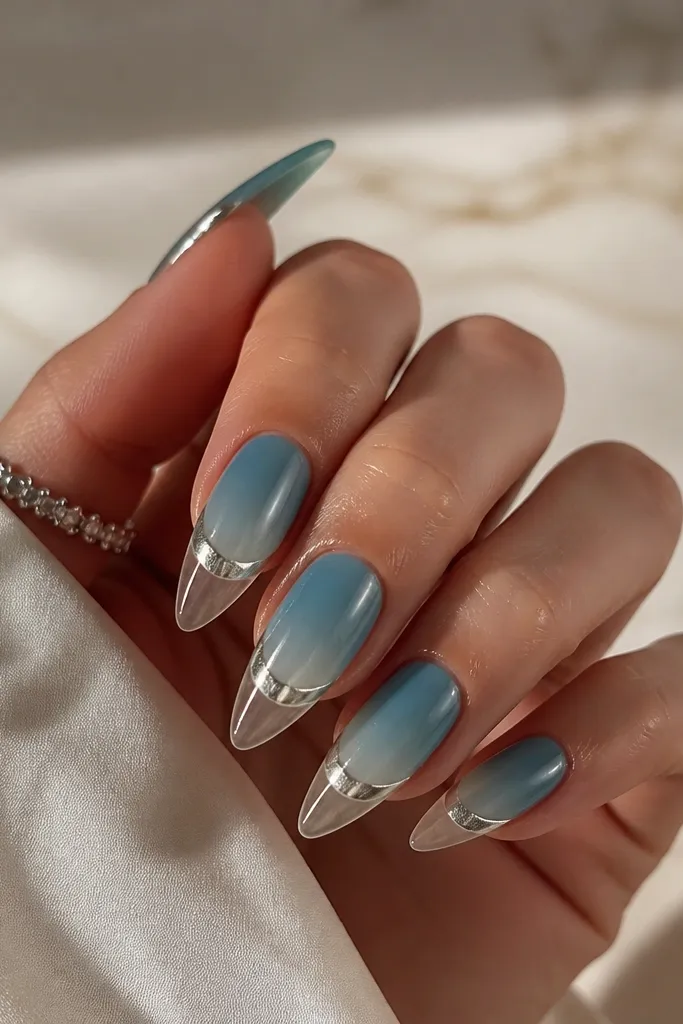
This one feels like water on glass. Teal ombre gives a fresh pop, and the clear fade keeps the nail looking longer. The silver chrome waterline band adds a graphic, clean detail that makes the design look intentional even if your gradient is slightly soft. It's a strong choice for vacations and beach events because it matches the vibe without needing nail art gems.
Start with a clear jelly base and cure. Apply teal gel at the tip and blend into clear so the ombre covers about 1/3 of the nail length. Use a thin brush to paint a curved tack line just above the tip, then dust silver chrome only on that curve. Seal with glossy top coat, then cap the tip edges carefully so the band doesn't lift.
Editor's noteUse a slightly curved striping brush so the chrome band looks like it's following the nail shape.
Watch outMaking the chrome band too thick turns it into a block instead of a waterline.
14. Rose Gold Ombre with Micro-Glitter Tip Fade
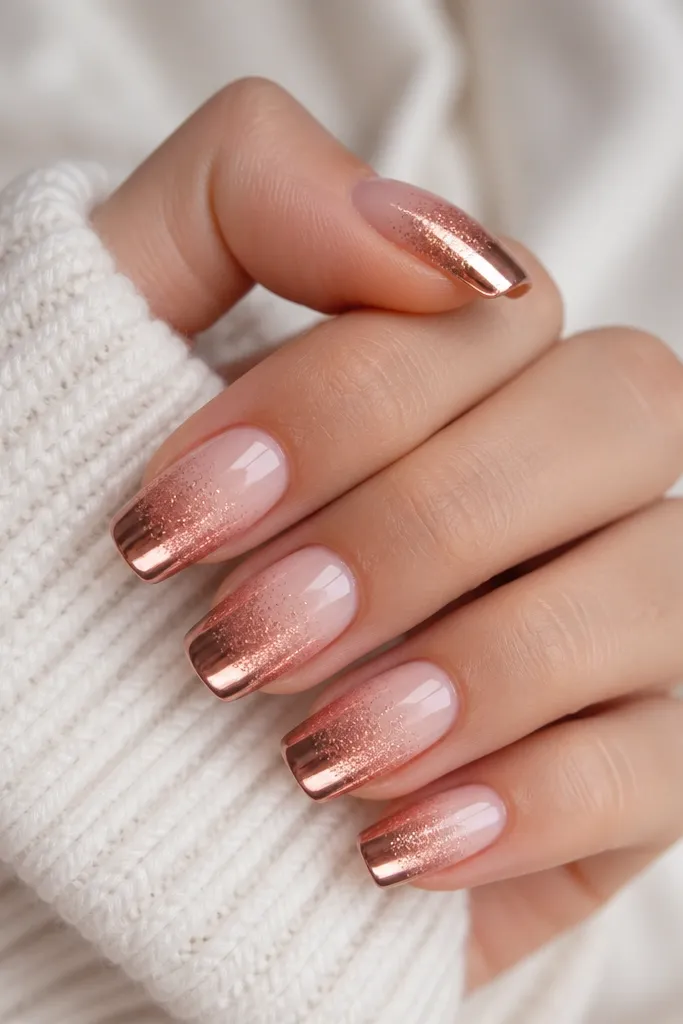
This is a "soft glam" version that still looks easy to do. Rose gold ombre flatters most skin tones because it's close to warm nude, and it pairs with rose gold jewelry. Micro-glitter blended into the tip adds texture so the chrome looks extra dimensional. When you press rose gold chrome on the glitter area, the sparkle looks like it's trapped under glass.
Apply a nude base gel and cure. Sponge rose gold pigment gel at the tip and blend upward, then add a tiny amount of fine rose micro-glitter only at the very top of the gradient. Add tack gel over the glittered area and press rose gold chrome powder so it sticks to the sparkles. Seal with glossy top coat in two thin coats to keep the surface smooth.
Editor's noteUse very fine glitter (not chunky) so it doesn't create bumps under chrome.
Watch outPutting chrome over chunky glitter makes ridges that catch dirt.
15. Pearl White Ombre with Silver Chrome Cuticle Glow
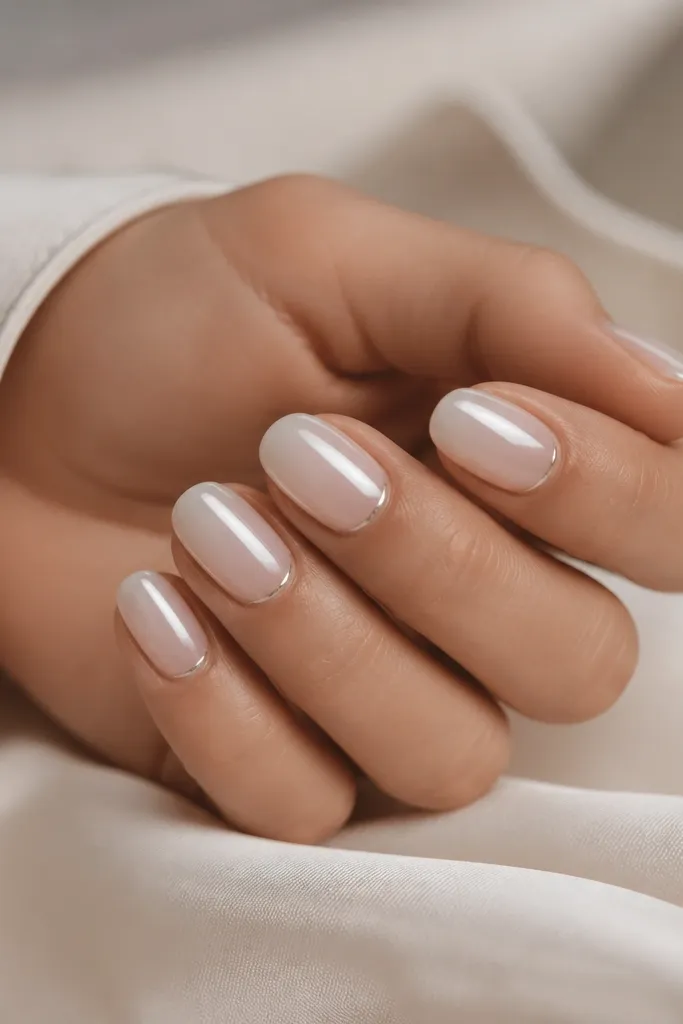
This design flips the usual placement. Instead of chrome at the tip, you get a silver cuticle crescent that makes your nail bed look brighter and more defined. Pearl white ombre is forgiving and flattering because it matches natural pink tones, so your nails look clean even on shorter lengths. The chrome crescent gives that "highlight" effect that looks expensive in photos.
Start with a sheer nude base and cure. Create pearl white ombre by blending pearl gel from the mid-nail down to the tip, leaving the cuticle more sheer. Apply tack gel around the cuticle in a thin crescent (leave a hairline gap from the skin), then press silver chrome powder lightly. Seal with glossy top coat, using a small brush to cap the crescent edges.
Editor's noteLeave a 0.5 mm gap from the cuticle - chrome touching skin lifts and smears.
Watch outOverloading chrome at the cuticle can make it look like a smudge.
16. Moody Charcoal Ombre to Black Mirror Tips
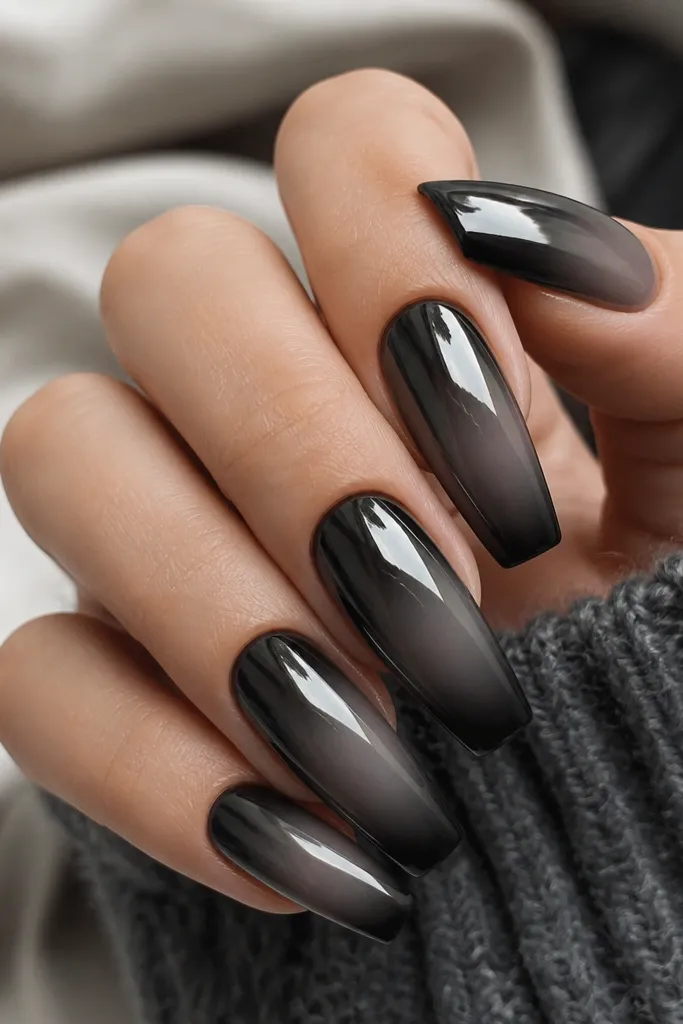
Charcoal to near-black is sleek and dramatic without needing extra art. The ombre smooths the transition so the black tips look sharp instead of harsh. Black mirror chrome gives a deep reflection that looks almost wet. This flatters deep skin tones beautifully and also looks striking on fair skin if you keep the base sheer rather than opaque.
Apply a sheer gray base and cure. Ombre charcoal into near-black at the tip, blending so the darkest area sits on the top 1/3 of the nail. Add tack gel only on the darkest zone and press black mirror chrome powder. Tap off and seal with glossy top coat, making sure the chrome area is fully capped to prevent lifting.
Editor's noteUse a thin liner brush to clean the chrome edge so it looks intentional.
Watch outOver-capping with heavy top coat can shrink the reflection and make black chrome look flat.
17. Sky Blue Ombre with Hologram Chrome Center
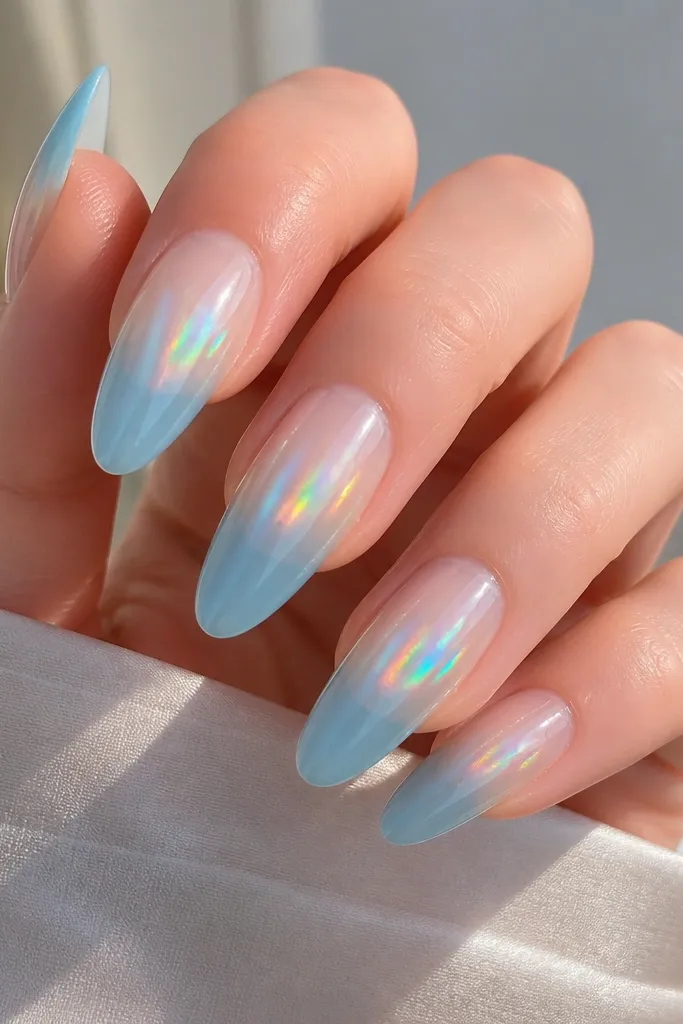
Sky blue ombre keeps it fresh, and hologram chrome turns it into something that looks like it's moving. The clear fade makes the nail look long and clean, so the design feels airy rather than busy. Hologram chrome in a center band gives you a focal point that flatters the shape of the nail. It's a great option for summer events and festivals.
Start with a clear jelly base and cure. Sponge sky blue at the tip and blend into clear, keeping the ombre smooth and about 1/3 of the nail length. Apply tack gel in a vertical center band from mid-nail to near the tip. Press hologram chrome powder on the band and tap off excess, then seal with glossy top coat.
Editor's noteIf hologram chrome looks too subtle, add a second light dusting over the same band before sealing.
Watch outCovering the whole nail in hologram chrome makes the look busy and harder to blend.
18. Nude to Brown Ombre with Rose Chrome Micro-Lines
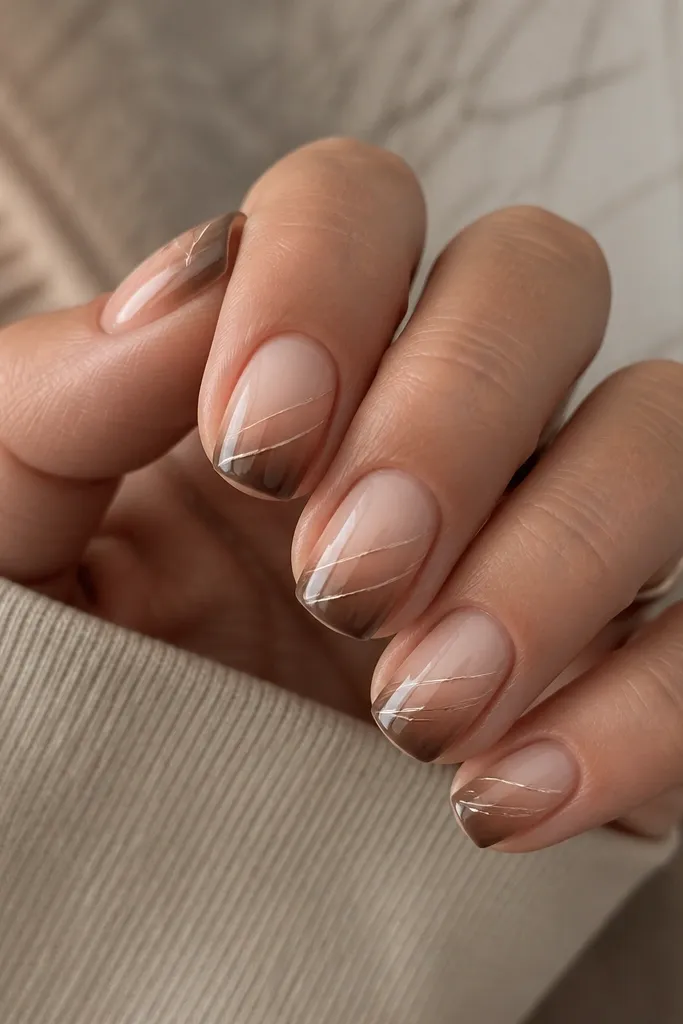
This one adds structure without bulky nail art. Nude to brown ombre is super flattering and looks natural on most hands, and rose chrome micro-lines make it feel delicate. The diagonal lines guide the eye across the nail, which can make shorter nails look more elongated. It's a good choice if you want ombre chrome but you hate big charms or thick decals.
Apply a sheer nude base and cure. Ombre brown into nude at the tip, blending upward about 3 mm. Add a thin tack gel layer on the gradient, then use a detail brush to drag two or three diagonal lines of tack and press rose chrome powder into each line. Seal with glossy top coat, keeping the lines smooth by painting top coat thinly over them.
Editor's noteUse gel liner brush pressure lightly - too much pressure spreads the tack and blurs the lines.
Watch outTrying to draw lines after chrome powder is sealed makes them impossible to define.
19. Milky Nude Ombre to Silver Chrome Half-Moon
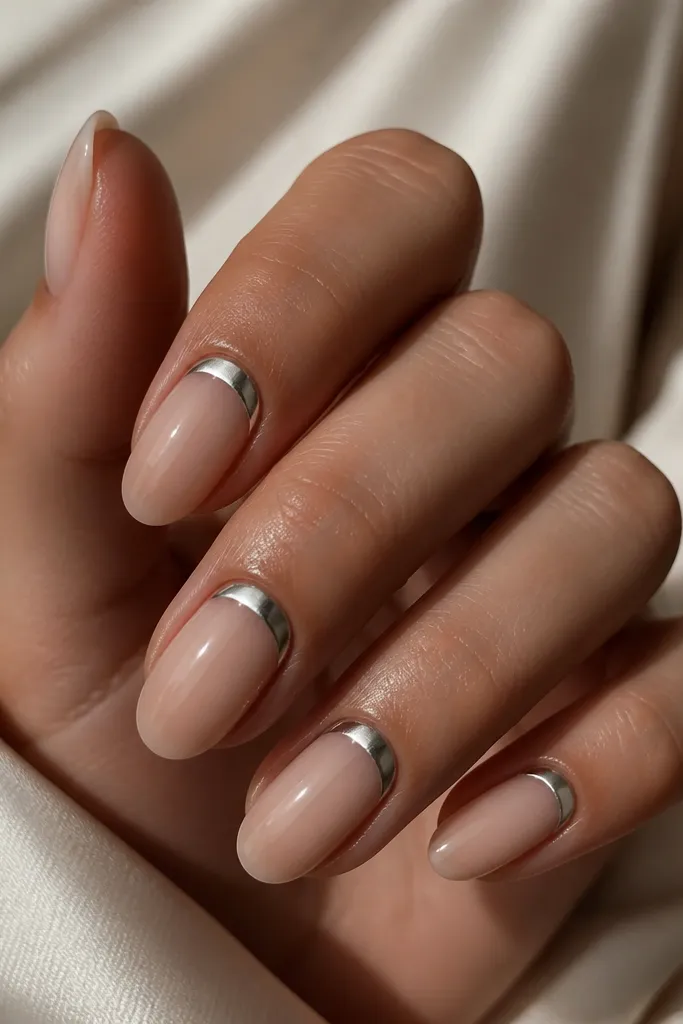
This is basically a chrome french twist, but in an ombre-friendly way. The milky nude gradient stays soft and flattering, while the silver half-moon gives a crisp highlight that makes the nail bed look fuller. It works on short nails too because the half-moon sits where the eye naturally focuses. If you like classy nails that still look special, this is your pattern.
Start with a milky nude base and cure. Create a subtle ombre by blending a slightly deeper nude at the tip into the base, keeping it under 1/4 of the nail length for a gentle fade. Apply tack gel around the cuticle in a half-moon shape with a clean gap from the skin. Dust silver chrome over the tack, tap off, then seal with glossy top coat in two thin layers.
Editor's noteUse a small silicone cuticle tool to help press the chrome into the half-moon edge cleanly.
Watch outLetting chrome touch your cuticle skin causes lifting and smudges.
20. Red Rose Ombre with Rose Gold Chrome Marble Swirl
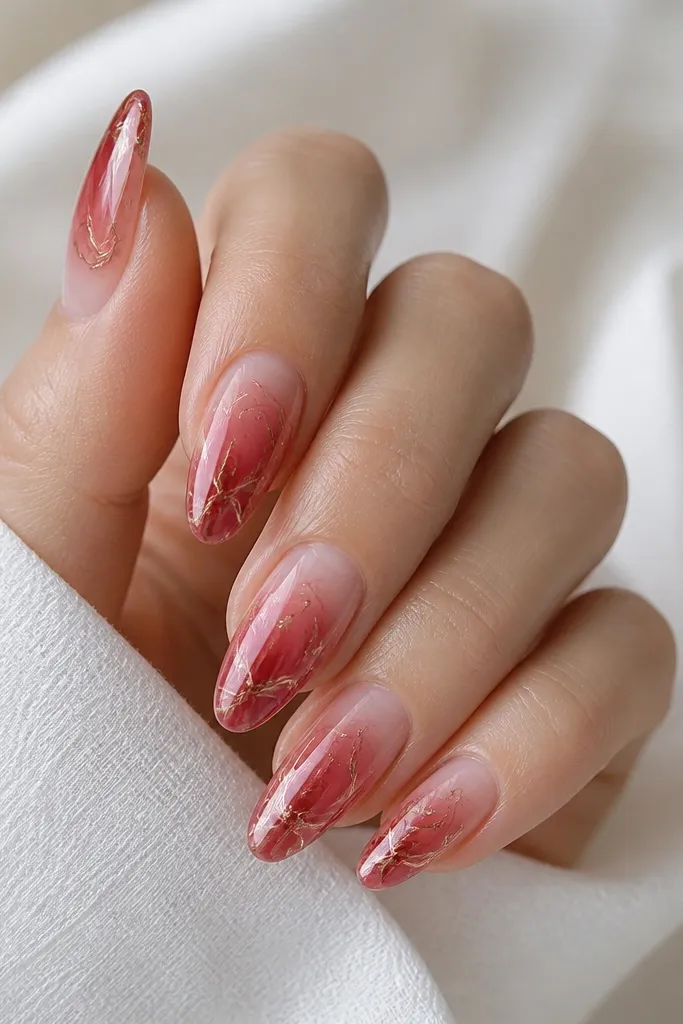
Marble swirls look hard, but this version is beginner-friendly because you're placing chrome into gel lines, not carving patterns. Red rose ombre gives a romantic base, and rose gold chrome swirls add movement. The swirls are thin, so the ombre still reads smoothly. This flatters warm undertones and looks stunning with both gold and rose gold jewelry.
Use a sheer pink base and cure. Ombre red rose gel at the tip blending upward until you cover about 1/3 of the nail length. Apply tack gel over the mid-to-tip area, then use a thin brush to draw 2-3 curved swirl lines of tack. Press rose gold chrome into the swirls, then seal with glossy top coat, painting over the swirls thinly so they don't smear.
Editor's noteWipe your brush with gel cleanser between nails so the swirl lines stay crisp.
Watch outThick swirl lines look chunky once top coat hits - keep them hair-thin.
21. Orange Cream Ombre with Gold Chrome Confetti Specks
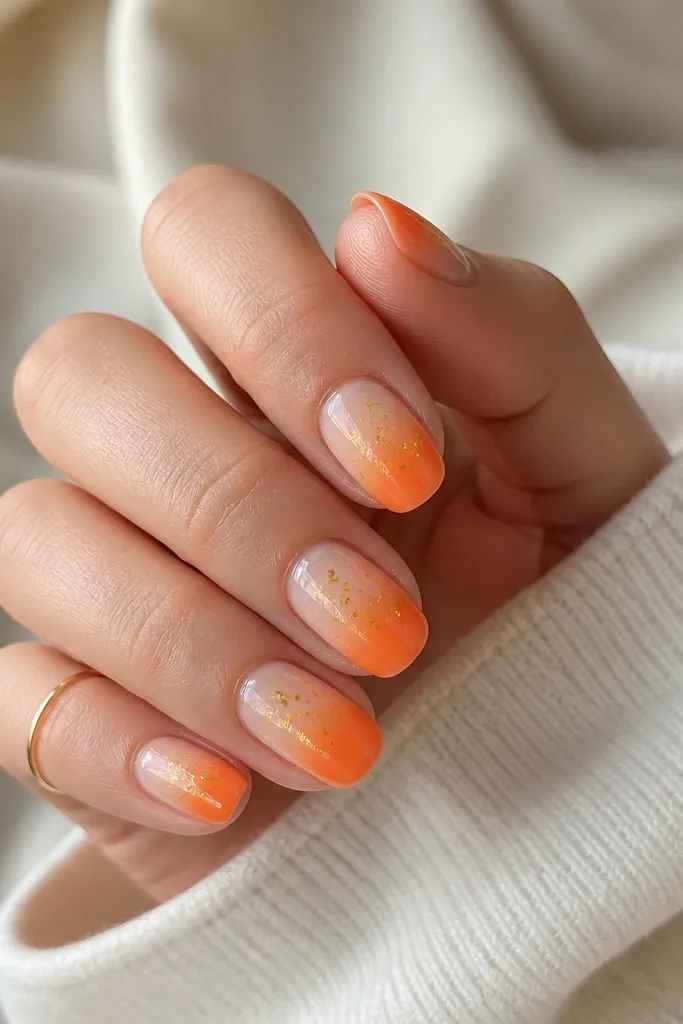
This is a fun, easy way to make ombre chrome feel playful. Orange cream ombre warms up your hand and looks good on all nail lengths, but it's especially cute on short ovals. Gold chrome confetti specks add sparkle without making the whole tip mirror. It's a great choice for summer birthdays and vacation photos when you want something bright but still wearable.
Start with a pale nude base gel and cure. Sponge orange cream at the tip and blend upward to mid-nail. Apply tack gel only on the top half of the ombre, then tap gold chrome powder with your finger or a sponge tip to create small specks. Seal with glossy top coat, making sure top coat covers the specks so they don't catch on clothes.
Editor's noteTap off over a tray - you can reuse the excess confetti safely if it hasn't touched skin.
Watch outPressing the chrome confetti too hard turns it into a solid layer.
22. Pearl Lavender Ombre with Chrome Crisscross
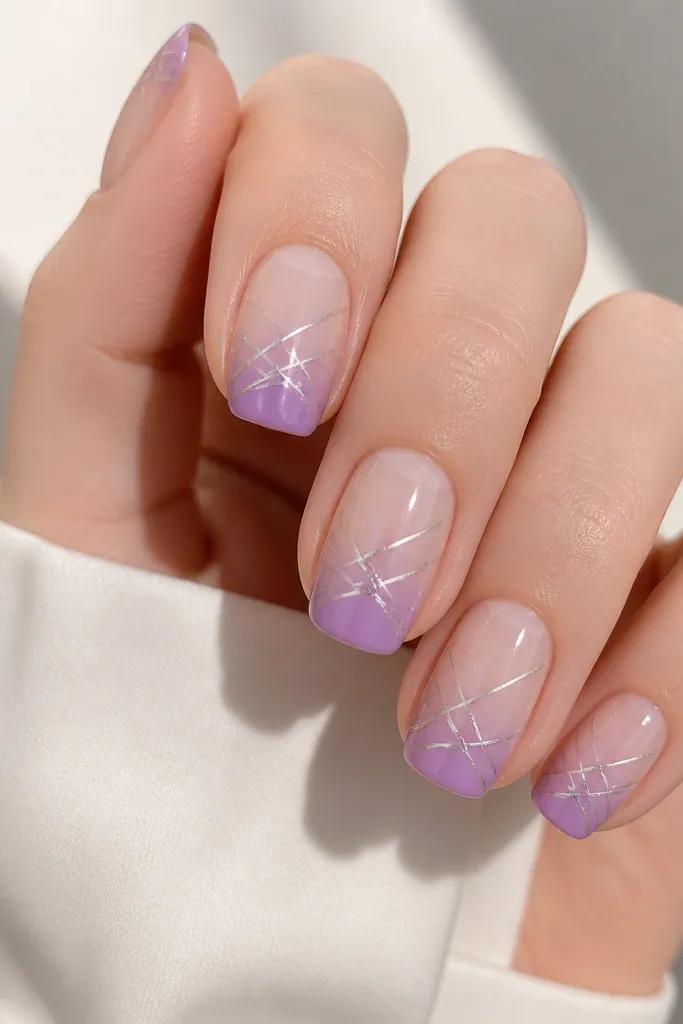
Crisscross chrome turns a simple ombre into a design you can wear to events. Lavender pearl ombre keeps it soft, and the silver crisscross lines add a cool, clean pattern. This looks best on medium shapes because there's enough space to place the lines without crowding the cuticle. It also flatters cool undertones and makes nails look more "finished" than plain chrome.
Apply a sheer pearl base and cure. Ombre lavender at the tip fading into pearl at mid-nail, keeping the gradient smooth and about 1/3 length. Add a tack layer over the ombre area, then draw a crisscross pattern with a thin brush: two diagonals that intersect near the center. Press silver chrome into the lines, tap off, then seal with glossy top coat.
Editor's noteUse gel liner brush with stiff bristles so the lines stay straight.
Watch outToo many intersections makes it look messy; keep it to two diagonal lines per nail.
23. Seafoam Ombre to White Chrome Bubble Tip
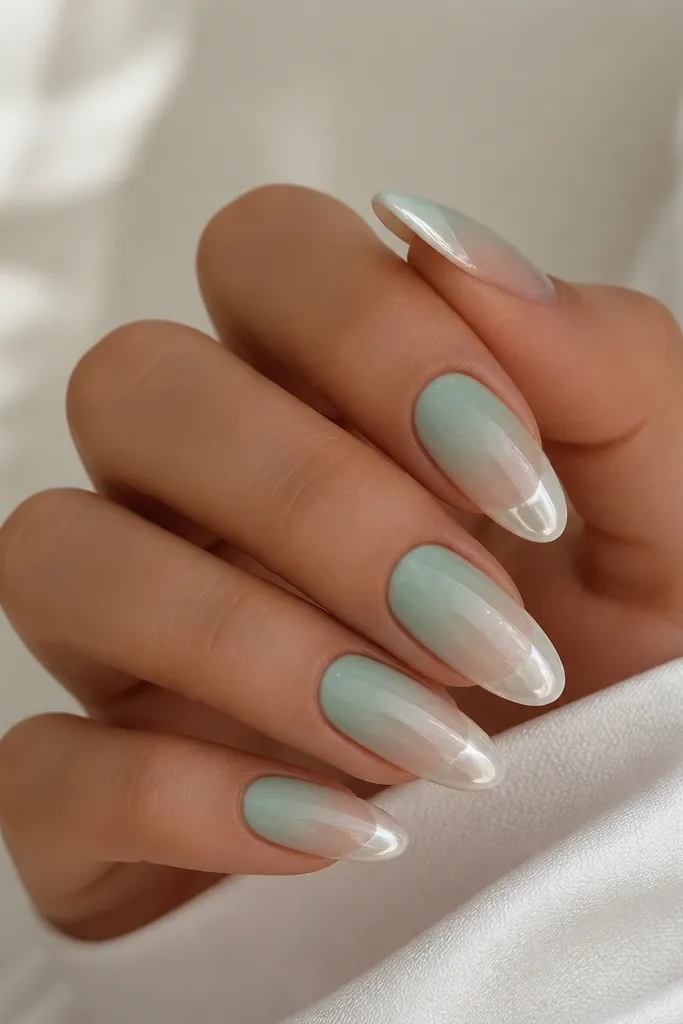
Seafoam is the calm version of teal, and the bubble tip makes it cute instead of sharp. White chrome on a rounded tip area looks like a highlight cloud, and it flatters hands because it keeps the nail edge light. This design looks great on fair and neutral undertones and makes your nails look fresh for spring and beach trips. It's also beginner-friendly because the chrome placement is limited to one shape.
Start with a sheer nude base and cure. Ombre seafoam at the tip into sheer, blending upward about 1/3 of the nail length. Apply tack gel only where you want the bubble tip - use a small dotting tool to shape a rounded edge. Dust white chrome over that bubble area, press lightly, then seal with glossy top coat.
Editor's notePractice the bubble shape on one nail first - it's easier to adjust before you chrome all ten.
Watch outDragging the tack after it sets ruins the rounded edge.
24. Sheer Black Ombre to Silver Chrome French Fade
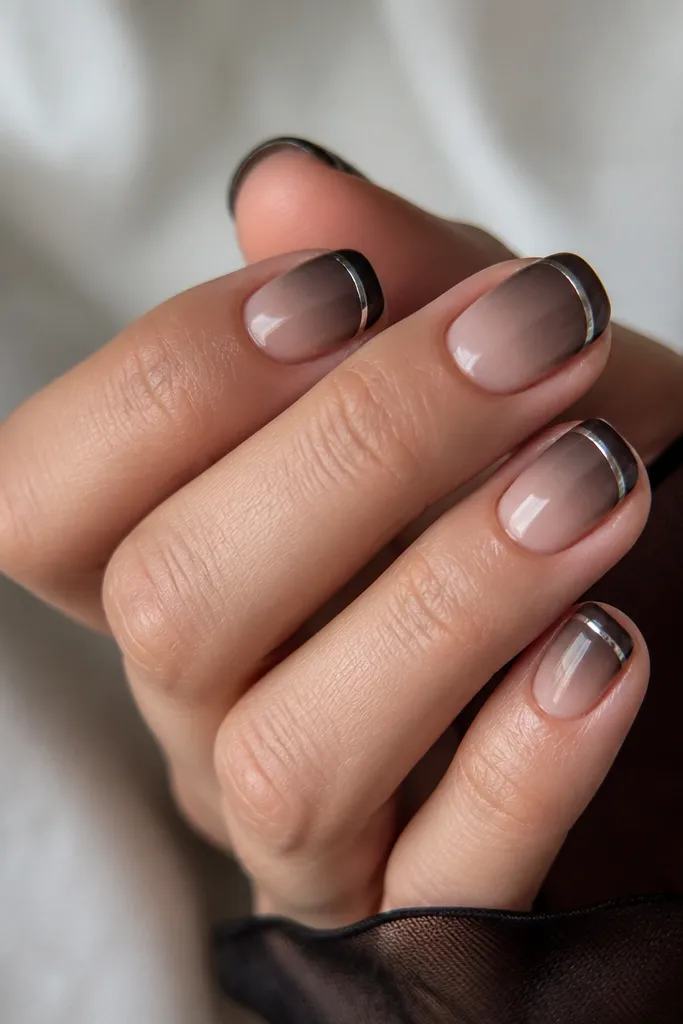
This looks like a French manicure but it has depth because the ombre is doing the work. The sheer black tip fade keeps it modern, and the silver chrome band at the top of the tip makes it feel crisp. It's flattering on short nails because the band gives definition without shrinking the nail. I wear this when I want "clean but edgy" and it works with casual outfits and evening looks.
Apply a sheer nude base and cure. Create a sheer black ombre by painting black gel at the tip and blending it upward lightly so the cuticle stays transparent. Add tack gel in a thin band across the tip (leave a small gap above the very edge), then dust silver chrome into that band. Seal with glossy top coat, and use a thin brush to clean the chrome edge so it looks straight.
Editor's noteUse striping tape to form the chrome band - press it down gently and remove after you dust chrome.
Watch outMaking the band too wide turns it into full chrome tips instead of a French fade.
25. Soft Peach Ombré with Copper Chrome Micro-Stud Tips
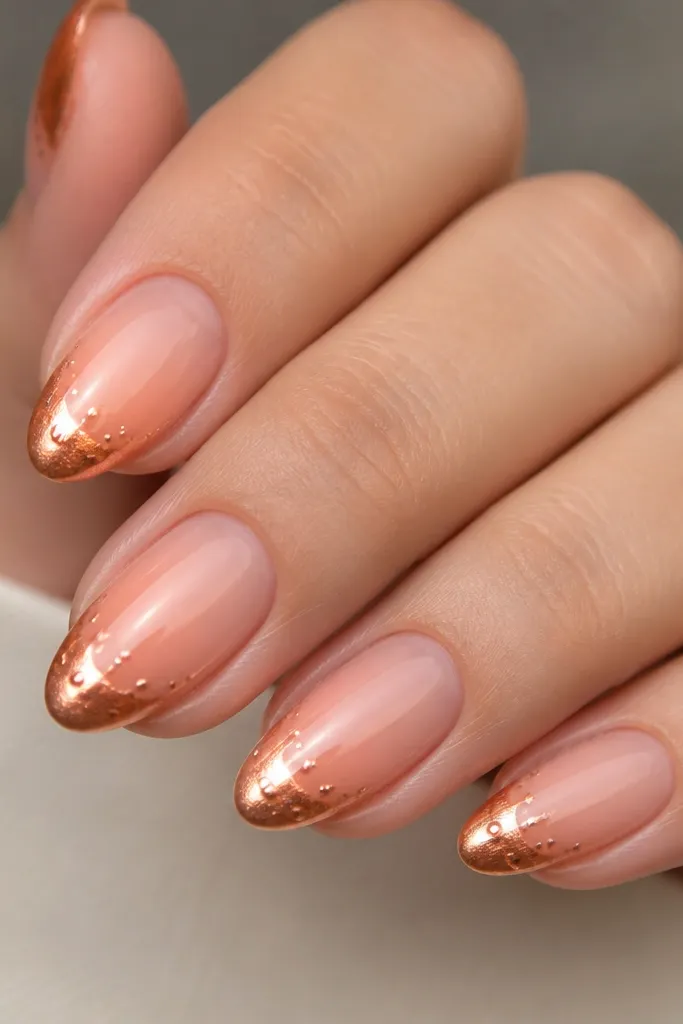
This is the "glam but still easy" look. Soft peach ombre makes the nails look healthy, and copper chrome at the tips adds warm reflection. The micro-stud look is created with tiny dots of chrome gel and powder, so it doesn't require heavy rhinestones. It flatters hands that look best with warm tones and gives a playful sparkle for parties.
Start with a nude-peach base and cure. Ombre peach into nude with a sponge, keeping the blend smooth and about 1/3 nail length. Apply tack gel to the tip area, dust copper chrome, and press lightly. Then use a dotting tool to place tiny dots of tack gel on top and dust a second light layer of copper chrome, sealing after.
Editor's noteIf you can't find micro-studs, use tiny dots of gel and chrome powder instead - it's lighter and cleaner.
Watch outUsing big rhinestones with chrome makes the surface uneven and catches on fabric.