
1. Icy Blue Milk Ombre with Mirror Chrome Tips
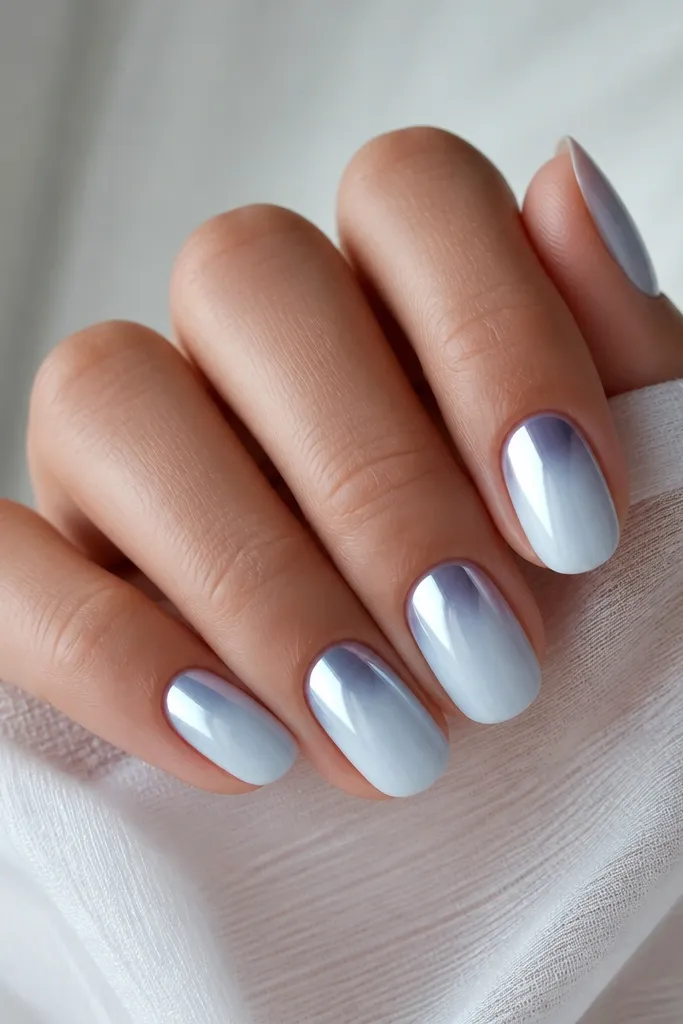
This one is for the "clean expensive" look. The base starts as a sheer milky white near the cuticle, then fades into icy blue, so your skin tone shows through but still looks bright. The chrome is concentrated on the tip area, which makes your nails look longer without turning into a heavy block of color. I wear this on fair to medium skin because the icy blue doesn't overpower - it brightens the hand. It also works for almost any outfit because the color sits in that cool, wintery family.
Start by prepping and applying a rubber base coat, then cure. Sponge on the ombre using three passes: milky white at the cuticle (about 2 mm), icy blue in the middle (cover the next 3-4 mm), then deepen the tip with icy blue at the last 2 mm. Feather the sponge edges with a small brush so there's no hard line. After curing, apply mirror chrome gel only to the tip fade zone, cure, then buff lightly with a lint-free pad if your kit recommends it. Finish with a glossy top coat that is safe for chrome - no thick layers.
Editor's noteIf your mirror chrome looks streaky, wipe the nail with 70% isopropyl before chrome gel. One quick wipe beats repeated rubbing.
Watch outAvoid putting chrome all over a thick, wet ombre - it traps pigment and makes the finish look cloudy.
2. Deep Navy Fade into Steel Blue Chrome
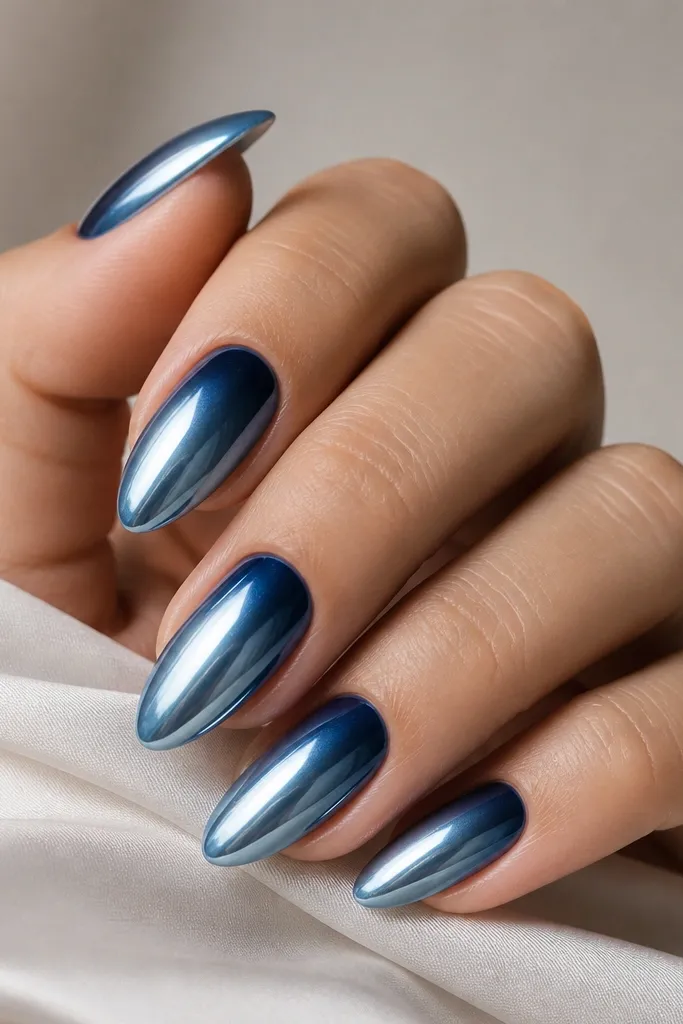
This is the "night sky" version that still looks classy in daylight. Deep navy at the base makes the nail look grounded, and the fade into steel blue keeps it from getting too dark. The chrome is all-over, but because the gradient already has depth, the reflection looks layered instead of flat. Medium to deep skin tones look especially good here because navy brings out warmth in the skin, then steel blue cools it down. It's also a strong choice for formal events because the chrome reads like jewelry.
Apply a sheer base coat and cure. Sponge on the gradient with deep navy near the cuticle, fading to a lighter steel blue around the middle, then slightly brighten the tip so the chrome has something reflective to grab. Cure fully. Apply mirror chrome gel across the whole nail (not just the tips), keeping your brush strokes thin so you don't flood the gradient. Cure again, then cap the free edge with a thin top coat to lock everything in.
Editor's noteWhen you sponge the navy, keep the darkest blue within the first 2-3 mm so the nail doesn't look bruised.
Watch outDon't cure the ombre under a lamp for too short a time - soft layers under chrome cause lifting at the cuticle.
3. Cobalt Ombre with Aurora Chrome Flakes
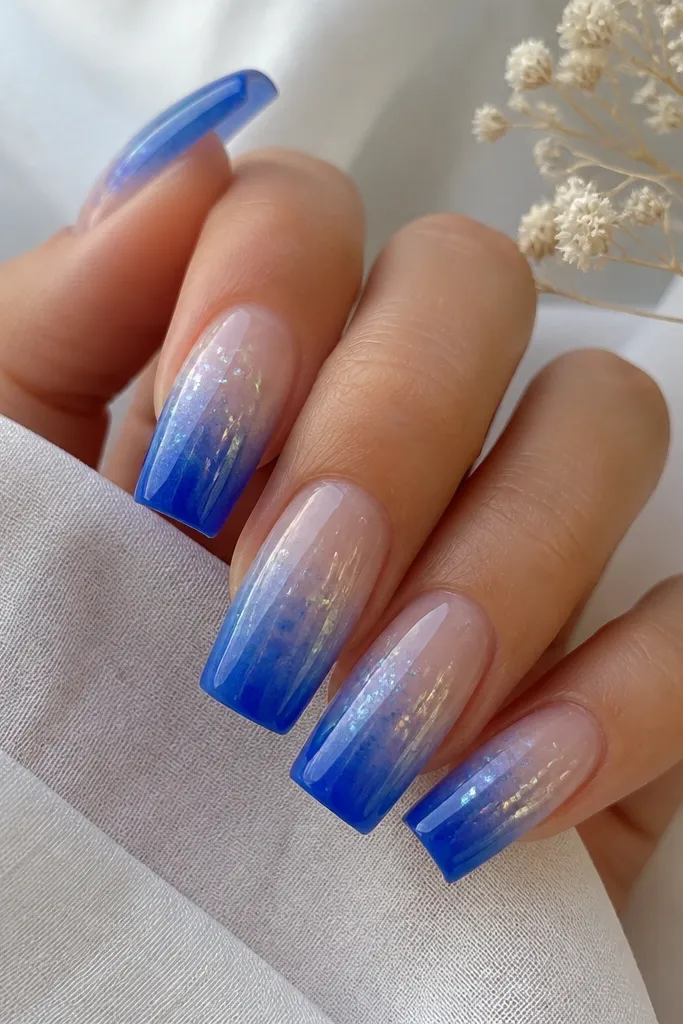
Flakes give you movement, and this design looks different every time you turn your hand. The cobalt ombre starts strong at the tip, then fades into a clear base so the flakes float rather than sink. I like this on long square or squoval nails because the flat shape makes the flakes look intentional. It flatters hands with longer fingers because the fade draws a line down the nail. For cool-toned skin, the aurora shift (green-blue) looks extra striking; for warm tones, it still works because the cobalt anchors it.
Start with a clear base coat and cure. Sponge cobalt blue at the tip area down into the nail, leaving the cuticle nearly bare (about 1-2 mm clear). Cure and then apply a tacky gel layer only where you want flakes to land - usually the middle to tip. Press aurora chrome flakes into the tacky zone and seal with a thin top coat, curing between if your gel requires it. Finish with glossy top coat, then wipe any residue around the edges.
Editor's notePress flakes with a silicone tool, not your fingers. Oils from your skin grab flakes and leave bare spots.
Watch outAvoid thick gel over flakes - it dulls the sparkle and makes the surface look bumpy.
4. Cornflower Blue Ombre with Silver Chrome Cuticle Halo
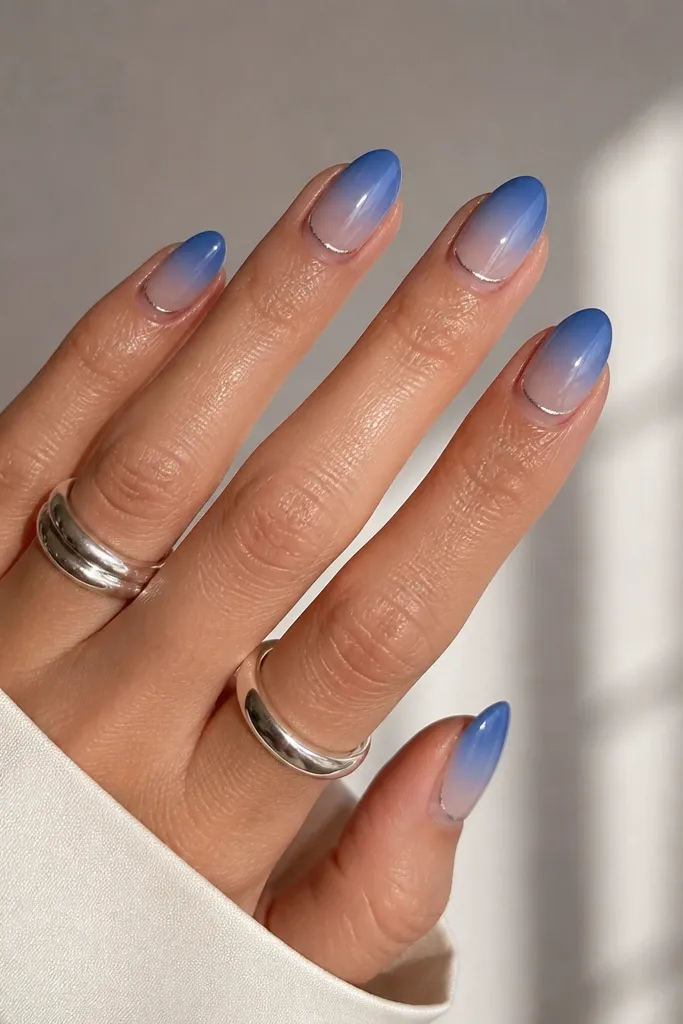
This one is small-detail magic. The ombre is soft cornflower into sheer, keeping everything airy. Then you add a thin silver chrome halo around the cuticle - just a crescent line - which makes the nail look styled like jewelry. I've had this work on short nails because the halo visually frames the nail bed. It flatters almost any skin tone because silver sits neutral, and the cornflower stays bright without going neon. It's perfect for weddings or photos because the halo catches flash.
Apply a sheer pink or clear base, cure. Sponge cornflower blue from the tip up to about 2/3 of the nail, leaving the cuticle area almost transparent. Feather the transition so there's no line. Cure, then use a fine brush to paint a thin crescent of silver mirror chrome gel around the cuticle, avoiding the skin by about 0.5 mm. Cure, then top coat with a glossy chrome-safe finish.
Editor's noteUse a liner brush with stiff bristles; you want a crisp crescent, not a fuzzy blob.
Watch outDon't let the halo touch your skin - it lifts fast and makes cleanup messy.
5. Periwinkle Ombre with Frosted Blue Chrome Powder
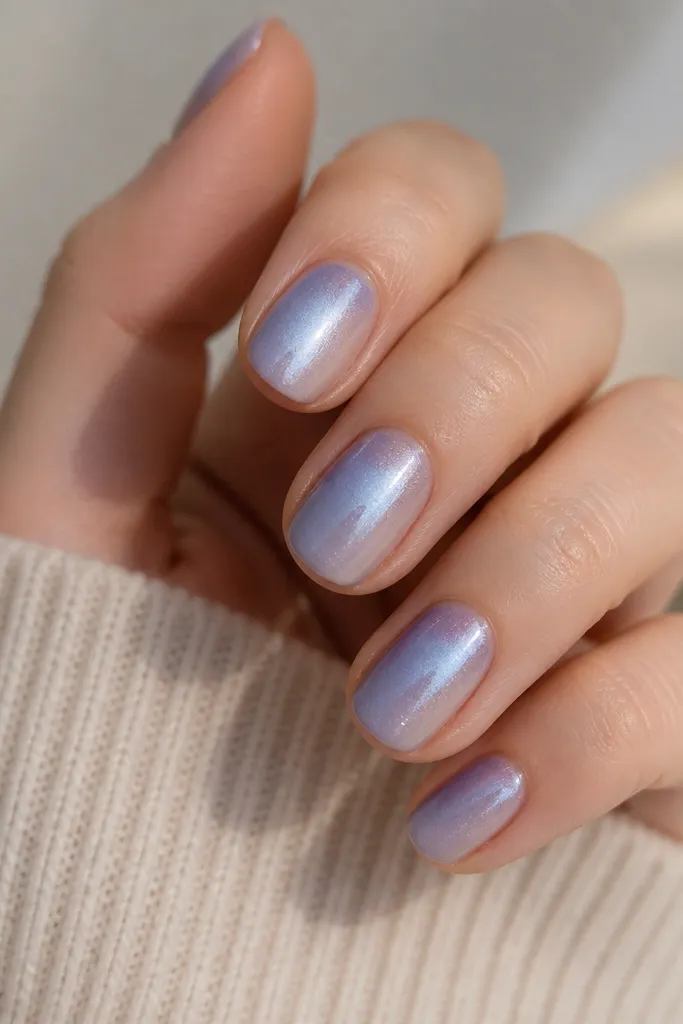
If mirror chrome looks too harsh for you, frosted powder is the answer. The periwinkle-to-milky ombre keeps the base soft, and the chrome powder adds a light-catching haze instead of a hard reflection. This is flattering on hands that want a "glow" without looking overly metallic. I wear this on everyday errands because it doesn't look like you're trying too hard. It also looks great on very short nails since the frosted texture makes the nail look fuller.
Start with a milky base coat and cure. Sponge periwinkle from the tip upward to about 2/3 of the nail, leaving the cuticle area clear or barely tinted. Cure. Apply tacky gel on the middle and tip only, then dust blue chrome powder onto the tacky zones and press gently. Tap off excess, then seal with a thin layer of glossy top coat.
Editor's noteDust chrome powder with a soft eyeshadow brush - it spreads evenly without gouging the ombre.
Watch outAvoid rubbing the chrome powder after it's set - you'll remove it and get dull patches.
6. Teal Ombre with Blue-Green Chrome Shift
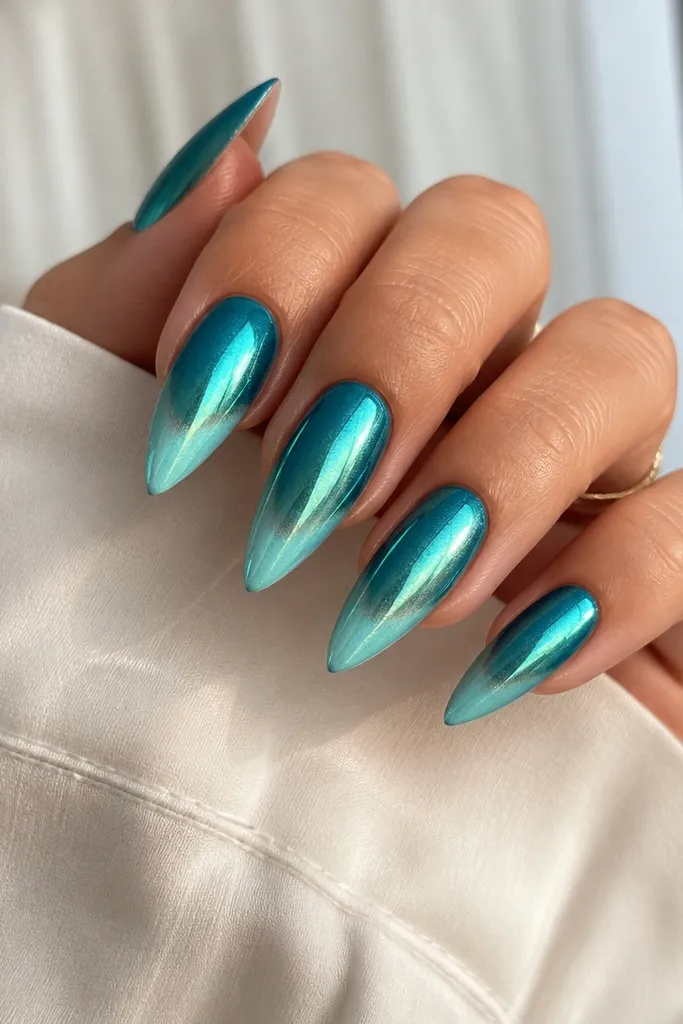
This design reads like a color shift gemstone. Teal at the cuticle makes the gradient look rich, and the turquoise tip keeps it bright. The chrome shift (blue-green) adds an extra dimension, so it looks more expensive than a single-tone chrome. I like it on medium to deep skin tones because teal brings out contrast. It also looks incredible under daylight and car headlights because the shift flashes green-blue.
Apply a base coat and cure, then sponge teal near the cuticle fading into turquoise toward the tip. Keep the transition smooth with light pressure and multiple sponge taps. Cure fully. Apply tacky gel over the entire ombre, then dust blue-green chrome powder from cuticle to tip, pressing lightly with a sponge applicator. Seal with a glossy top coat and cap the free edge.
Editor's noteIf the shift looks too green or too blue, adjust by changing the amount of turquoise in the tip - the chrome reflects what's under it.
Watch outDon't choose a chrome shift that's the same exact tone as your blue base - it flattens the gradient.
7. Blue Ombre with Galaxy Chrome Spray Effect
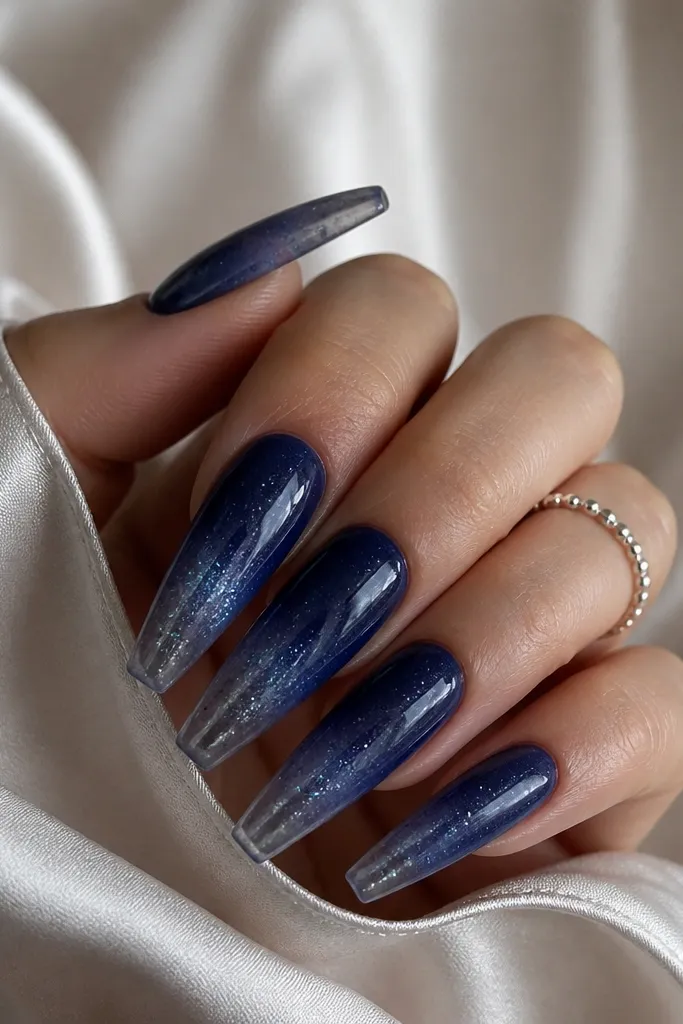
This is the "space in a bottle" look, and it's easier than it looks. The ombre is smoky - not just blue - so it has atmosphere. The galaxy chrome spray adds micro-dots that catch light like stars, and because they're tiny, you don't need a heavy chrome layer. It flatters long nail shapes and looks great with cool makeup palettes. For fair skin, the smoky base prevents it from looking too icy; for deeper skin, the silver specks pop hard.
Start with a base coat, then sponge deep blue at the tip fading into a smoky gray-blue near the middle, leaving the cuticle slightly sheer. Cure. Shake galaxy chrome spray and mist from about 15-20 cm away in two light passes, letting it land naturally. Cure again. Finish with a glossy top coat, keeping it thin so the specks stay crisp.
Editor's notePractice the spray on a fake nail first - distance controls how dense the stars look.
Watch outAvoid spraying too close - you'll get thick blobs that look like glitter glue.
8. Light Blue Ombre with White Chrome Cloud Center
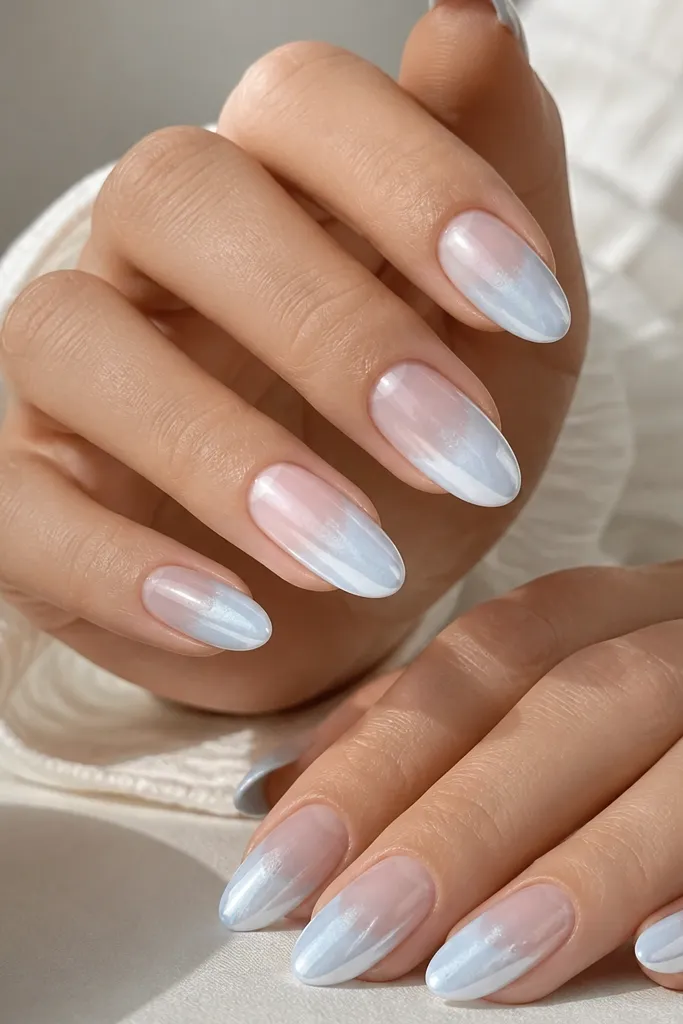
This one gives you that cloud-like glow people ask about in person. The base ombre is light blue to clear, so it looks clean and airy. Then you place white chrome in a cloud patch across the middle and slightly into the tip, leaving the cuticle open. The contrast makes the nail look "lifted," not heavy. I've worn this with both gold and silver jewelry and it still looks right because white chrome sits neutral. It's also flattering on shorter nails because the cloud shape draws the eye upward.
Apply a sheer base and cure. Sponge light blue from the tip up to about 2/3 of the nail, keeping the cuticle 2 mm sheer. Cure and apply tacky gel only in the center-to-tip "cloud" area. Dust white chrome powder, then use a soft brush to blend the edges so it looks like a cloud, not a sticker. Seal with a glossy top coat, and cap the tip lightly.
Editor's noteBlend the cloud edges with a clean dry brush while the tacky layer is still active.
Watch outDon't cover the whole nail with white chrome - it turns into a flat white block.
9. Royal Blue Ombre with Micro-Stripe Chrome Lines
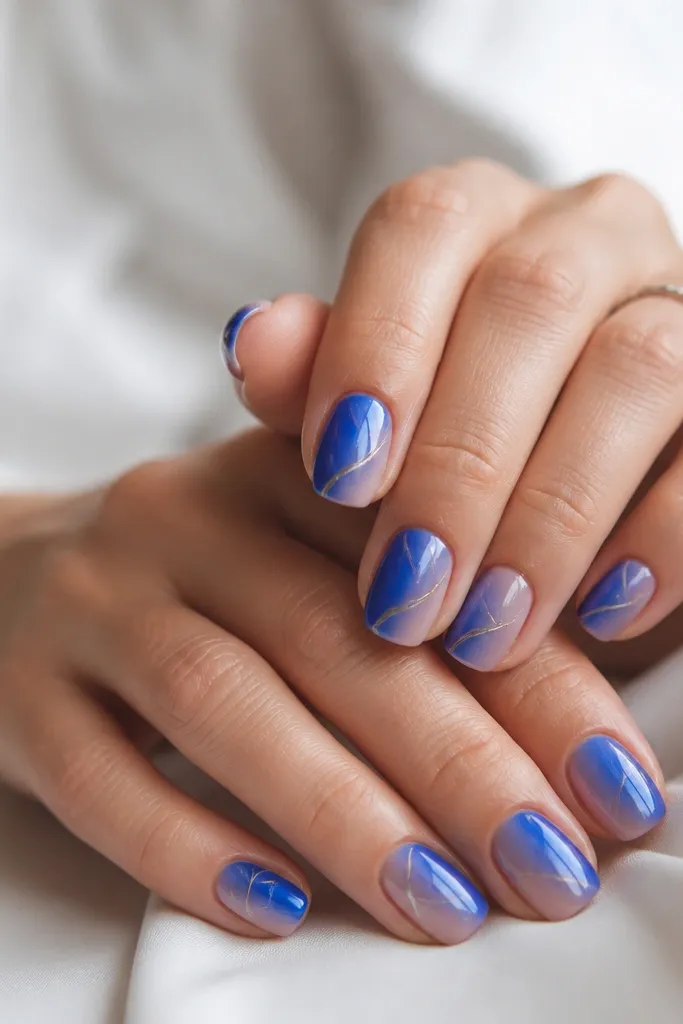
I love micro-lines because they make chrome look designed instead of random. The ombre is royal blue fading into sheer, so the base is bold but clean. Then you place one or two diagonal micro chrome stripes that catch light in motion. This flatters wider nails because the diagonal lines visually narrow the nail bed. It also looks great for people who want chrome but don't want full coverage. The silver lines keep it crisp even when the ombre is dramatic.
Start with a sheer base coat and cure. Sponge royal blue at the tip down to about 1/2 to 2/3 of the nail, leaving the cuticle clear. Cure and apply a thin layer of base gel where stripes will go - only small sections. Use a chrome gel or striping gel to draw 2-3 micro-diagonal lines, then cure. Apply chrome powder over the lines (or use mirror chrome gel if your product is stripe-friendly), brush off excess, and seal with glossy top coat.
Editor's noteKeep stripes 0.5 mm apart. Too close together makes them look like one thick streak.
Watch outSkip thick stripe gel - it creates ridges that catch lint and make the nails look unfinished.
10. Blue Ombre with Chrome French Reverse at the Tip
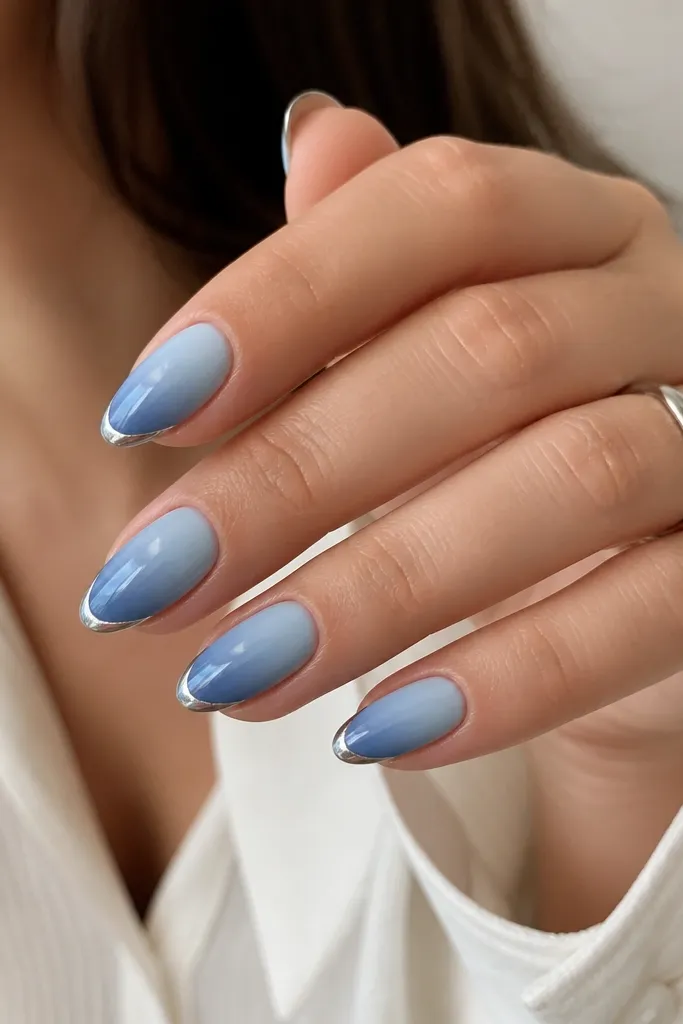
Reverse French makes the tip look engineered. The ombre fills the nail in blue tones, then the chrome arc at the tip defines the edge without needing a thick line of color. I like it on medium almonds because the arc follows the natural curve and makes the nail look neat. This design works for both light and deep skin tones because the chrome arc is bright and neutral. It also photographs well because the arc reflects straight-on.
Apply a base coat and cure. Sponge blue ombre from cuticle to tip, choosing a mid-blue to fade into a slightly darker blue at the last 2-3 mm. Cure. Then paint a reverse French arc right at the tip edge using mirror chrome gel, keeping the arc about 1 mm thick. Cure again, and top coat over the arc with a chrome-safe glossy layer.
Editor's noteUse a nail stencil for the arc the first time. Freehand arcs are where most people get wobbly tips.
Watch outAvoid chrome arc placement too far down the nail - if it sits past 3-4 mm, it looks like a separate sticker.
11. Powder Blue Ombre with Silver Chrome Drip Fade
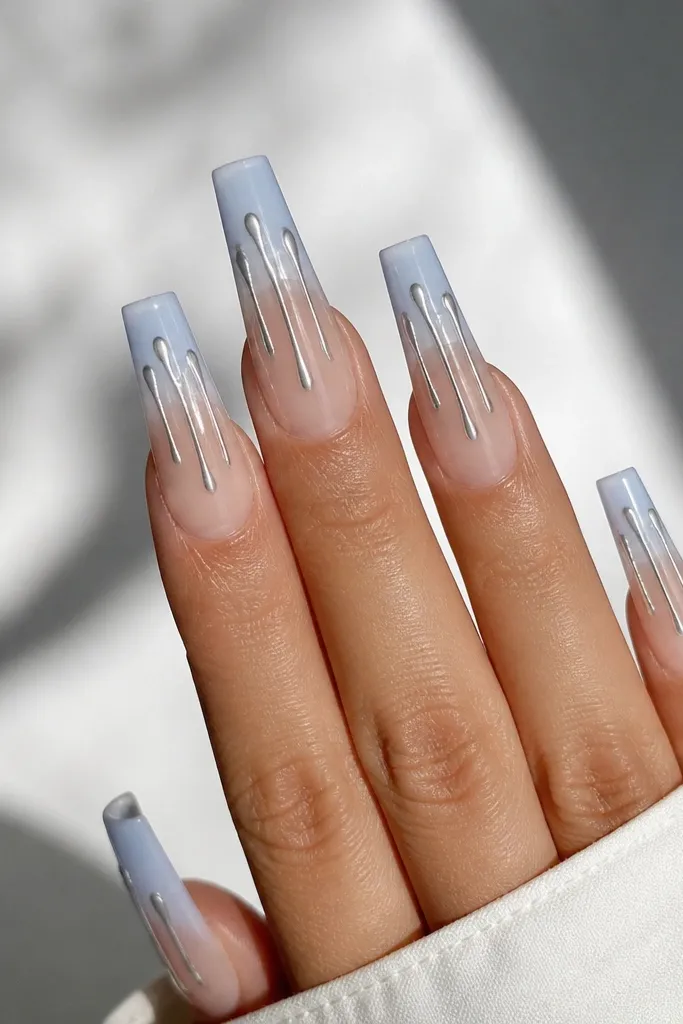
Drips add attitude without making the nail messy when you keep them controlled. Powder blue ombre stays soft and wearable, then silver chrome drips add sharp sparkle. The drip lines make the nail look longer because they create vertical movement. I recommend this for medium to long nails; on short nails the drips crowd the shape. It's especially flattering with cool-toned outfits because the silver chrome feels icy and clean.
Start with a sheer base and cure. Sponge powder blue from the tip up to about 2/3 of the nail, leaving the cuticle clear. Cure. Apply tacky gel at the tip center and slightly down the nail in three narrow columns. Place silver chrome powder on those columns, then use a thin liner brush to stretch the chrome into drip shapes before sealing. Cure and finish with glossy top coat, keeping it thin so the drips stay crisp.
Editor's noteMake the drips uneven - two short, one slightly longer. Even drips look artificial.
Watch outAvoid thick chrome buildup - it turns into a chunky ridge that catches on sleeves.
12. Midnight Blue Ombre with Frosted Chrome Edge
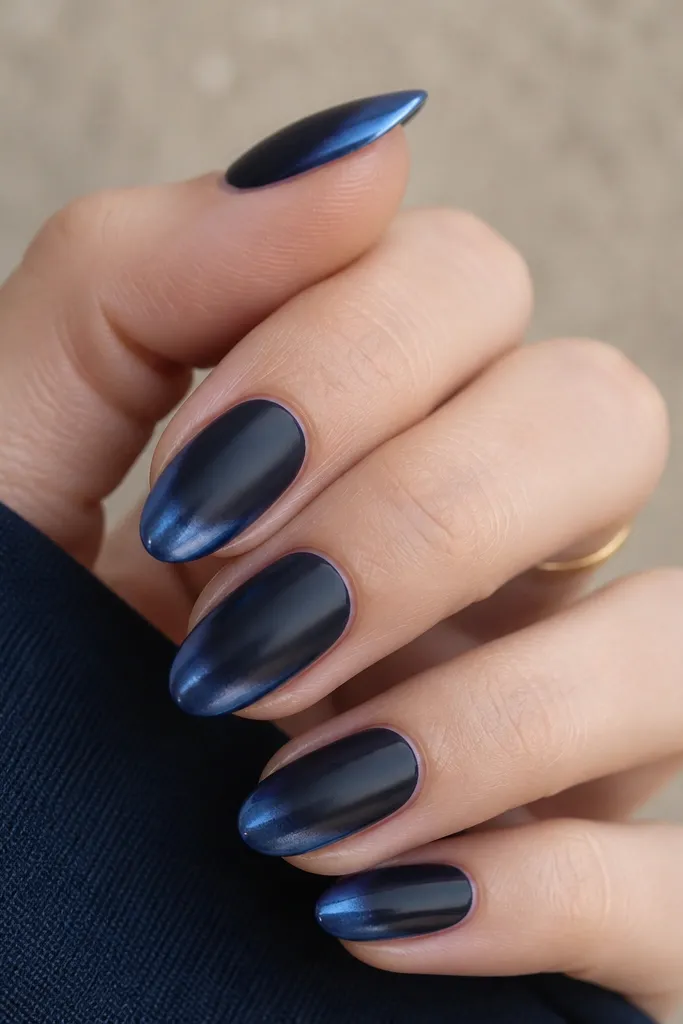
Edge chrome makes nails look tailored. The midnight blue ombre is smooth and deep, and the frosted chrome only sits on the outer edges and tip border, so it looks like a custom frame. I like it for short nails because it adds shine where your eye already lands - the edges. This is flattering on hands with thinner nail beds because the framing gives structure. It also hides tiny chips better because the chrome edge is less obvious when it wears.
Apply a base coat and cure. Sponge midnight blue from cuticle to tip, but keep the cuticle slightly lighter - like soft navy - so the ombre has depth. Cure. Apply tacky gel only along the outer edges and last 1-2 mm of the tip. Dust frosted blue chrome powder, then gently tap off excess from the center. Seal with glossy top coat over everything except the chrome edge if your product needs separate sealing - follow your gel's rule, then cure.
Editor's noteUse a small piece of foam to press chrome along the edge. Fingers smear and blur the outline.
Watch outDon't put chrome in the center - it makes short nails look flat instead of framed.
13. Baby Blue Ombre with Opal Chrome Overprint
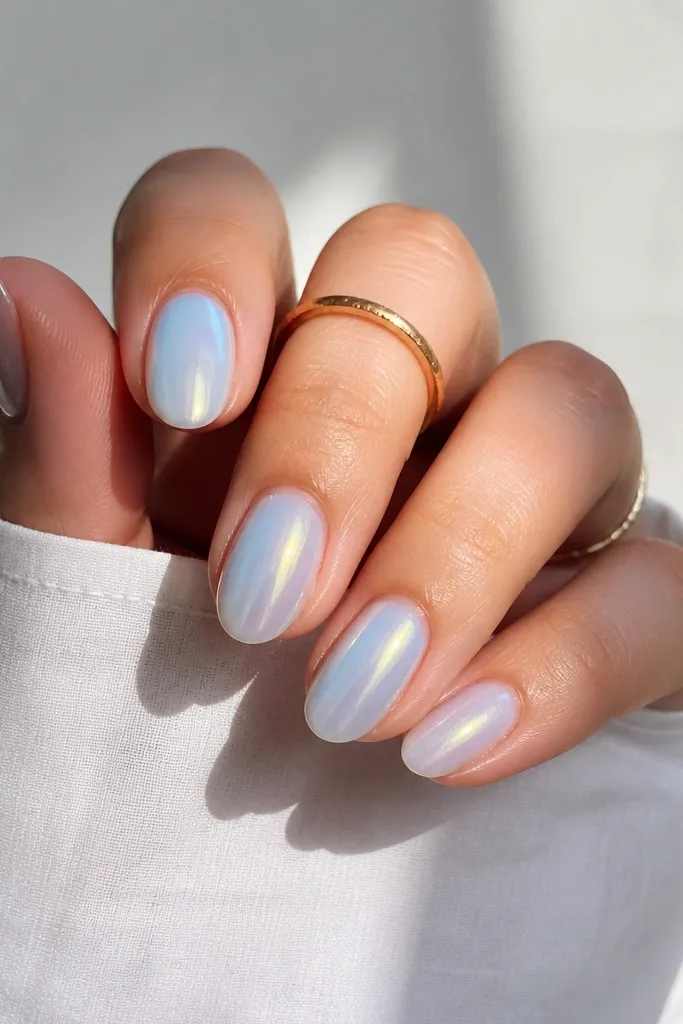
Opal chrome makes baby blue look like it's glowing from under the surface. The ombre is gentle: baby blue at the tip, milky clear near the cuticle. Then opal chrome is applied over the entire nail so the reflection shifts pink-lavender-green depending on the light. I wear this when I want something soft but still photo-ready. It flatters fair skin because it brightens, and it flatters medium skin because opal chrome adds dimension without looking harsh. It's also a great option if you don't want a super obvious "mirror" look.
Start with a milky base coat and cure. Sponge baby blue at the tip down into the nail, leaving the cuticle area clear. Cure. Apply tacky gel across the full nail - thin and even - then dust opal chrome powder all over. Press lightly, then seal with a glossy top coat. If you see dull spots, go back with a second micro-layer of tacky gel only on those spots, dust again, and seal.
Editor's noteSpray or dust opal chrome in two light passes. One heavy pass makes it look gritty.
Watch outAvoid using a matte top coat over opal chrome - it kills the shift effect.
14. Sky Blue Ombre with Starburst Chrome Lines
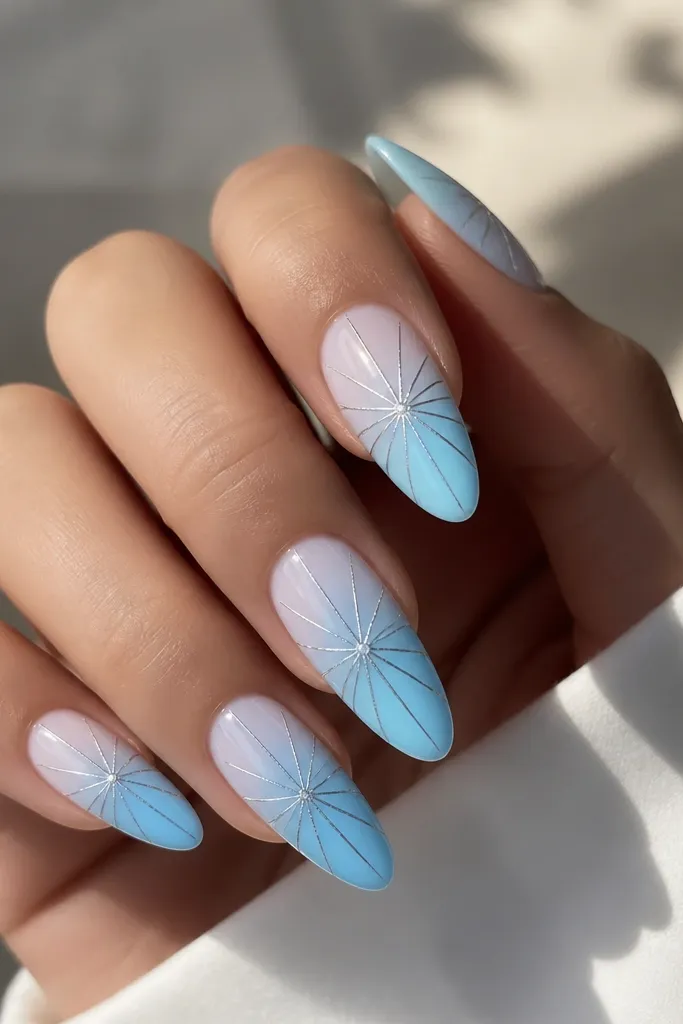
Starburst lines look like you planned them for hours, but they're quick once you have a steady hand. The sky blue ombre stays smooth and light, and the starburst lines in silver chrome add focal sparkle at the center. This makes hands look brighter because your eye lands in the middle of the nail. I like it for date nights because it catches flash from phone cameras. It also works on both fair and deeper skin tones since silver is neutral and sky blue stays clean.
Apply a base coat and cure. Sponge sky blue from the tip up to about 2/3 of the nail, leaving the cuticle near-clear. Cure. Add tacky gel in a small oval at the center of the nail where the starburst will sit. Use a fine brush to place 6-8 thin chrome lines that radiate outward, then cure. Dust or apply mirror chrome gel to the lines, brush off excess, and seal with glossy top coat.
Editor's noteKeep the starburst diameter small - about 3 mm. Big starbursts look like a sticker.
Watch outDon't rush the line edges - uneven lines make chrome look messy, not artsy.
15. Blue Ombre with Chrome Butterfly Wing Accent
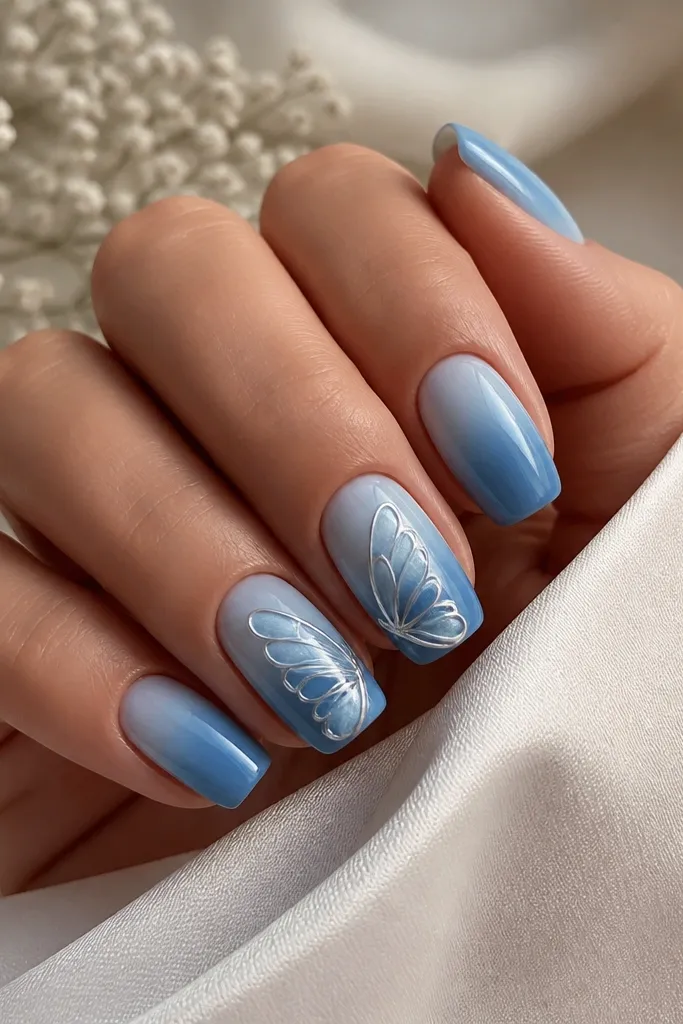
Butterfly wing accents add personality without covering every nail. The ombre gives you the consistent gradient, then the chrome wing shapes create a crisp focal point. I've found this looks best when the wing sits on the side of the nail and points toward the tip, not centered - it makes the nail look longer. This design flatters hands with short fingers because the diagonal wing creates vertical illusion. It also looks great at events where you want something playful but still polished.
Start with a sheer base and cure. Sponge a blue ombre that's slightly darker at the tip and lighter in the middle, keeping the cuticle about 2 mm clear. Cure. On accent nails only, apply tacky gel where the butterfly wing will sit - a diagonal wing shape about 5 mm wide. Place pale blue-silver chrome powder over the tacky gel, then seal with a thin glossy top coat. Finish by cleaning the sides with a small brush dipped in alcohol.
Editor's noteUse butterfly wing decals only if you can seal edges perfectly; otherwise freehand wing shapes look cleaner.
Watch outAvoid putting wing chrome on every nail - it stops looking like an accent and starts looking like clutter.
16. Teal-to-Rose Ombre with Blue Chrome Overcast
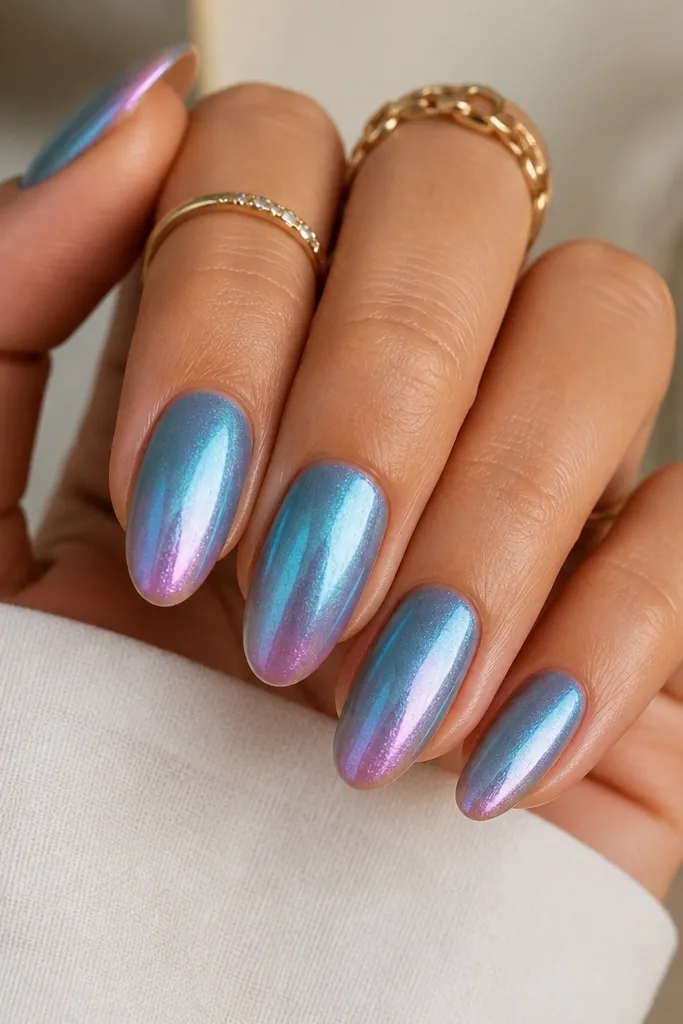
This is the color-mix combo that looks expensive because it has hidden contrast. The base gradient goes teal to a muted rose at the tip, then blue chrome overcasts it so you still read "blue" at first glance. Under light, you get a soft pink undertone peeking through the chrome - it makes people ask what polish you used. I love this on medium skin tones because the rose undertone warms the cool teal. It's also stunning for spring and summer because it feels fresh, not heavy.
Apply a base coat and cure. Sponge teal near the cuticle, then fade to a muted rose-pink at the tip. Cure and check the gradient in daylight. Apply tacky gel across the nail - thin enough that you still see the undertones - then dust blue chrome powder over everything. Press gently, remove excess, and seal with glossy top coat. Cap the free edge so the chrome holds through wear.
Editor's noteIf the rose gets too loud, reduce the rose area to the last 2-3 mm only.
Watch outAvoid using a bright magenta rose - it fights with blue chrome and looks messy.
17. Aqua Ombre with Iridescent Chrome Outline
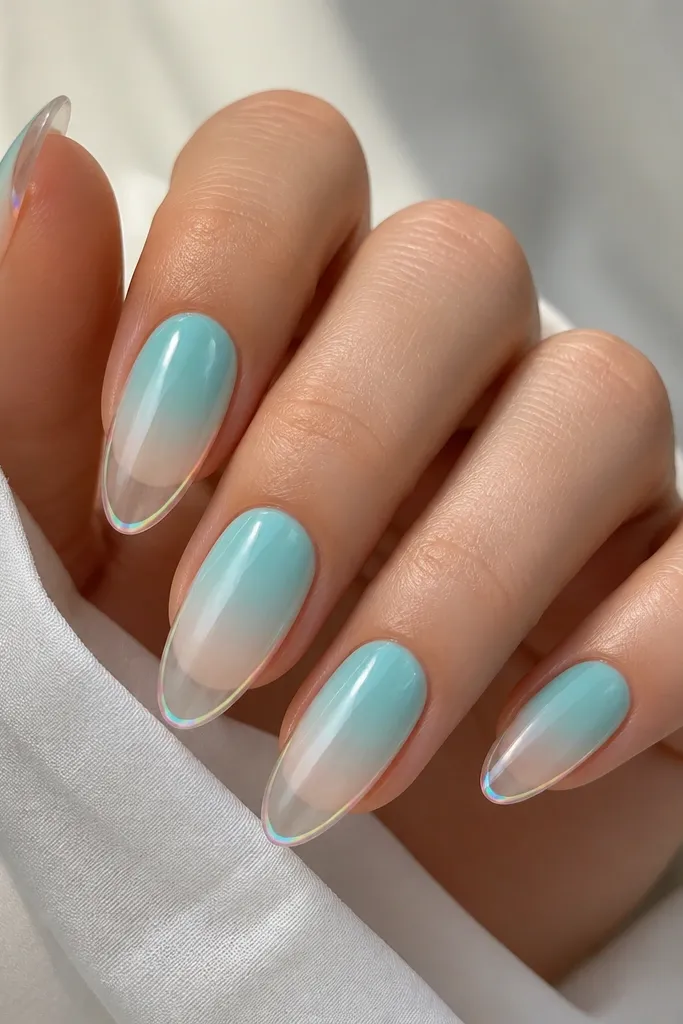
Outlines make nails look like they belong in a manicure magazine. The aqua ombre is light and breathable, then an iridescent chrome outline traces the perimeter so the nail looks sculpted. I prefer this on longer nails because the outline has room to show without crowding. It flatters hands with narrow nail beds because the outline makes the shape appear wider and more defined. Under light, the iridescence shifts between blue and pearl - it looks expensive even with minimal color.
Start with a sheer base and cure. Sponge aqua from the tip up to about 2/3 of the nail, leaving the cuticle area clear or very sheer. Cure. Use an ultra-fine liner brush to paint a thin outline with iridescent mirror chrome gel along the sidewalls and around the tip edge. Cure again. Seal with glossy top coat, and do a careful edge cap so the outline doesn't lift.
Editor's noteOutline the sides first, then connect at the tip. One continuous line reduces bumps.
Watch outAvoid thick outline gel - it raises the surface and makes the chrome wear unevenly.
18. Blue Ombre with Pearl Chrome Center Dot
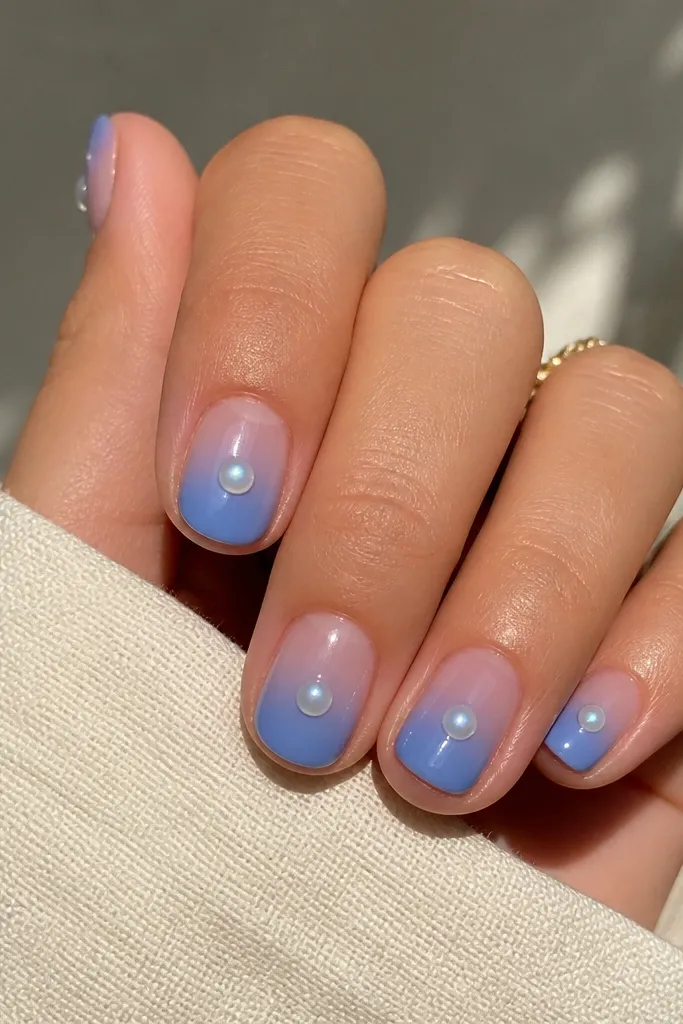
Pearl chrome dots are the fastest way to make ombre look intentional. The blue gradient is smooth and simple, and the dot adds a focal point that reads like a small jewel. I like this on short nails because dots break up the gradient and keep it from looking too plain. It also flatters hands that look better with soft details - the pearl chrome is bright but not mirror-sharp. For fair skin, the dot gives a clean highlight; for deeper skin, it adds contrast without needing extra color.
Apply a base coat and cure. Sponge blue ombre from tip to cuticle, keeping the cuticle sheer. Cure fully. Apply a tiny amount of tacky gel in the center of the nail, about 1 mm wide. Add pearl chrome powder by pressing with a small foam applicator, then seal with glossy top coat. Repeat on each nail, and cap the dot area with a very thin top coat so it doesn't pop off.
Editor's noteUse a toothpick to place the tacky gel - it keeps the dot perfectly round.
Watch outAvoid a big dot. If it's larger than 2 mm, it starts looking like a sticker.
19. Silver-Blue Ombre with Chrome Negative Space Half-Moon
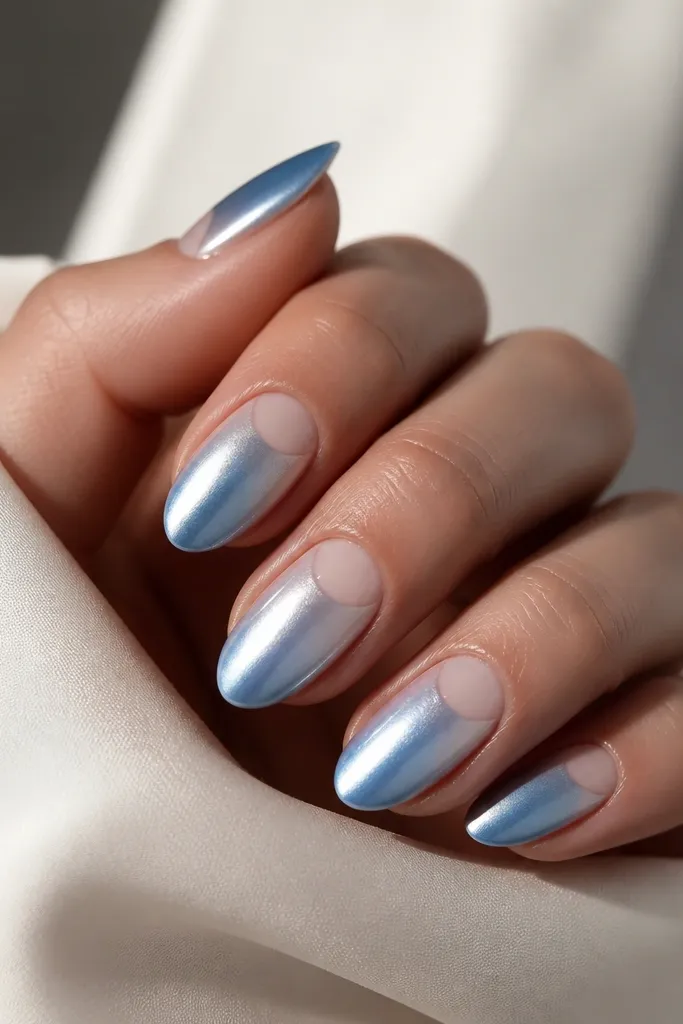
Negative space makes chrome look modern instead of heavy. The ombre runs in silver-blue tones, but you leave a clean half-moon at the cuticle so your nail bed shows through. Then chrome covers the rest, so you get reflection without losing that airy gap. This is flattering on almost every nail shape, especially almond, because the half-moon follows your cuticle curve. It also hides minor cuticle growth since the half-moon stays consistent when nails grow.
Start with a clear base coat and cure. Sponge silver-blue ombre over the nail but keep a half-moon cuticle area untouched - leave it about 2 mm tall. Cure. Apply tacky gel over the ombre area only, avoiding the negative space. Dust silver-blue chrome powder or apply mirror chrome gel over the tacky zone, then cure. Seal with glossy top coat, keeping the negative space clean and uncoated.
Editor's noteMask the half-moon with a small piece of tape if freehand feels shaky. Pull it off right after top coat application for a crisp edge.
Watch outDon't flood the cuticle area with chrome gel. Any slip into the negative space ruins the look.
20. Blue Ombre with Chrome Marble Vein Overprint
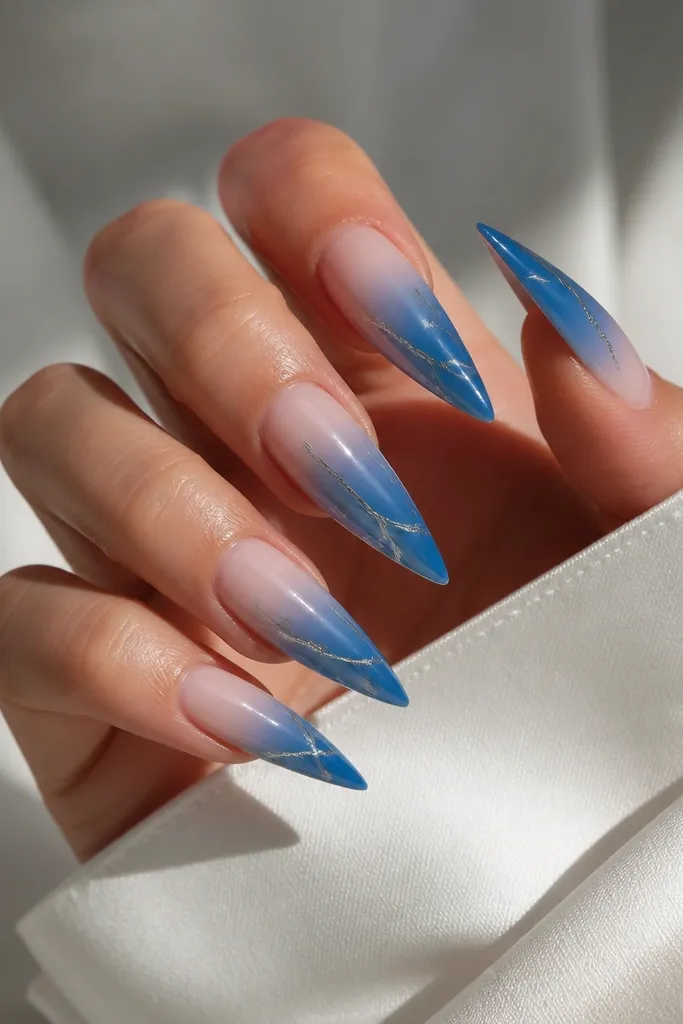
Marble veins make ombre look like actual stone. The blue gradient provides the depth, and the chrome veins add movement and sparkle. I like this on stiletto and long almond because the diagonal veins look natural along the nail's length. It flatters hands with strong nail shape because the veins emphasize the structure. The marble effect also hides tiny streaks in the ombre - your eye reads stone, not blending.
Apply a base coat and cure. Sponge a blue ombre with two shades: a mid-blue in the middle and deeper blue at the tips, leaving the cuticle sheer. Cure. Apply a thin layer of clear gel, then draw thin vein lines with silver chrome gel or striping gel - 3-5 veins per nail. Cure, then dust silver chrome powder over the veins if needed for extra reflection. Seal with glossy top coat and cap the tips.
Editor's noteKeep veins thinner at the cuticle and slightly thicker near the tip. It mimics real marble flow.
Watch outAvoid big thick veins - they turn into chrome stickers instead of marble.
21. Aqua Ombre with Chrome Triangle Accent at the Tip
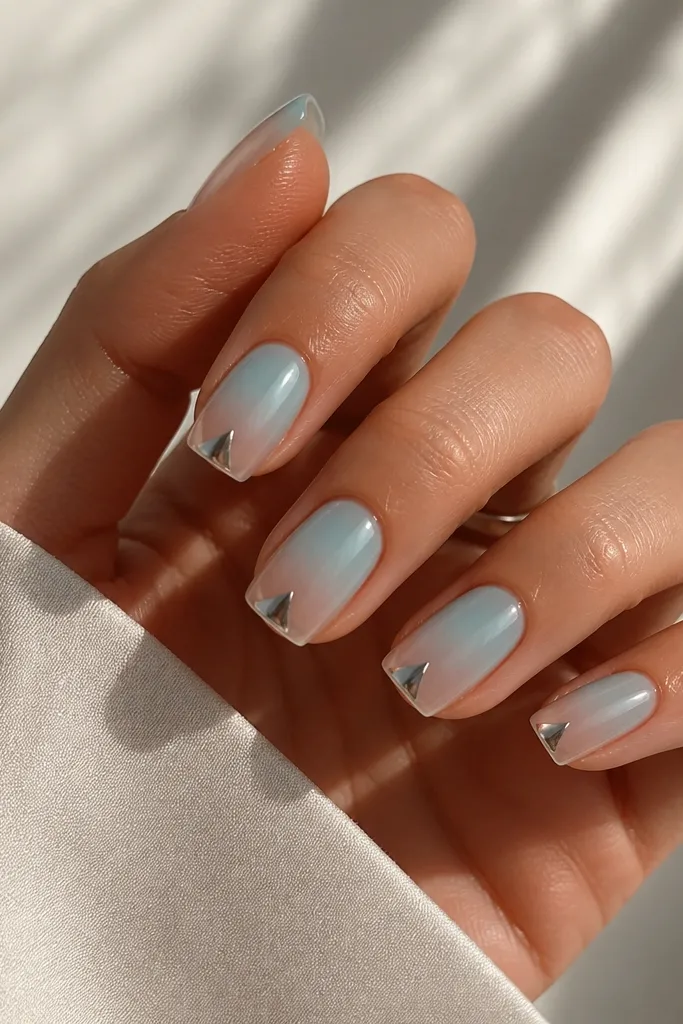
Triangles are clean and graphic, and that helps chrome look modern. The aqua ombre is soft and light, and the chrome triangle gives a sharp focal point that makes the whole manicure look designed. I've found this works on both short and medium nails because the triangle sits in the tip zone without taking over the nail bed. It's flattering if your nails are slightly wider, since the triangle draws the eye to the center. Under light, the mirror shine makes it look like a tiny piece of metal art.
Prep and apply a base coat, cure. Sponge aqua from the tip up to about 2/3 of the nail, leaving the cuticle sheer. Cure. Mark the triangle with a dot at the center of the tip and two dots about 2 mm left and right - then connect them with a fine brush using mirror chrome gel. Cure, then top coat with a chrome-safe glossy finish. Clean around the edges so the triangle stays crisp.
Editor's noteUse a nail guide card under your hand so your triangle edges stay symmetrical.
Watch outAvoid a triangle that reaches too far down the nail. Keep it in the last 2 mm for the best balance.
22. Blue Ombre with Chrome Halo Stars on Accent Nails
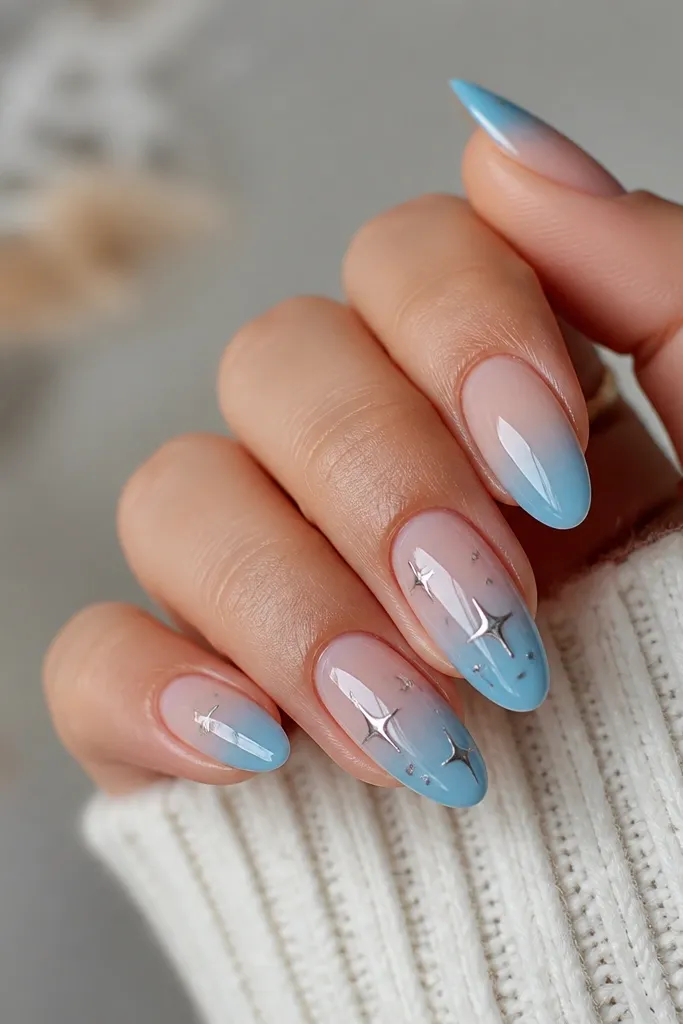
This is the "cute but not childish" version. The deep blue ombre gives you the dramatic gradient, and the small chrome star halo adds sparkle where the eye naturally rests - around the center. I like it for birthdays or holiday parties because it reads festive without being glitter overload. It flatters fair to medium skin since silver chrome brightens the nail bed. The star halo also looks good in photos because it reflects from multiple angles.
Apply a base coat and cure. Sponge deep blue at the tips fading into sheer at the cuticle, keeping the darkest area about 2-3 mm. Cure. On accent nails only, apply tacky gel around the center in a small ring shape, then press tiny star-shaped chrome pieces into the tacky gel. If you don't have star pieces, draw stars with chrome gel and dust silver powder. Seal with glossy top coat and cap the free edge.
Editor's noteUse only two accent nails. More stars makes it look like a sticker sheet.
Watch outAvoid thick halo rings. A wide ring looks like a donut instead of a delicate frame.
23. Cyan Ombre with Chrome Lip Gloss Shine on Tips
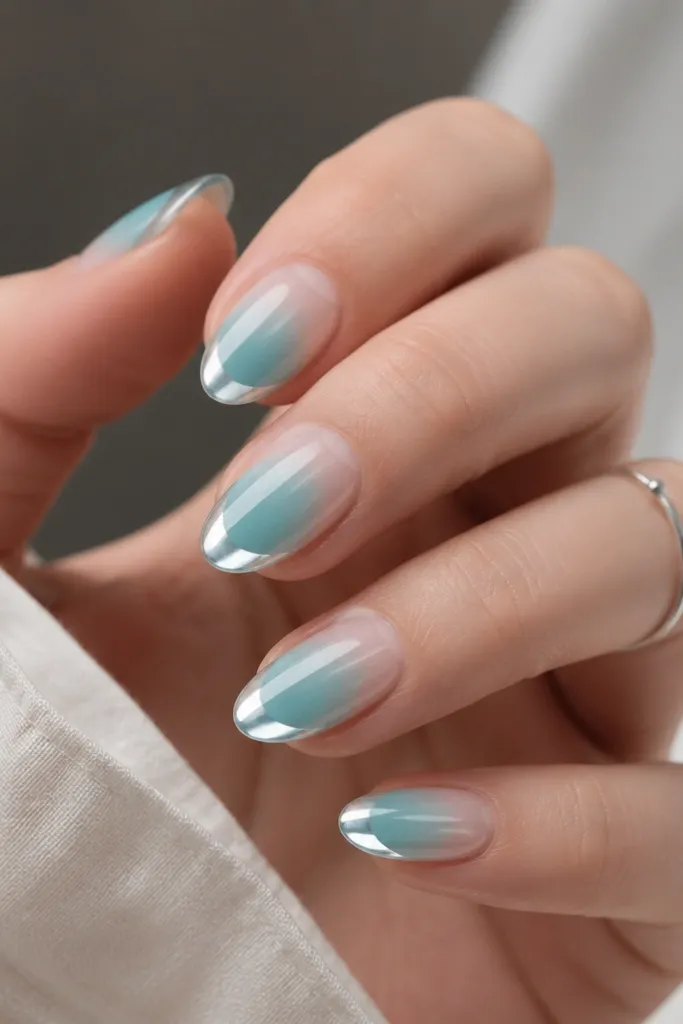
This design looks like the chrome is sealed under a thick gloss, even though it's simple. The ombre is cyan to milky clear, which keeps it fresh and bright. Then you apply mirror chrome gel as a thin band across the tip - like a lip gloss swipe - so it's glossy and reflective at the edge. I like this for everyday wear because it's subtle until you move your hands. It flatters all skin tones because cyan is clean, and the tip band makes nails look tidy.
Start with a milky base coat and cure. Sponge cyan at the tip up to about 1/2 the nail, leaving the cuticle 2 mm lighter. Cure. Apply mirror chrome gel in a thin horizontal band across the tip, about 1.5-2 mm tall, and cure. Seal with one glossy top coat, then cap the free edge with a thin layer so the chrome doesn't wear first.
Editor's noteKeep the chrome band straight. A curved band can look uneven on short nails.
Watch outAvoid stacking multiple chrome layers on the tip band. It makes the surface too thick and catches lint.
24. Navy Ombre with Blue Chrome Sidewalls
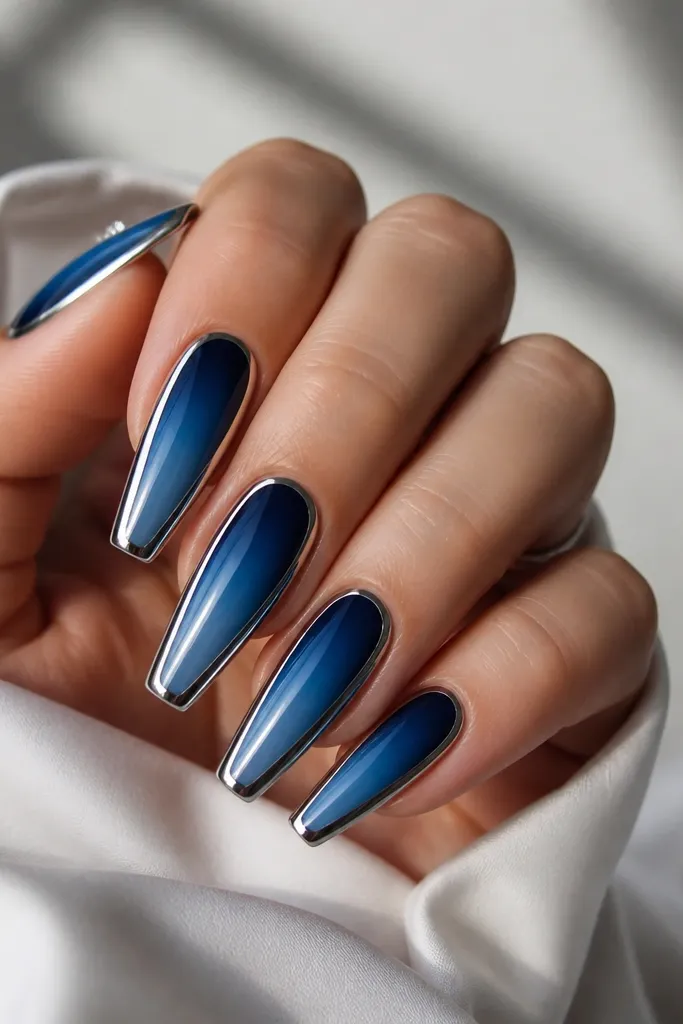
Sidewall chrome gives you a sleek, architectural look. The navy ombre stays deep and smooth in the center, while the chrome along the sidewalls adds a bright frame that makes your nails look sharper. I like this on long coffin nails because the sidewalls are easy to define and the chrome catches light as you move. It flatters hands with slightly flat nail beds because the side framing adds dimension. It also works well if you want chrome but hate the look of full coverage.
Prep and apply base coat, cure. Sponge navy near the cuticle fading into mid-blue at the tip, then cure. Apply tacky gel only on the left and right sidewalls - keep it narrow, about 1 mm from the edge. Dust or apply blue mirror chrome gel along those side lines, then cure. Seal with glossy top coat, and clean any chrome that touches the skin with a cotton bud dipped in alcohol.
Editor's noteUse gel polish striping tape to mask the sidewalls if you want ultra-clean lines.
Watch outDon't let sidewall chrome creep onto the center. That's what makes it look cheap instead of framed.
25. Glacier Blue Ombre with Chrome Waterline
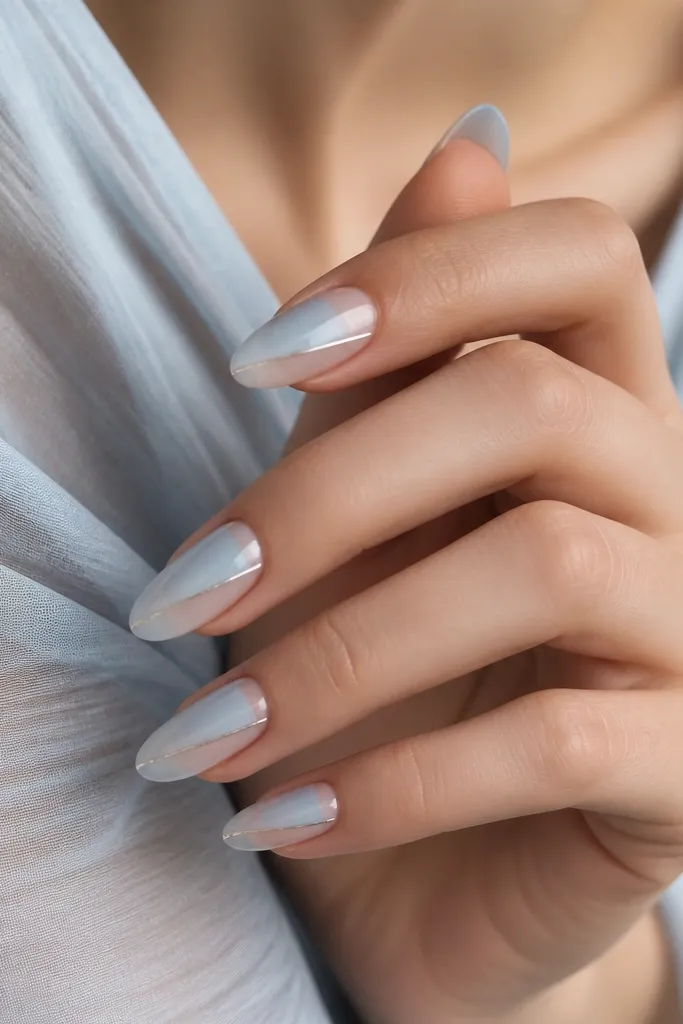
A waterline chrome creates the illusion of depth, like the nail has a glass layer. The glacier blue ombre is pale and cool, fading down into clear at the cuticle. The chrome line sits around the middle, so it acts like a visual divider that makes the nail look longer. I've worn this with minimal jewelry and it still looks intentional. It's flattering on short almond nails because the line adds structure without needing length.
Apply base coat and cure. Sponge glacier blue from the tip down to the cuticle, but keep it sheer near the base. Cure. Apply tacky gel in a thin horizontal strip around the middle of the nail, about 2 mm tall. Dust mirror chrome powder or apply chrome gel to that strip, press lightly, and cure. Seal with glossy top coat, and cap the strip edges so it doesn't lift.
Editor's notePlace the waterline slightly above the center for most nail shapes. It looks more elongated.
Watch outAvoid placing the chrome line too close to the cuticle. It can make nails look short.