1. Champagne-to-Ivory Mirror Fade
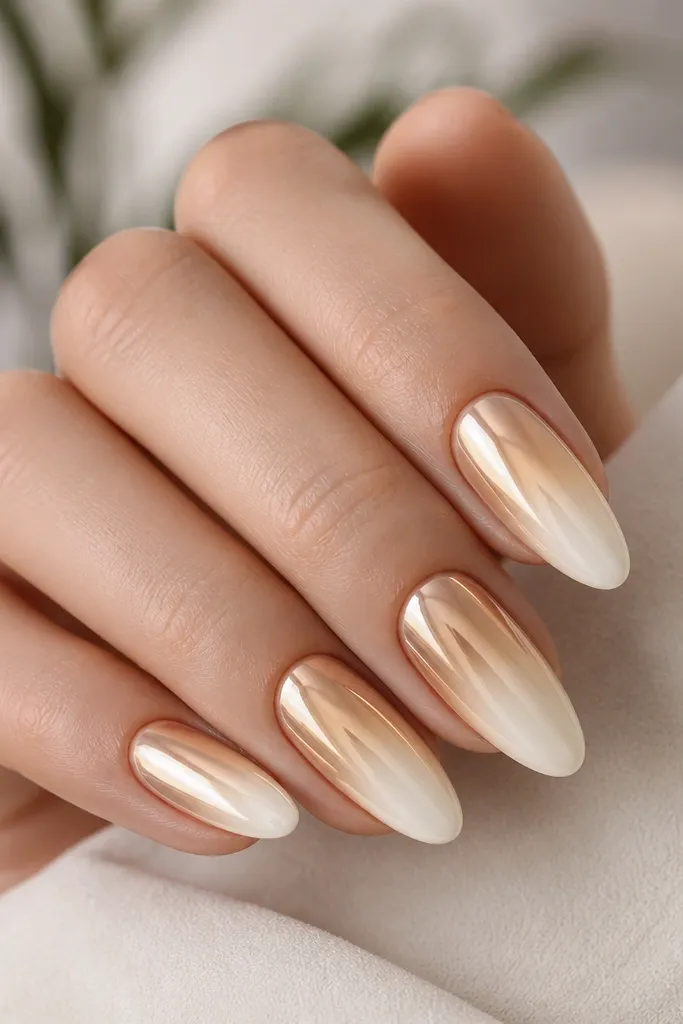
Start with a champagne nude gel that matches the warmth of your skin, then fade it into ivory at the free edge. The trick is that the center stays opaque - you want the chrome to reflect a bright, clean base. This set flatters most skin tones because it reads neutral-warm, not yellow or pink. On short squoval nails, the fade makes your nail bed look longer; on almonds, it looks like a glossy highlight across the curve. I love it for weddings, date nights, and any time you want "expensive" without glitter.
File and buff to a smooth matte, then apply a thin base coat and cure. Sponge-ombre champagne gel from the cuticle down about two-thirds, then blend ivory gel from the middle to the tip and feather the join with a clean sponge. Cure each layer, then apply chrome powder over the tacky foil gel or chrome gel base in a full coverage mirror. Finish with a high-shine top coat that stays mirror-friendly and cure fully.
Editor's noteUse a slightly warmer ivory than you think - pure white can look chalky under mirror chrome.
Watch outDon't put chrome over a streaky ombre; the mirror will show every ridge.
2. Rose Quartz Ombre with Pink Chrome Tips
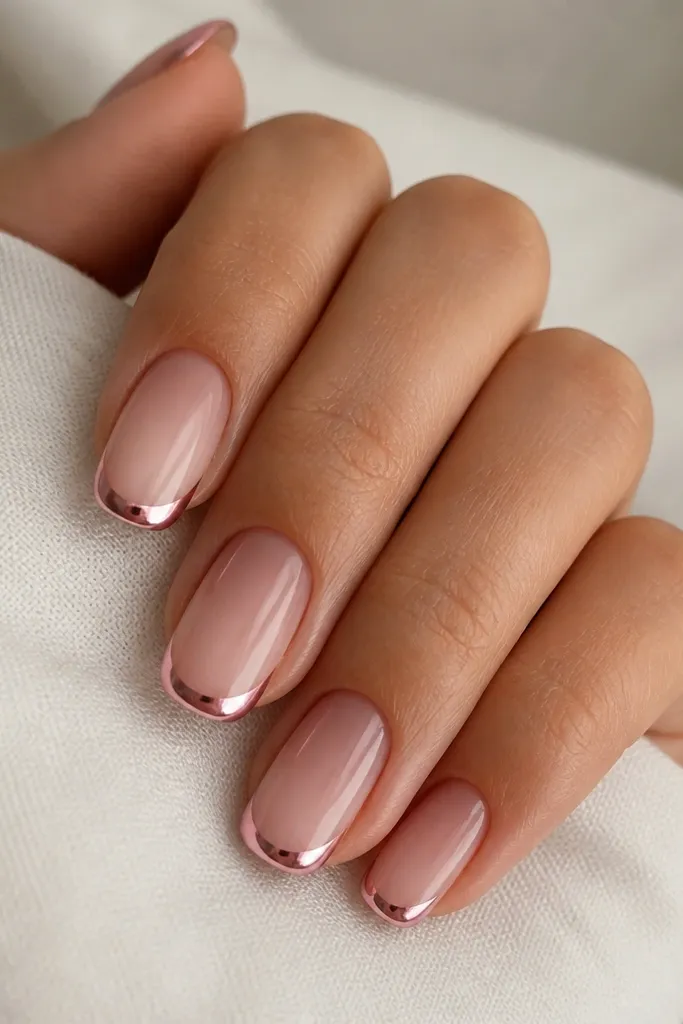
This design keeps the ombre soft and feminine, then adds chrome only where the light hits first - the tip. The rose quartz fade looks great on fair to medium skin because it mimics natural nail glow, and it still works on deeper skin when you use richer rose rather than pastel. The chrome tips make the nails look sharper and more "styled" than a full mirror set. For oval and almond shapes, the tip placement follows the natural highlight line of your nail. It's a perfect choice for everyday luxe because it doesn't scream for attention.
Create the ombre by painting dusty rose at the cuticle, then blending into pale blush about one millimeter before the free edge. Cure, then take a thin liner brush to refine the fade so it looks like one smooth gradient. Apply chrome gel to the last 20-30% of the nail length, starting slightly off-center so the fade stays visible behind it. Press pink chrome powder onto the chrome gel, wipe lightly, then seal with a glossy top coat.
Editor's noteKeep the chrome boundary curved - a straight edge makes it look like a sticker.
Watch outSkip full coverage chrome here; it ruins the soft rose effect and can look heavy.
3. Icy Lilac Fade into Silver Mirror
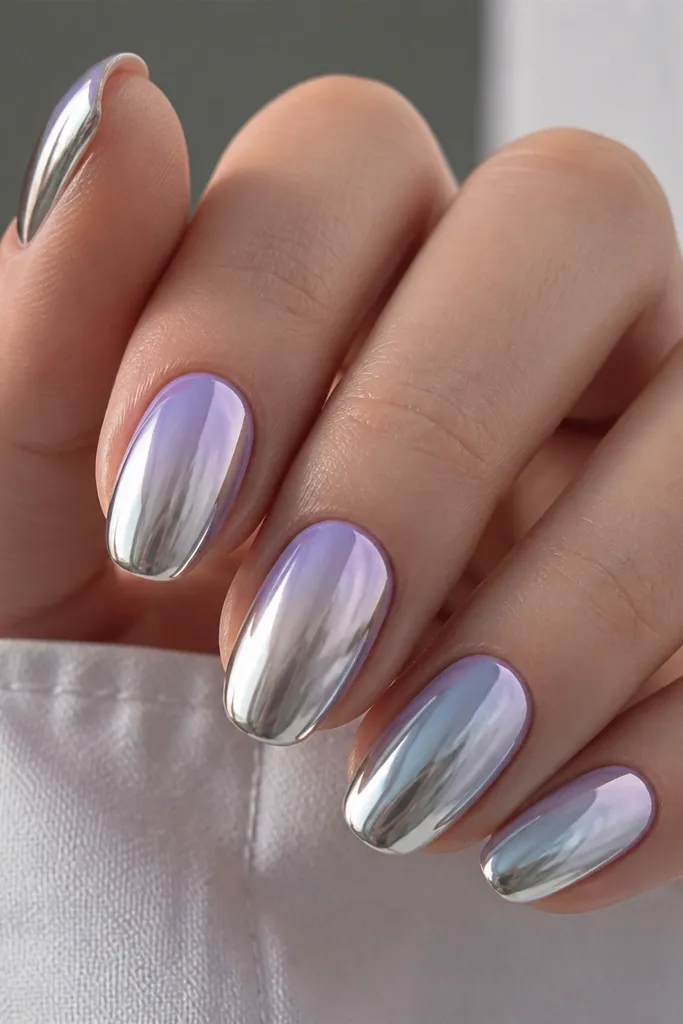
Cool ombres look especially luxe under silver chrome because the reflection stays crisp instead of turning muddy. I use icy lilac for the base and fade it toward almost sheer at the tips, but I keep the first third opaque so the nail doesn't look patchy. This flatters fair, cool-toned, and neutral skin because it reads like frosted glass. On medium-length nails, the near-clear tip makes the whole set look airy. If you wear silver jewelry a lot, this set matches without trying.
Apply a sheer base gel, then sponge icy lilac from cuticle to mid-nail and blend toward a sheer lilac at the tip. Cure and check under a lamp for any gray spots; fix those with a thin, opaque lilac layer only where needed. Apply silver chrome gel across the entire nail and cure to the tacky stage your system needs. Rub silver chrome powder in firmly, buff off excess, then top coat with a mirror-safe glossy finish.
Editor's noteIf your tips look too transparent, add a whisper-thin lilac layer before chrome so the fade stays smooth.
Watch outDon't use warm nude shades under silver chrome; it pulls the gradient toward gray.
4. Peachy Nude Ombre with Gold Chrome Half-Moons
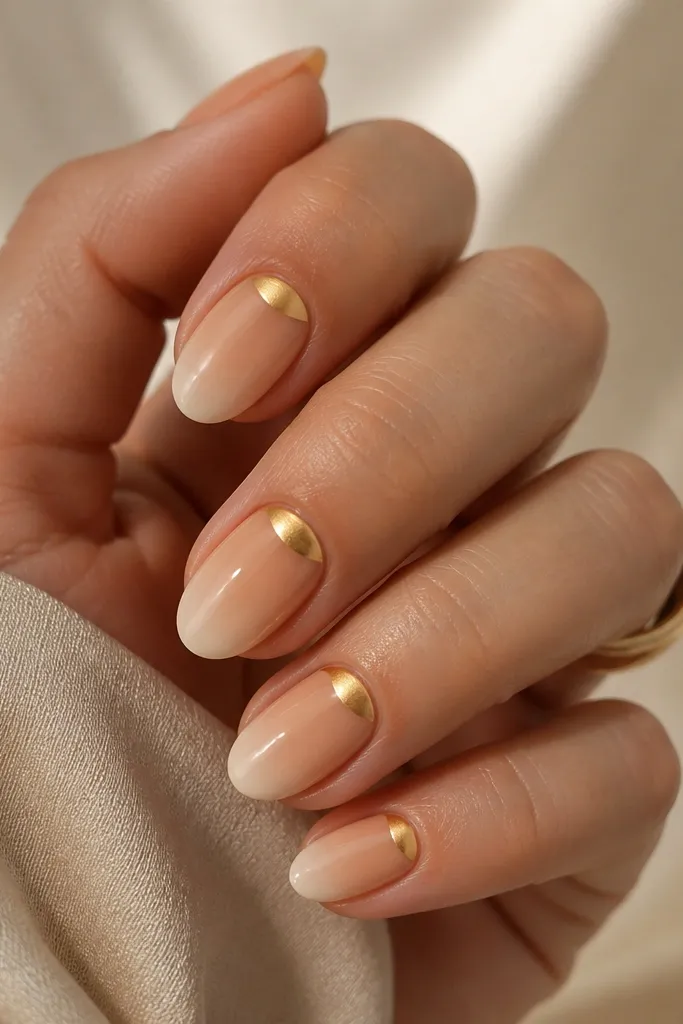
This is my go-to when you want chrome but hate full mirror sets. The ombre stays skin-like and flattering, while the gold chrome half-moon at the cuticle creates that jewelry effect without covering everything. It looks amazing on short nails because the chrome band visually "frames" the nail bed. Peachy nudes also look good across skin tones when you pick the undertone - more apricot for warm, more rose-peach for neutral. It's a strong choice for brunch, office days, and photos where you want subtle shine.
Paint a peach nude base from cuticle down to about two-thirds, then blend to creamy beige at the tips and cure. Take a small cuticle brush and paint gold chrome gel in a neat half-moon from one sidewall to the other, staying about 1-2 mm away from the side edges. Apply gold chrome powder, press gently, then remove excess with a soft brush. Seal with a glossy top coat, keeping the half-moon crisp.
Editor's noteMake the half-moon slightly higher than your cuticle line - it lifts the look.
Watch outDon't let gold chrome touch the sidewalls; it makes the set look messy fast.
5. Caramel-to-Mocha Ombre with Copper Chrome
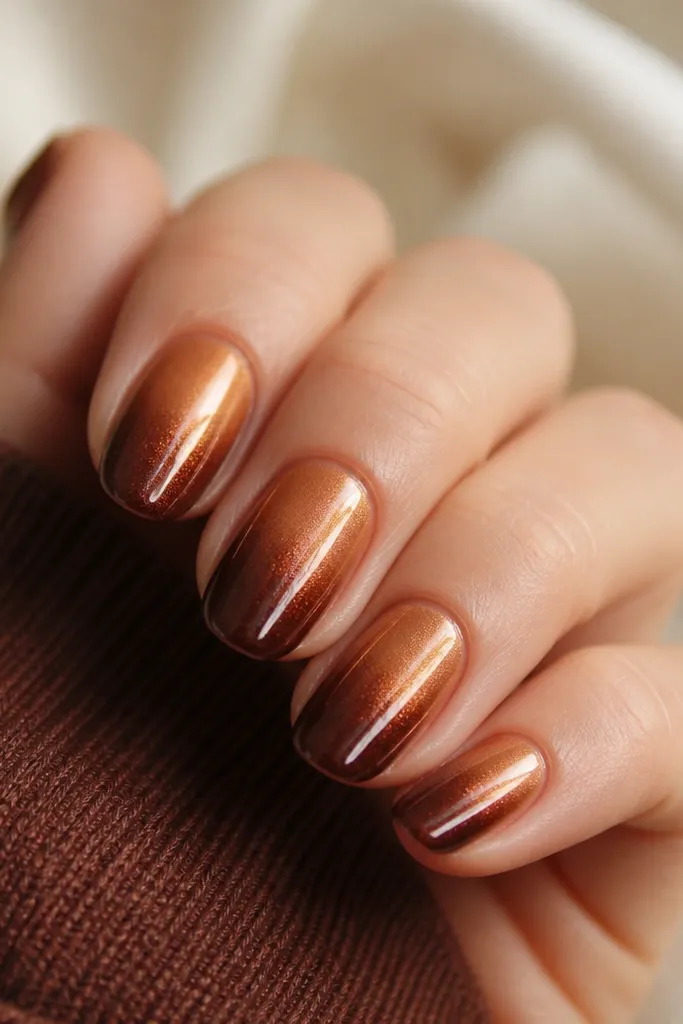
Warm browns under copper chrome look like caramelized sugar under a spotlight. I use caramel near the cuticle and fade into mocha so the gradient has depth instead of looking flat. This set is especially flattering on medium to deep skin tones because the warm metals don't fight your undertone. On long almond nails, the fade looks like a smooth glaze; on shorter nails, it still reads luxe because the copper reflection adds dimension. Wear it with gold-toned rings and warm-toned lip colors.
Sponge caramel gel from cuticle to mid-nail, then blend mocha gel from mid-nail to the tips. Cure and add a second thin layer if the ombre looks uneven under direct light. Apply copper chrome gel over the full nail, cure to tacky, then press copper chrome powder until it's evenly mirrored. Top coat with a glossy finish that doesn't dull copper and cure fully.
Editor's noteIf copper looks too orange, mix in a touch more brown in your ombre so the fade stays refined.
Watch outAvoid using a red-brown base with copper chrome - it can look muddy and cheap.
6. Black Cherry Fade into Deep Plum Chrome
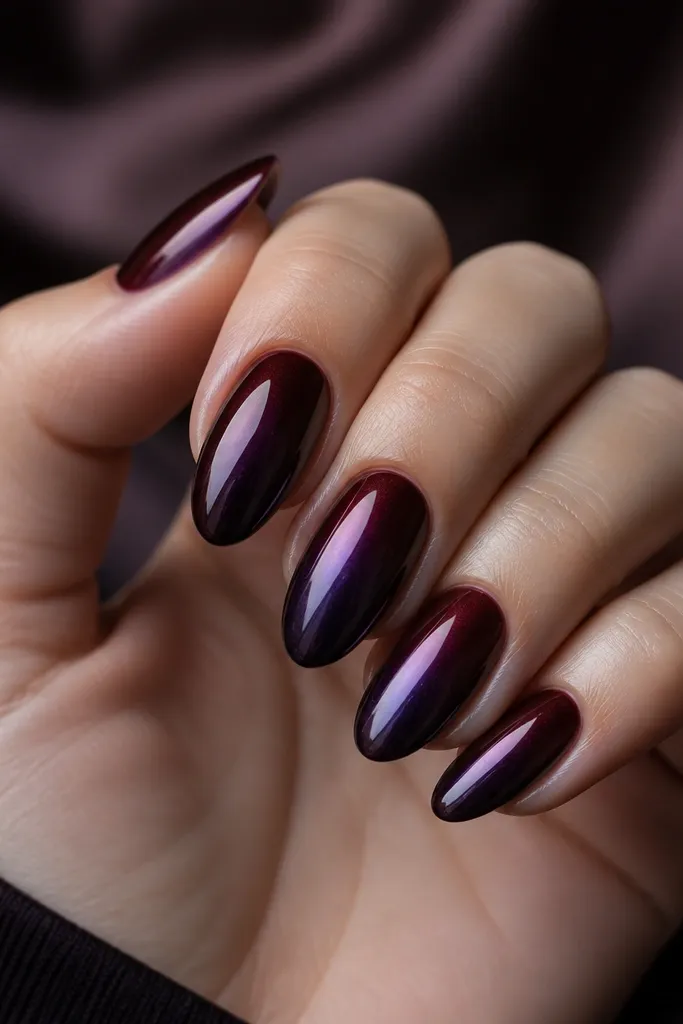
Dark ombres can look luxe when they stay glossy and clean, not smoky. Black cherry near the cuticle gives you that depth, and a plum fade keeps the gradient smooth rather than turning into a single flat color. I like this on almond and stiletto because the chrome reflection follows the nail's curve. It flatters most skin tones, but it's stunning on deeper skin where the purple undertone pops. This is your "night out" set - it looks incredible under club lighting and candlelight.
Paint black cherry gel at the cuticle and blend into deep plum about two-thirds down. Use a brush to feather the join so there's no hard line. Cure, then apply plum chrome gel from cuticle to tip for full coverage mirror. Press plum chrome powder, buff off excess, and seal with a glossy top coat that keeps the mirror finish sharp.
Editor's noteKeep your base gel opaque; sheer dark bases can look patchy once chrome reflects light.
Watch outDon't skip a good top coat; without it, dark chrome can look grainy.
7. Milky White Ombre with Silver Chrome Cloud Tips
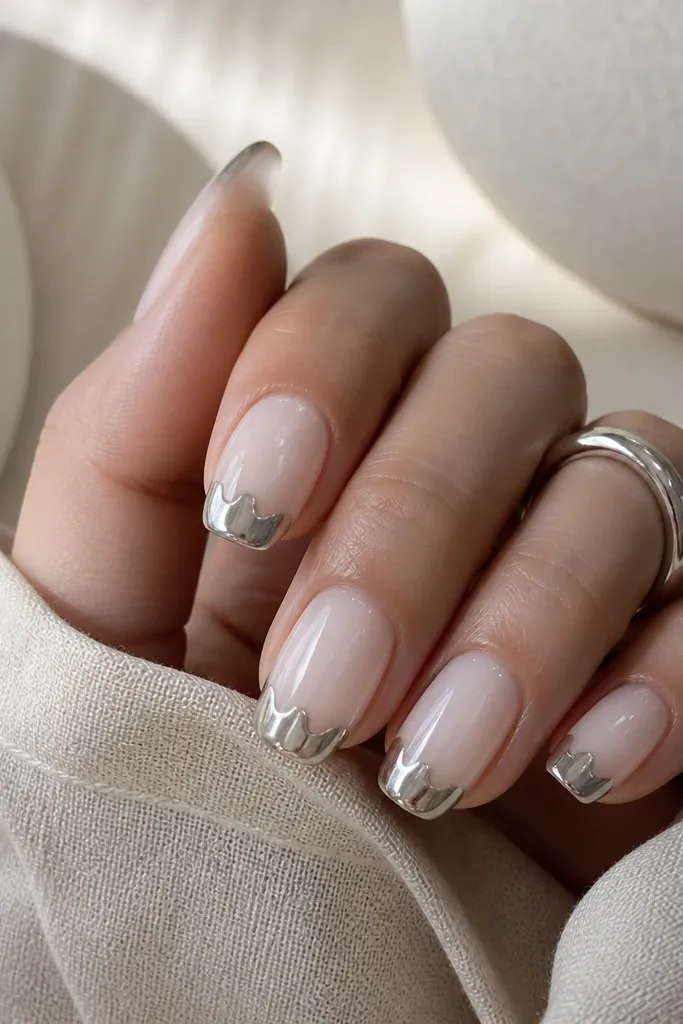
Milky white ombres look clean and expensive because they mimic "glazed" nails, and silver chrome turns them into a winter highlight. The key is that the fade should go toward clear, not gray. Cloud-shaped chrome tips look playful but still polished because the edges are feathered. This is flattering on short oval and squoval nails because the clear tip keeps nails from looking bulky. If you want something that works with everything, this is it.
Apply milky white gel at the cuticle and sponge it to the mid-nail, then blend toward a clear gel at the tips and cure. For the chrome, paint chrome gel only on the tip, then use a small sponge to rough up the edge so it looks like a soft cloud. Press silver chrome powder into that tacky zone, wipe gently, and cure. Finish with a glossy top coat that doesn't blur chrome.
Editor's noteUse a slightly thicker clear gel at the tip so the gradient doesn't vanish under chrome.
Watch outDon't make the chrome tip too wide; if it reaches halfway up the nail, it stops looking airy.
8. Teal Sea Glass Ombre with Aurora Chrome Flecks
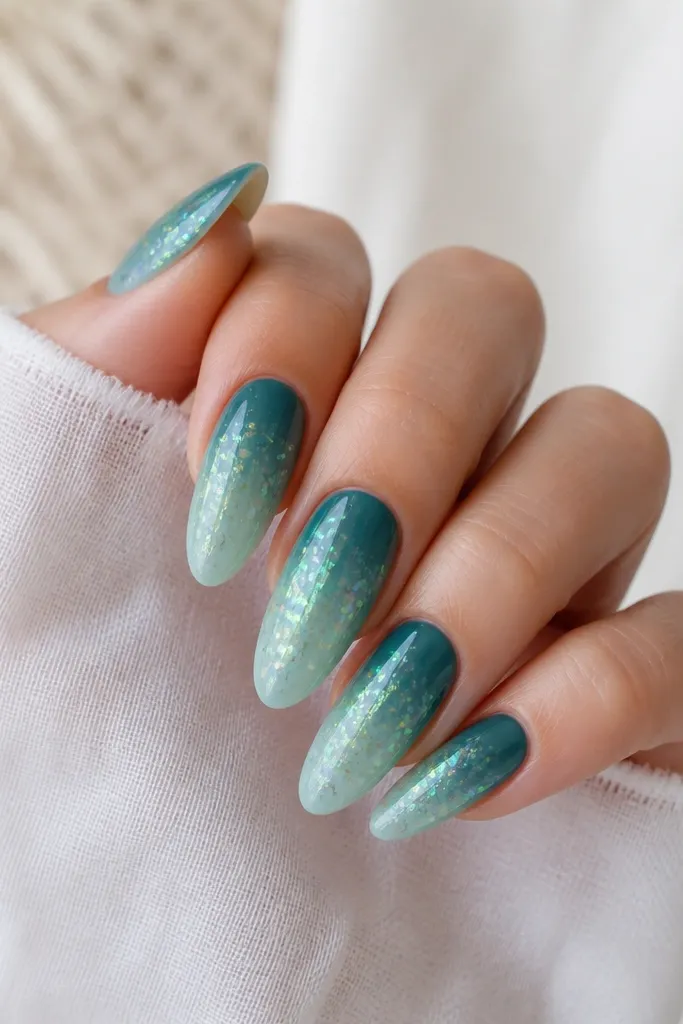
Sea glass colors look like they were poured, and aurora chrome flecks add that "moving" light effect without going full mirror. I do a teal-to-aqua ombre that stays translucent at the tips but not patchy. The aurora flecks look best on medium almond because there's enough surface for the light to catch. This set flatters cool-toned skin and looks amazing with silver or icy jewelry. It's also a great choice when you want chrome texture without committing to a full chrome look.
Sponge teal gel near the cuticle and blend into pale aqua toward the tips, curing between layers if needed for opacity. Apply a thin chrome base gel only to the middle and upper tip - not the whole nail. Press aurora chrome powder (or mix aurora flakes) lightly so it lands as flecks instead of full coverage. Seal with a glossy top coat, keeping the flecks intact by using gentle pressure when top coating.
Editor's noteTap off excess chrome powder over a paper towel so you control how sparse the flecks look.
Watch outDon't over-press aurora chrome; it turns from speckled to flat coverage.
9. Violet-to-Blue Ombre with Iridescent Chrome Overlay
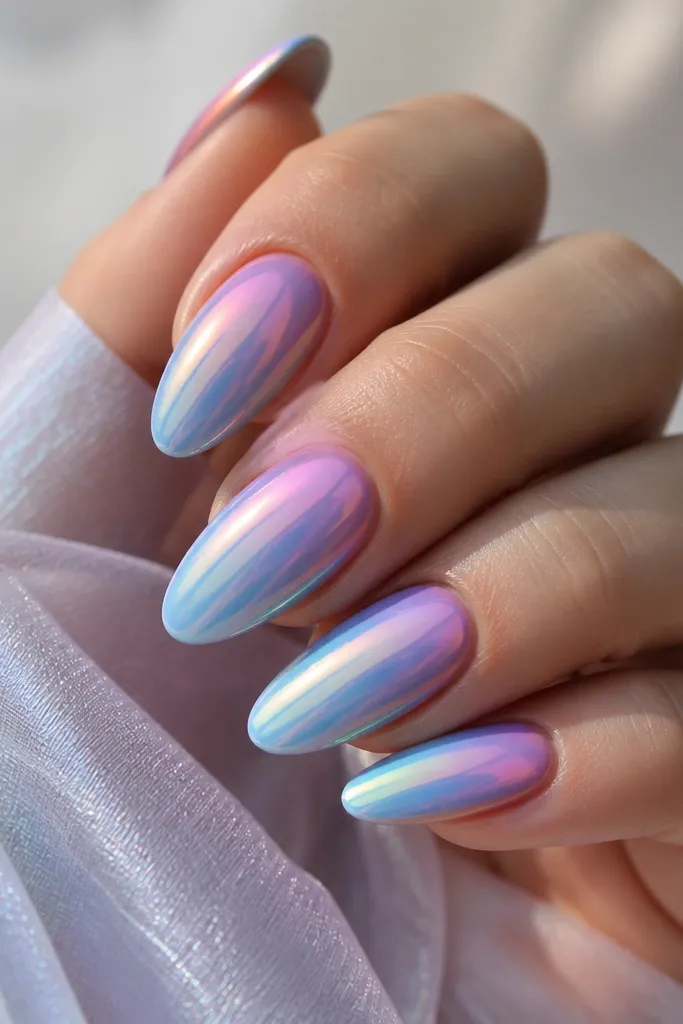
Iridescent chrome is the secret weapon for ombres because it changes color as you move, so the gradient feels alive. I build a violet-to-blue ombre first, then apply an iridescent chrome overlay so the base colors peek through. It flatters anyone who likes bold nails but doesn't want one flat shade. On almond nails, the color shift follows the nail curve and looks extra luxe in motion. This set is perfect for festivals, vacations, and any time you want a "wow" that's still smooth and wearable.
Paint violet gel at the cuticle and blend into royal blue at the tips using a sponge for a soft gradient. Cure and add a second thin layer if the violet-to-blue line looks too thin. Apply iridescent chrome gel over the entire nail, then press iridescent chrome powder until it looks evenly reflective. Wipe and seal with a high-gloss top coat that keeps iridescence from dulling.
Editor's noteAngle the nails under a lamp before top coat; if you see dull patches, press chrome once more before sealing.
Watch outDon't use a thick gel base under iridescent chrome; it can mute the color shift.
10. Nude Ombre with Mirror Chrome Stiletto Tip
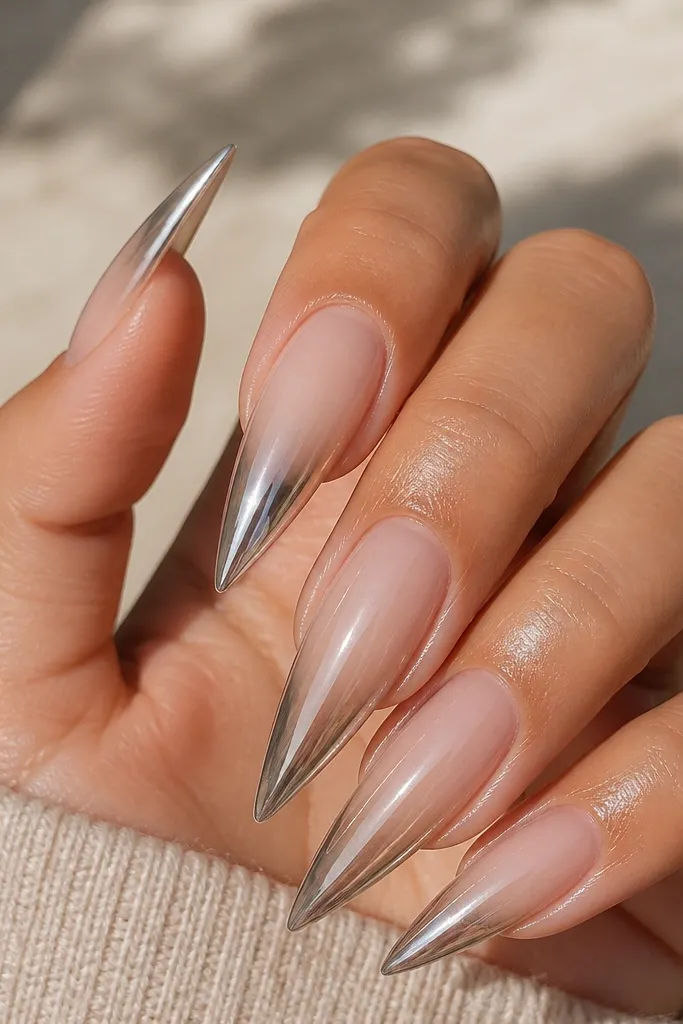
This design feels creative because the chrome is shaped, not just painted. I use a nude-to-pale nude ombre so your base looks clean, then I place mirror chrome only on the tip in a stiletto triangle. It's dramatic on long almond or stiletto nails and still flattering because the ombre keeps the nail bed looking natural. This also looks great on hands with shorter fingers because the sharp tip shape creates a length illusion. Pair it with minimal jewelry so the nail shape does the talking.
Apply skin-toned nude gel from cuticle down and blend to a paler nude at the tips, curing. Use a striping brush to outline a triangle at the very tip, then fill it with chrome gel only inside the lines. Press mirror chrome powder into the triangle, wipe excess, and cure. Finish with glossy top coat over the whole nail, but keep the triangle edges crisp by not dragging the brush across them.
Editor's noteMake the triangle slightly wider on the free edge than you think - it looks sharper on camera.
Watch outAvoid sloppy triangle edges; uneven lines read like nail art stickers.
11. White-to-Gray Ombre with Chrome Halo Cuticles
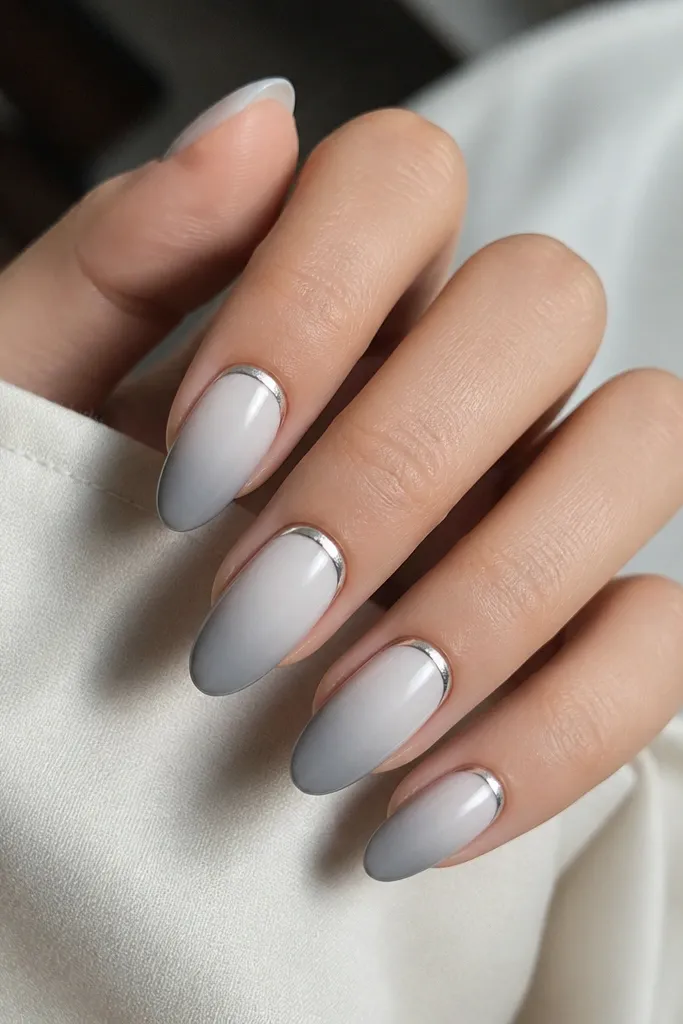
A gray-tinged ombre can look sleek instead of dull when you keep it cool and glossy. This set uses white at the base and fades into cool gray at the tips, then adds a thin silver chrome halo around the cuticle. The halo makes the nail bed look framed, which is flattering on most hand shapes. I like it for medium length nails because the halo has enough space to look intentional. It's a great "work dinner" look - polished without being loud.
Blend white gel at the cuticle into cool gray gel toward the tips using a sponge, then cure. Paint a thin ring of chrome gel around the cuticle with a dotting tool, leaving a small gap from the sidewalls. Press silver chrome powder onto the ring, then lightly brush off excess. Seal with a glossy top coat, careful not to flood the ring so it stays crisp.
Editor's noteKeep the halo ring thinner on thumb nails; it looks cleaner and more balanced.
Watch outDon't apply chrome gel too close to the skin; flooding causes lifting and dullness.
12. Emerald-to-Black Ombre with Green Mirror Chrome Full Set
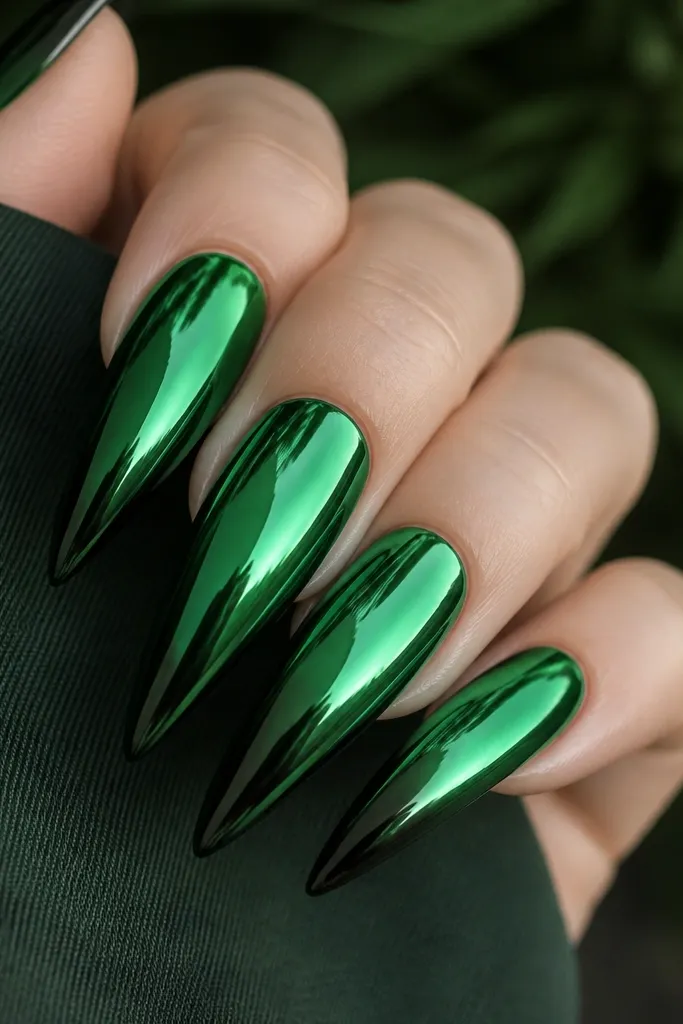
Green mirror chrome on an emerald-to-black fade looks like high-end glass with depth. The emerald near the cuticle gives brightness, while the near-black tips keep it grounded so it doesn't look too bright. This is a gorgeous choice for deep skin tones because the green pops without turning ashy. On almond nails, the fade looks like a gradient gemstone. If you wear green eyeshadow or gold jewelry, this set matches effortlessly.
Apply emerald gel near the cuticle and blend down into deep black at the tips, curing. Make sure the transition is smooth with no hard line by feathering the blend with a clean brush. Apply green mirror chrome gel over the full nail, cure to tacky, and press green chrome powder firmly. Buff off excess and seal with a glossy top coat that keeps the mirror shine sharp.
Editor's noteUse a slightly darker emerald than your first instinct so it doesn't turn swampy under chrome.
Watch outAvoid using a sheer green base; under mirror chrome it looks patchy.
13. Neon Coral Ombre with Chrome Rainbow Edge
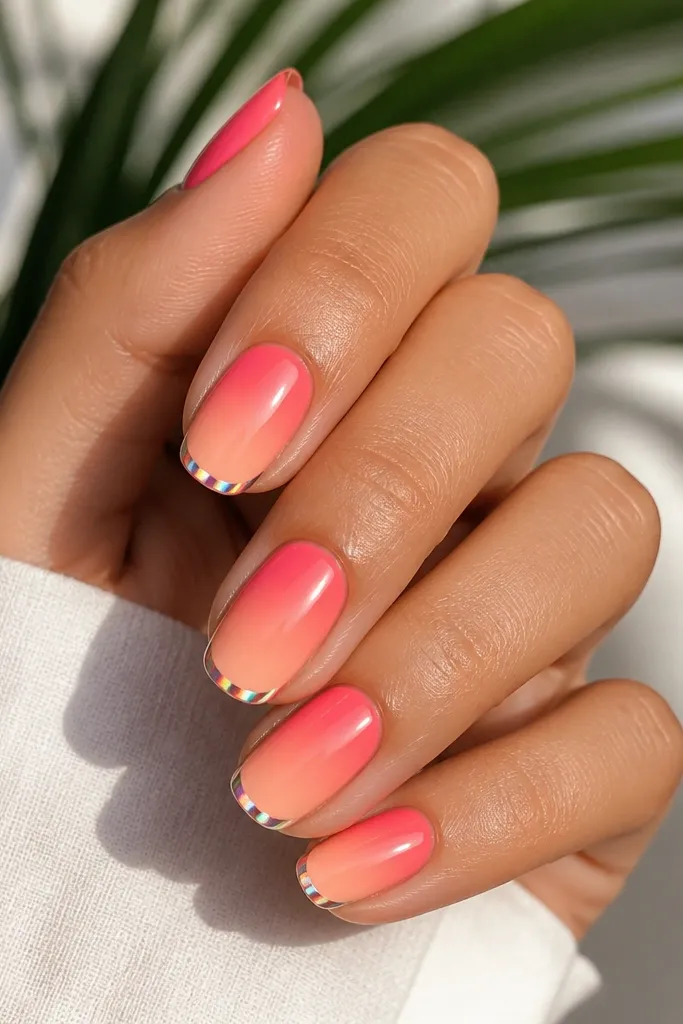
This is for when you want summer nails that still look luxe. Coral ombre is bright but flattering when it fades into peach instead of staying fully neon. Then you add a narrow chrome edge in iridescent tones so the free border flashes different colors. It looks best on short to medium almond because the edge stays visible without overwhelming the nail bed. Wear it with warm colors and let the nails carry the fun.
Sponge hot coral gel from the cuticle down to mid-nail, then blend into peach gel toward the tip and cure. Apply chrome gel only along the free edge - about 1-2 mm up the nail - and cure to tacky. Press iridescent chrome powder onto that thin band, wipe excess, then seal with glossy top coat. Make sure the edge follows your natural smile line so it looks clean.
Editor's noteKeep the chrome band thin; thick bands make neon sets look like costume nails.
Watch outDon't cover the whole nail with rainbow chrome; it flattens the ombre.
14. Moody Plum Ombre with Micro-Flake Chrome Specks
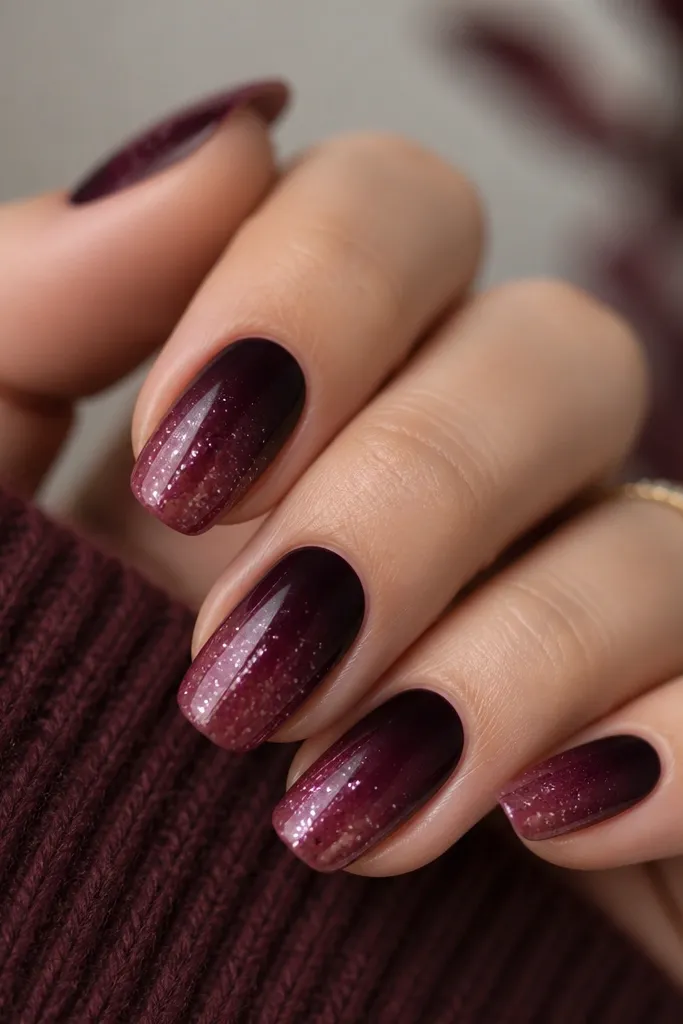
Micro-speck chrome looks expensive because it adds texture without turning the nail into a solid metal sheet. I build a plum ombre first so you still get color depth, then I place tiny chrome specks where light naturally hits. This flatters hands that look good with dark polish and works well on almond and oval. The specks also hide small application imperfections better than full chrome. It's a great option for fall and winter because the wine tones read cozy.
Blend deep plum gel at the cuticle into wine at the tips using a sponge, curing after each thin layer. Apply chrome base gel only in the middle area and the upper tip, then cure to tacky. Dip a fine brush in chrome powder and tap lightly so you get micro-specks instead of full coverage. Seal with glossy top coat, using gentle strokes to avoid wiping specks off.
Editor's noteIf you want the specks heavier on certain nails, do one nail at a time so you control the density.
Watch outDon't swipe a brush through loose chrome specks; you'll smear them into a gray film.
15. Classic French Ombre with Silver Chrome Smile Line
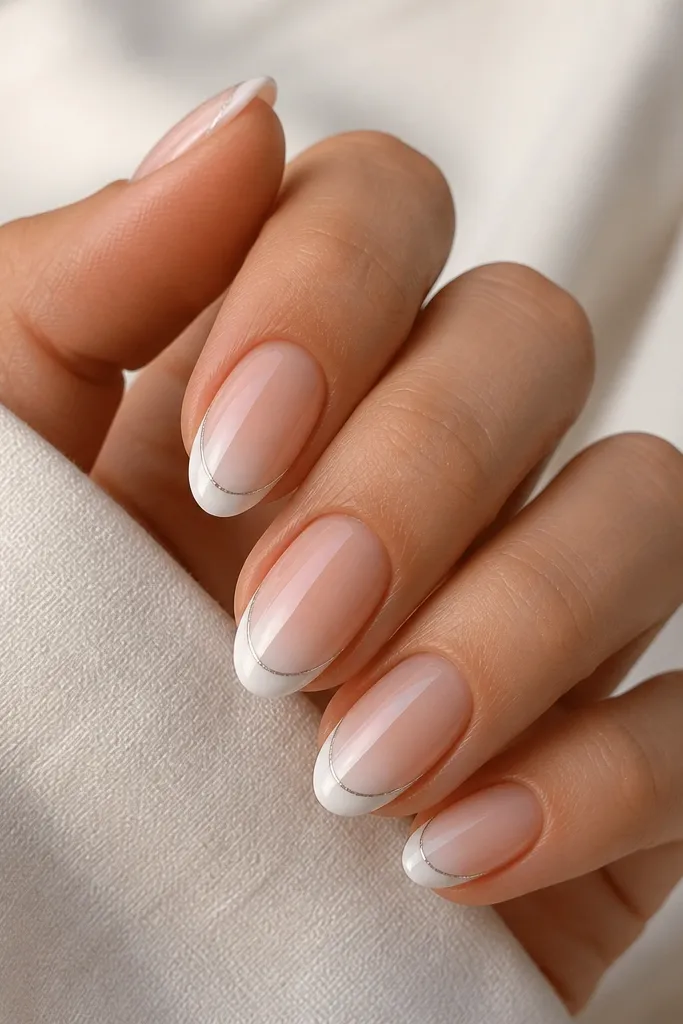
This looks like a French manicure turned into jewelry. The ombre base keeps it soft and clean, while the silver chrome smile line adds a crisp highlight that makes the whole set feel high-end. I love it on squoval nails because the smile line can be shaped neatly and stays elegant. On fair to medium skin, it looks bright and fresh; on deeper skin, it still works when your nude base is warm and opaque. It's one of the most wearable luxe ombre chrome nails designs because it matches everything.
Apply a nude gel base, then sponge a white-to-clear French-style ombre at the tips, blending into the nude about one-third up. Cure and refine the curve with a brush if needed. Paint chrome gel along the smile line only - keep it thin - and cure to tacky. Press silver chrome powder onto the smile line, wipe excess, then seal with a glossy top coat.
Editor's noteUse a striping brush with a slight taper so your smile line stays sharp.
Watch outAvoid thick chrome on the smile line; it looks chunky and cheap.
16. Black Nude Ombre with Rose Gold Chrome Center Stripe
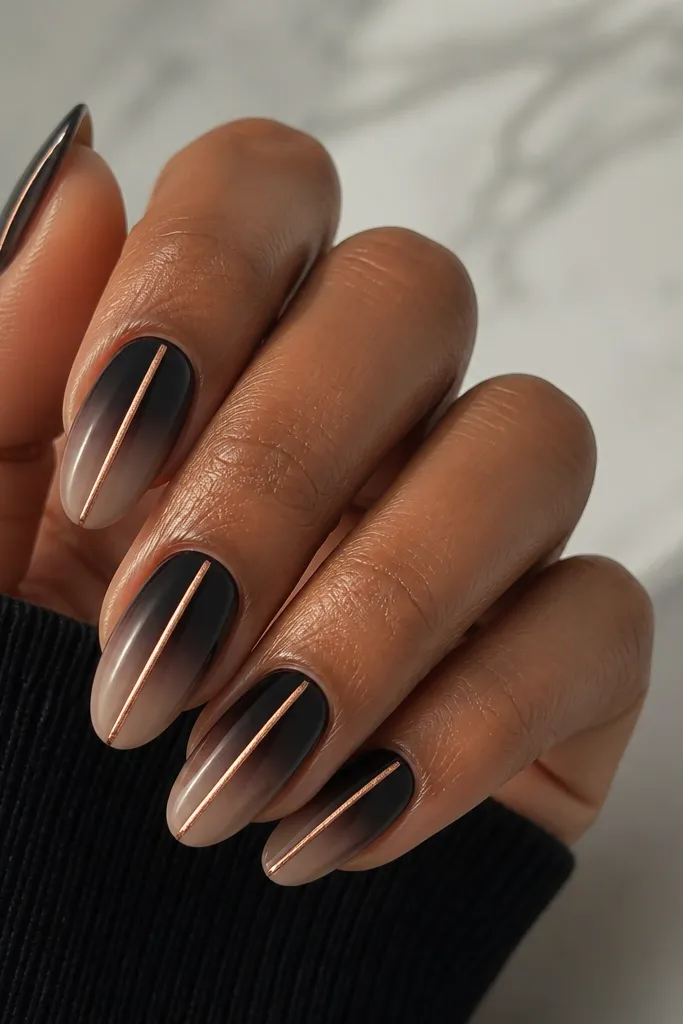
Center stripes are the fastest way to make ombre chrome feel intentional instead of random. This design uses a black nude ombre for drama, then places a rose gold chrome stripe down the middle so the reflection lands exactly where your eye goes first. It flatters medium to deep skin because the taupe fade stays grounded and the rose gold adds warmth. On almond nails, the stripe follows the natural elongation line. It's also great for people who want chrome but don't like full coverage.
Sponge black nude gel at the cuticle and fade to taupe at the tips, curing and checking for smooth transitions. Use a striping brush to paint a thin line of chrome gel down the center of each nail. Cure to the tacky stage, then press rose gold chrome powder onto the stripe. Seal with glossy top coat, and keep the stripe centered by wiping excess from the brush before top coating.
Editor's noteMake the stripe slightly wider on ring fingers - it balances the nail shape.
Watch outDon't let the stripe touch the sidewalls; it looks sloppy on photos.
17. White Milk Ombre with Chrome Drip at the Tips
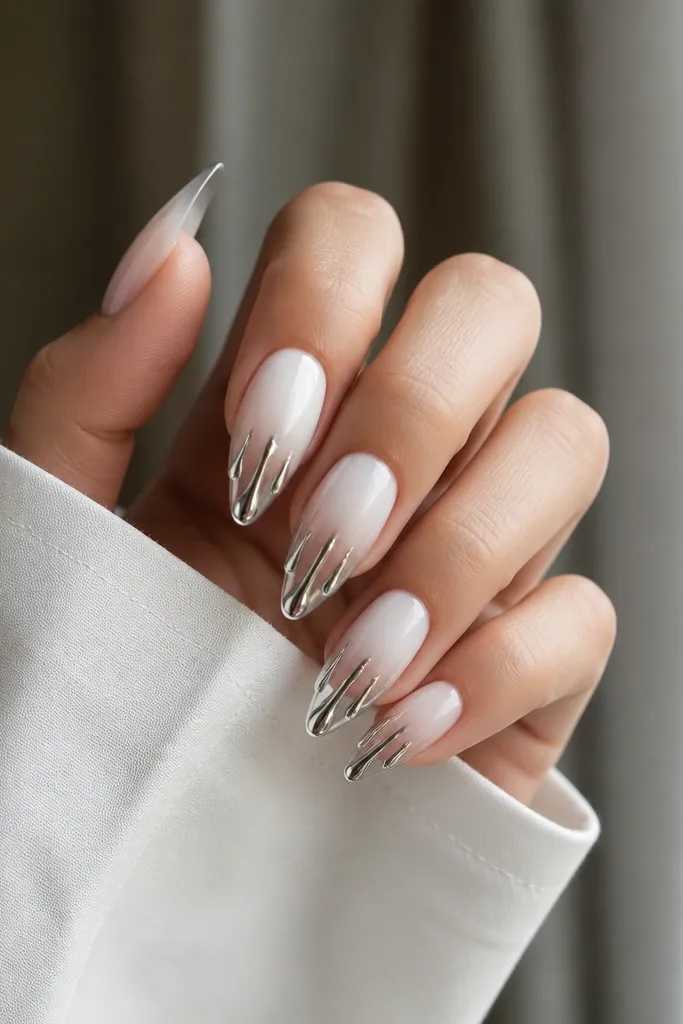
Drip chrome tips look artsy but still luxe when your base ombre is clean and glassy. I use milky white that fades into sheer so the drip chrome feels like it's floating on the nail. This looks incredible on long almond because the drips have room to taper without getting thick. It flatters fair and light skin especially well, but it also works on deeper skin when the milky base is warm rather than icy. The chrome drip adds movement and makes even a simple outfit look styled.
Apply milky white gel from cuticle down and sponge it toward sheer at the tips, curing. Create the drip by placing chrome gel at the free edge in a few small blobs, then pull each blob down with a dotting tool to form tapered drips. Cure to tacky stage and press silver or white chrome powder onto the drip areas only. Seal with glossy top coat, making sure the top coat doesn't blur the drip edges.
Editor's noteKeep drips uneven in length - one long, two short - it looks more natural.
Watch outDon't make every drip the same size; that reads like a stencil.
18. Taupe-to-Cream Ombre with Champagne Chrome Blended Fade
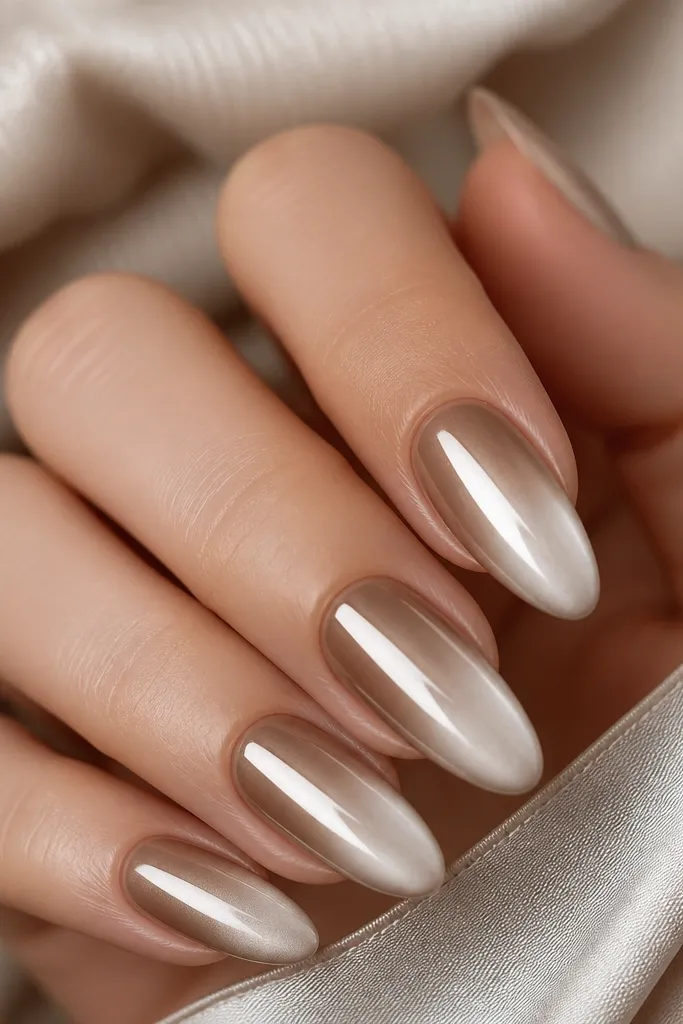
Champagne chrome over a taupe-to-cream fade looks like luxury neutrals. The taupe gives structure, and cream keeps it soft - then the champagne chrome makes it glow instead of turning flat. This set is flattering on almost every skin tone because it sits in the "neutral warm" zone. On short nails, it keeps your hands looking polished without looking too bold. It's also a great base if you like to switch between minimal and glam outfits.
Sponge taupe gel at the cuticle and blend into cream gel at the tips, curing. Add a thin second layer if you want more opacity in the center. Apply champagne chrome gel all over the nail, then press champagne chrome powder until it looks evenly mirrored. Buff lightly and seal with a glossy top coat so the blend stays smooth and the chrome stays reflective.
Editor's noteChoose taupe with a hint of pink or brown, not gray; gray under champagne chrome looks dull.
Watch outDon't overbuff before top coat; you can dull the mirror.
19. Emerald Chrome Fade with Blackened Ombre Base
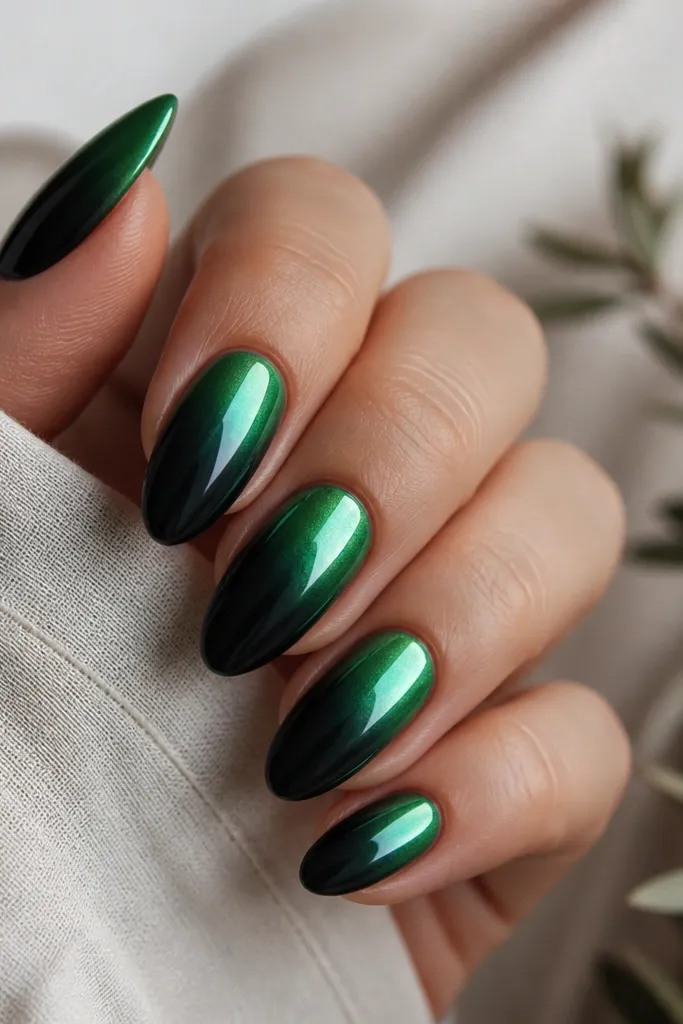
This is a moody luxe set where chrome lives mostly in the upper half. Start with a blackened base near the cuticle, fade into emerald toward the tip, then apply emerald chrome mainly on the upper portion so it looks like light is igniting the nail. The contrast flatters hands with strong nail beds because the emerald feels bright against the dark base. On almond nails, it gives a "cat-eye" vibe without the actual cat-eye pigment. It's dramatic but still clean because the ombre stays controlled.
Paint blackened gel near the cuticle and sponge into deep emerald toward the tip, curing. Apply chrome gel only on the upper half (about first half of nail length), keeping the lower fade visible. Press emerald chrome powder into the chrome gel, then cure. Finish with top coat over everything, but keep your brush light around the chrome boundary so it doesn't blend into the lower ombre.
Editor's noteUse tape on the lower third while you press chrome so the boundary stays crisp.
Watch outAvoid full chrome here; it removes the contrast that makes it feel high-end.
20. Pearl Ombre with White Chrome Edge on Every Other Nail
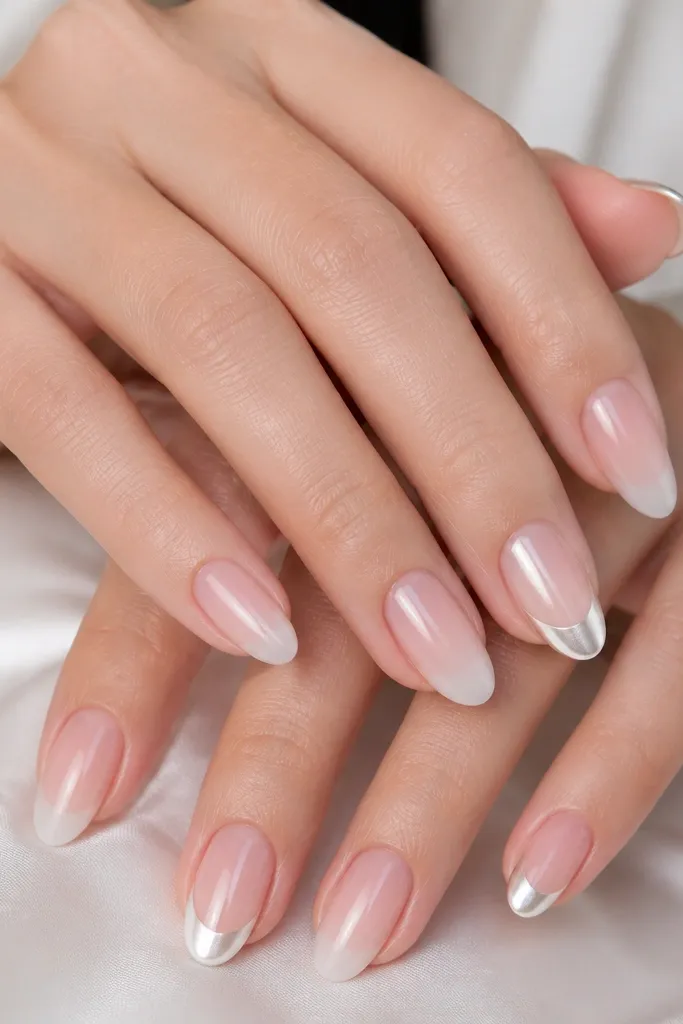
Alternating chrome accents is how you make ombre chrome look intentional instead of busy. I do pearl ombre on all nails, then apply white chrome only to the tips on select nails so the set has rhythm. White chrome edges look clean and bridal, and they photograph well because the reflection is bright without being warm. This flatters fair to medium skin especially, but it still works on deeper skin if the pearl base is creamy and not too pale. It's perfect for events where you want "pretty" more than "loud."
Create a pearl ombre by blending pale pink near the cuticle into milky white toward the tips, curing and adding a second thin layer for opacity. On alternating nails (I usually do index and ring), paint chrome gel only along the last 20% of the nail length. Press white chrome powder onto the gel and wipe excess. Top coat all nails with glossy finish, and keep the chrome edge aligned across those accent nails so it looks like a design, not a mistake.
Editor's notePick two nails for accents and stick to a pattern; it makes the set look designed.
Watch outDon't scatter white chrome on random nails; it reads accidental.
21. Sage Green-to-Clear Ombre with Silver Mirror Fade Down the Center
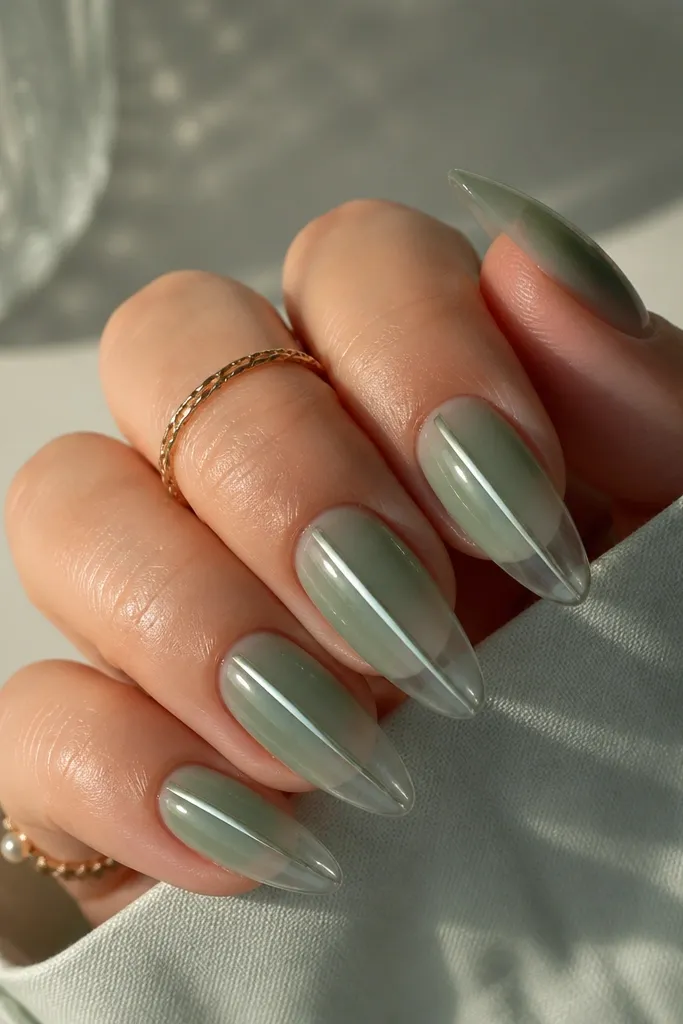
Center-mirror fades look modern because they guide the eye and add shine without covering the whole nail. This set uses sage-to-clear so it feels fresh, then adds a silver mirror stripe that tapers for a sleek finish. It flatters olive and neutral skin tones because sage sits in the same family as natural undertones. On oval nails, the taper makes the nail look longer and more refined. It's a great choice for people who like soft colors but still want chrome.
Sponge sage gel from the cuticle down to the mid-nail, then blend into clear gel at the tips and cure. Apply chrome gel in a narrow center stripe that starts at the cuticle and tapers as you approach the tip. Cure to tacky, then press silver chrome powder onto the stripe. Seal with glossy top coat, being careful not to flood the stripe edges so the taper stays clean.
Editor's noteUse a striping brush to draw the stripe first, then fill with chrome gel - it keeps the stripe straight.
Watch outDon't make the stripe too wide; wide stripes can look like a bandage.
22. Burgundy Ombre with Copper Foil Chrome Edge
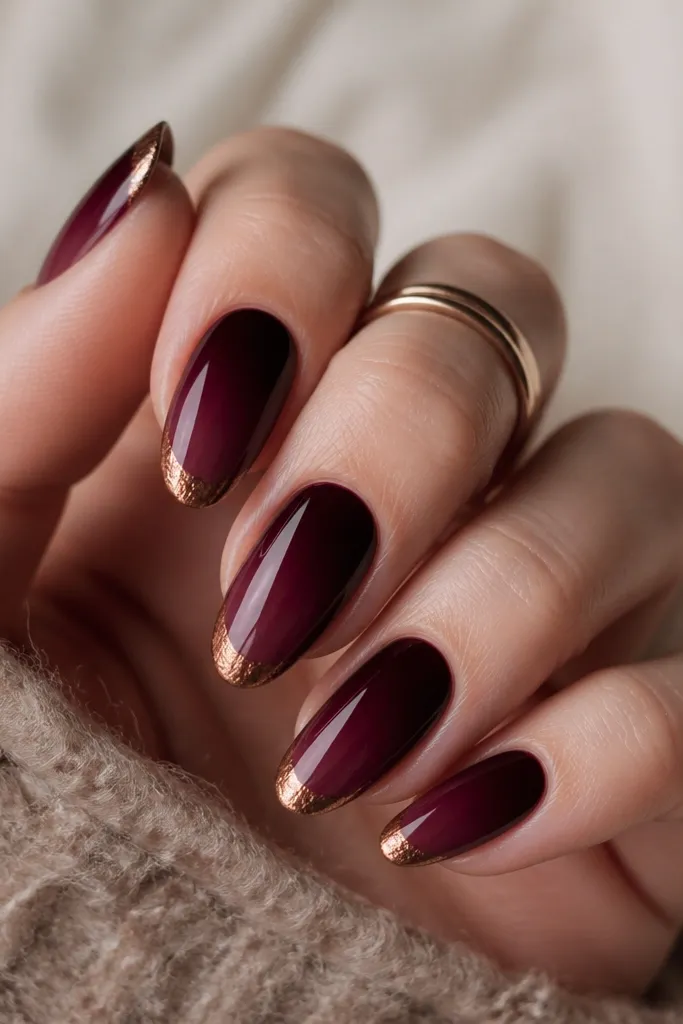
Copper foil chrome at the edge gives a different kind of luxe than powder mirror. The foil catches light with tiny texture, and that makes the burgundy ombre look more dimensional. I like this on almond nails because the copper edge follows the curve of the free border. It flatters warm undertones and looks gorgeous with gold jewelry. If you want something richer than silver but more wearable than full copper mirror, this is the sweet spot.
Blend deep burgundy gel at the cuticle into wine gel toward the tips, curing and smoothing the fade. Apply copper foil chrome gel only along the free edge - about 2 mm up - and cure to the sticky stage for foil. Press copper foil onto the gel, then trim excess with a small file. Seal with a glossy top coat to lock the foil in place and keep the edge looking clean.
Editor's noteUse a light touch with the foil - too much pressure flattens the texture.
Watch outDon't place foil too high up; it can overpower the ombre.
23. White Ombre with Aurora Chrome Half-Cover
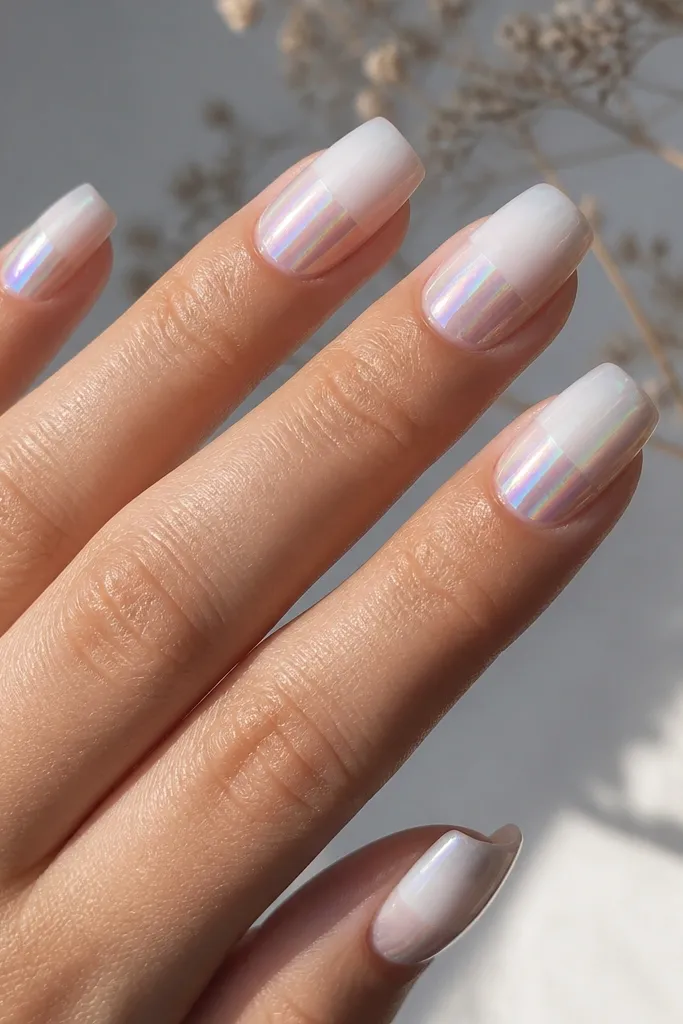
Aurora chrome half-cover looks artsy and clean because the reflective area is limited. I keep the base white-to-clear so the aurora doesn't dull into gray, and the split between matte-like base and shiny chrome feels intentional. This set flatters most skin tones because white-to-clear is neutral, and aurora adds color without being one single hue. On long almond, the half-cover makes the nail look like it's glowing. It's a fun pick for nights out and creative shoots.
Sponge white gel at the cuticle and fade into clear gel at the tips, curing. Paint aurora chrome gel on the lower half of the nail starting at about mid-length, avoiding the upper third so the ombre stays visible. Press aurora chrome powder into the gel until reflective, then wipe excess. Top coat with a glossy finish over the whole nail, using light strokes so the aurora doesn't smear.
Editor's noteMark the half point with a dot of clear gel before you apply chrome so every nail lines up.
Watch outAvoid uneven split lines; crooked halves make it look rushed.
24. Classic Nude Ombre with Mirror Chrome Reverse French on Thumbs
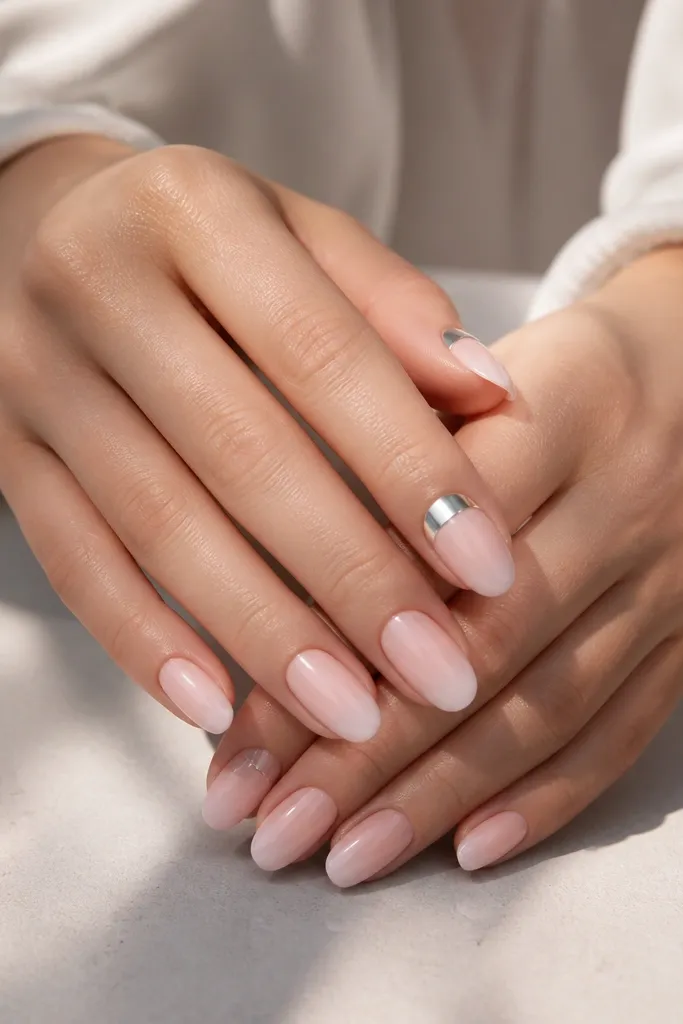
Reverse French is elegant because it frames the nail bed instead of covering the tip. I do a nude ombre on all nails for consistency, then I add mirror chrome reverse French only on thumbs so the set has a focal point. It flatters short nails because the chrome arc visually lifts the center of the nail bed. On medium skin tones, nude ombre keeps everything flattering while the chrome brings a clean, jewelry-like shine. This is a smart design if you want luxe but still want it to feel wearable.
Apply nude ombre to all nails by blending a nude gel at the cuticle into a slightly lighter nude toward the tips, curing. On thumbs only, paint chrome gel in a thin arc near the cuticle following your cuticle curve and leaving a small gap from the sidewalls. Cure to tacky, press mirror chrome powder into the arc, and wipe excess. Seal all nails with glossy top coat, making sure the thumb chrome arc stays crisp.
Editor's noteKeep the reverse French arc thin; thick arcs look like a chrome bandage.
Watch outDon't bring the arc too close to skin - it lifts and dulls quickly.
25. Satin Black Ombre with Graphite Chrome Fade Down the Tip
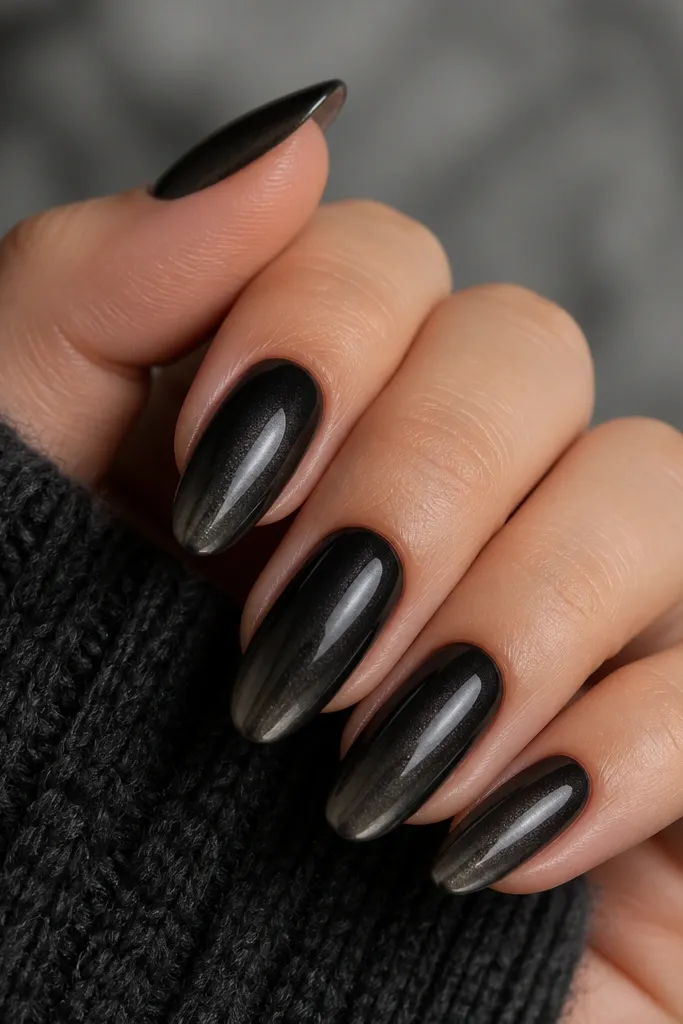
Graphite chrome over a black-to-charcoal ombre looks sleek and expensive because it stays darker and more subtle than bright silver. I keep the base slightly satin-looking before chrome by controlling the shine, then I place graphite chrome mostly at the tip so the reflection looks like a spotlight. This flatters anyone who wants a moody look without the harshness of full mirror. It's especially good for almond shapes because the tip fade looks like a clean highlight. Wear it for winter outfits, black dresses, or anytime you want nails that look "put together."
Sponge black gel at the cuticle into charcoal at the tips, curing and smoothing the blend. Apply graphite chrome gel only on the last third of the nail, then use a brush to feather the chrome boundary upward slightly. Cure to tacky and press graphite chrome powder into the chrome zone. Seal with glossy top coat, but keep the chrome boundary neat by not dragging your brush across it repeatedly.
Editor's noteFeather the chrome boundary with one gentle brush pass - more passes make it muddy.
Watch outAvoid full mirror chrome on this one; it loses the spotlight effect.