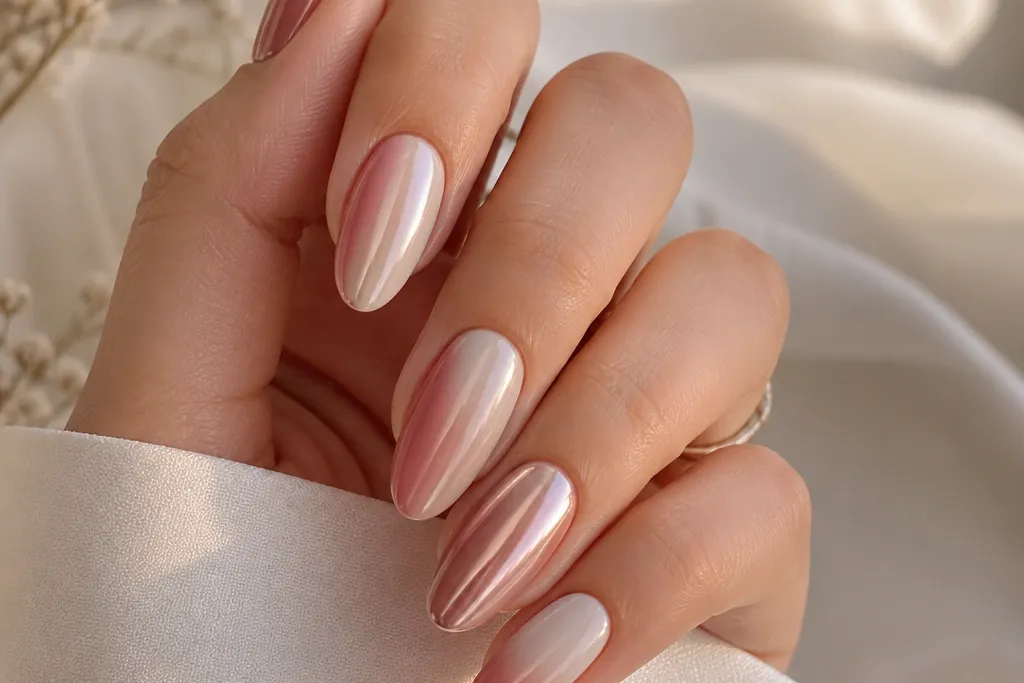
1. Champagne Nude to Rose Quartz Fade with Rose Chrome
This set looks luxurious because the base is sheer enough to keep your nail bed looking clean, and the ombre sits in the pink family so it flatters warm and neutral undertones. The champagne start makes the fade look bright even in winter light. Rose chrome on the top half gives you that candle-glow reflection without turning the whole nail into a mirror. It also photographs well because the gradient edge stays visible.
Start by prepping and pushing cuticles back, then apply a rubber base and cure. Sponge on sheer champagne gel at the cuticle, then add rose-pink gel only on the outer half of the nail, blending downward with a makeup sponge in 2-3 thin dabs. Cure between layers so the blend doesn't smear. Wipe tack residue lightly, then apply rose chrome powder to the upper half while the gel is tacky, and press gently with a chrome applicator. Finish with a glossy top coat and cap the free edge.
Editor's noteIf your chrome looks too flat, add one extra thin tack layer before powder so it grips and shines.
Watch outSkip full coverage chrome - it kills the ombre and makes the set look like a sticker.
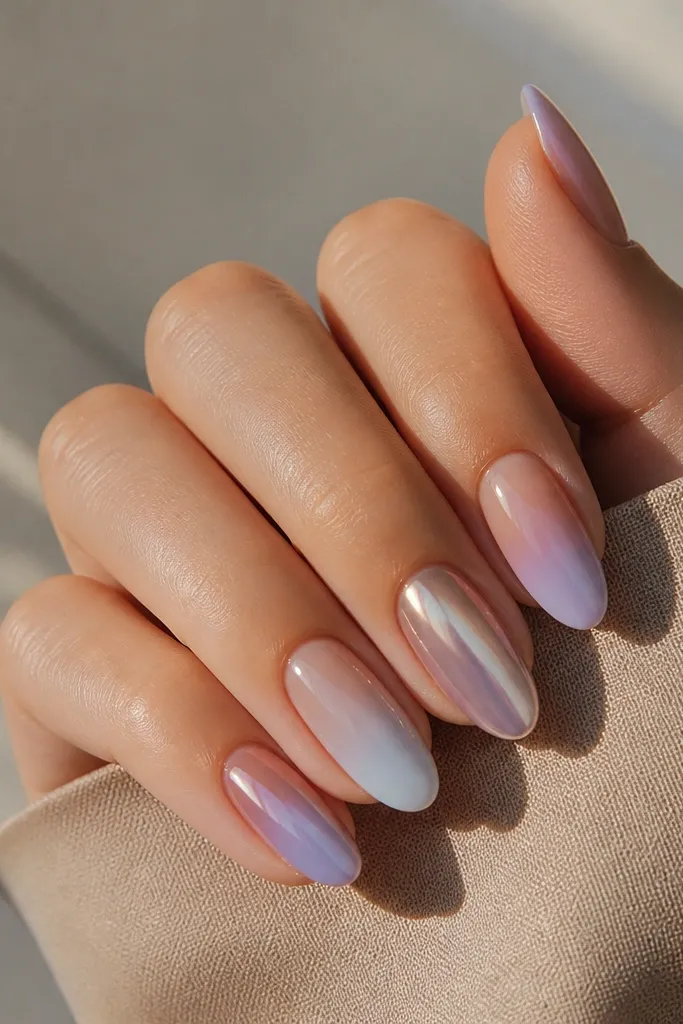
2. Icy Nude Ombré to Soft Lilac with Silver Chrome Fog
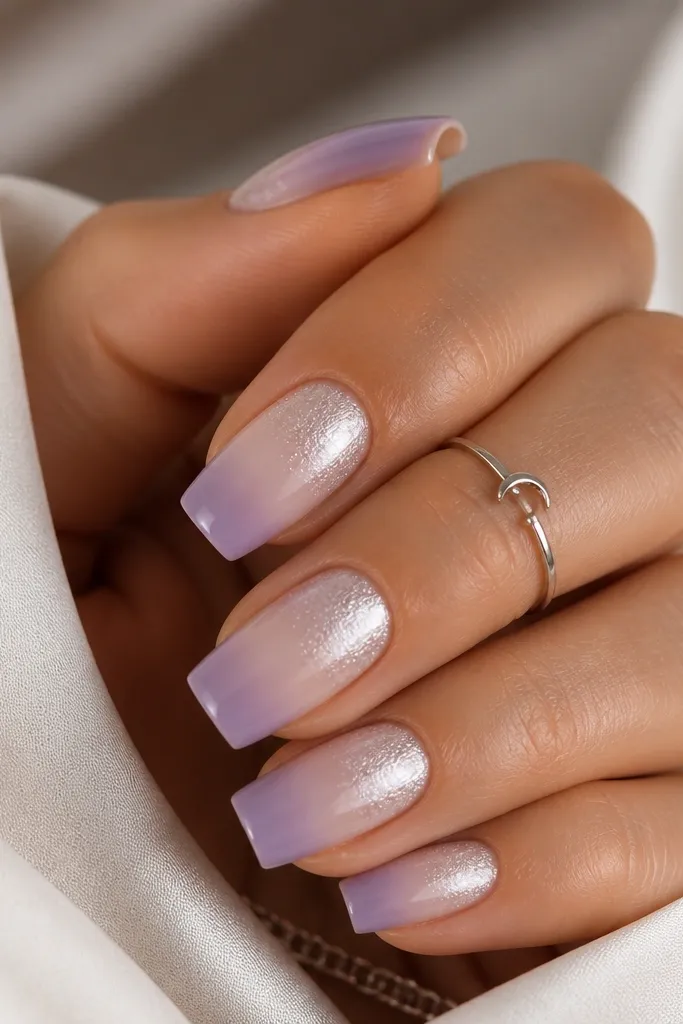
This is the "clean winter" version of ombre chrome nails. The icy nude base makes fair to light-medium skin look extra fresh, and the lilac tip adds a cool pop without going neon. Silver chrome on only the upper third keeps the lilac visible and makes your nails look like they have depth under glass. It's also flattering on shorter nails because the chrome is placed where your eye naturally focuses.
Apply a sheer icy nude gel and cure. Sponge lilac gel from the middle to the tip, blending upward until it looks like smoke, then cure again. For the chrome, add a thin clear tack layer only on the upper third, wait 10-20 seconds for it to grab, then buff silver chrome powder over it. Remove excess with a soft brush and seal with a glossy top coat, making sure the blend line stays smooth.
Editor's noteUse a fluffy chrome brush for the fog effect so the silver doesn't turn into a harsh line.
Watch outDon't use a thick layer of lilac at the tip - it makes the ombre look like blocks.
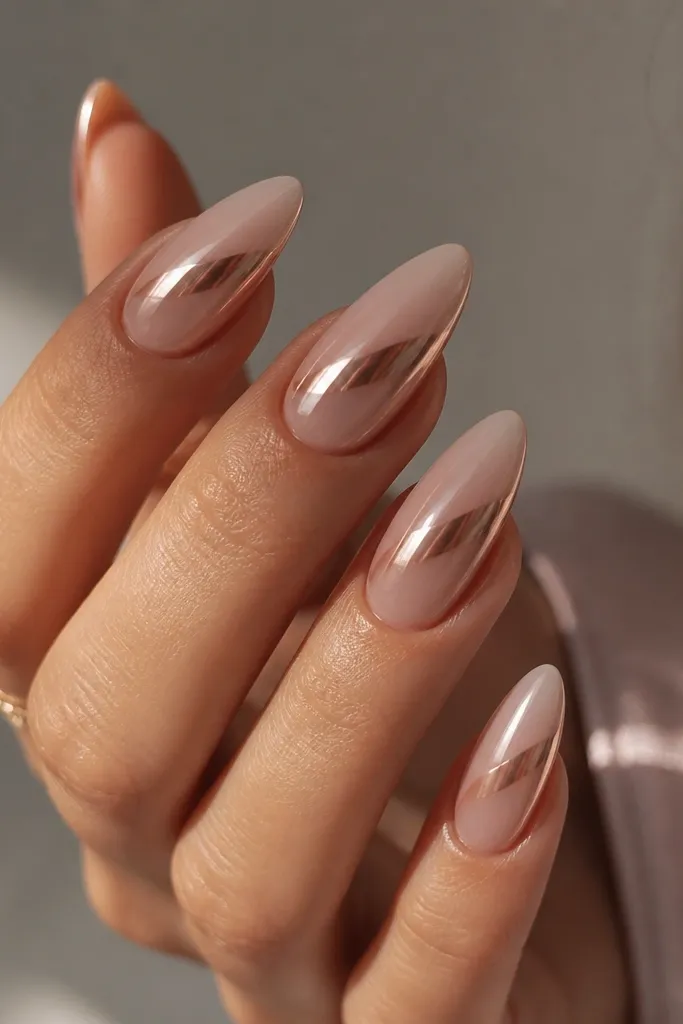
3. Milky White to Peach Ombre with Mirror Gold Edge Chrome
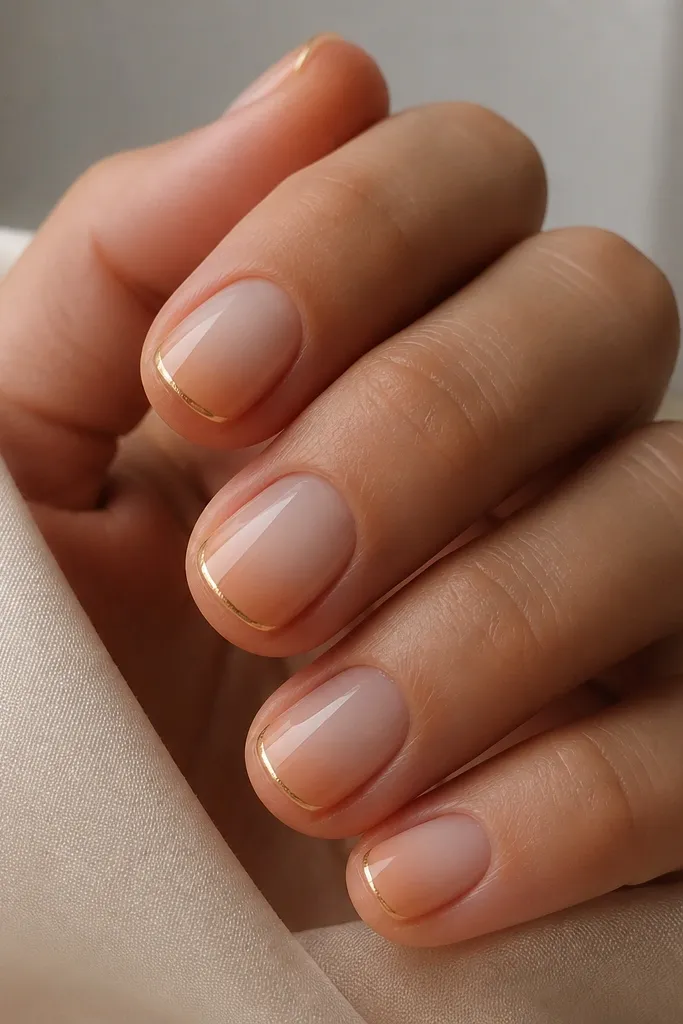
This one is perfect year round because peach reads warm in spring/summer but the milky white keeps it soft and wearable in fall. It flatters olive and neutral undertones because peach isn't too orange and the milky base brightens the nail bed. The gold chrome edge looks expensive because it's narrow and controlled - you get a flash of metal without covering the gradient. Rounded nails make it feel modern and low-fuss.
Start with a milky white gel at the cuticle, then build a peach ombre using a sponge from the middle toward the tip. Keep the peach semi-sheer so the fade stays airy. Cure and wipe residue. Add a strip of tacky gel only along the upper edge, then apply mirror gold chrome powder and tap off excess. Seal with a glossy top coat, and pay attention to the sidewalls so the chrome doesn't peel.
Editor's noteFor a crisp chrome edge, use a thin brush to paint the tack gel as a straight band before powder.
Watch outDon't let peach reach the cuticle - it can look muddy and shrink the nail visually.
4. Nude Rosy Ombre to Deep Cherry with Red Chrome Veil
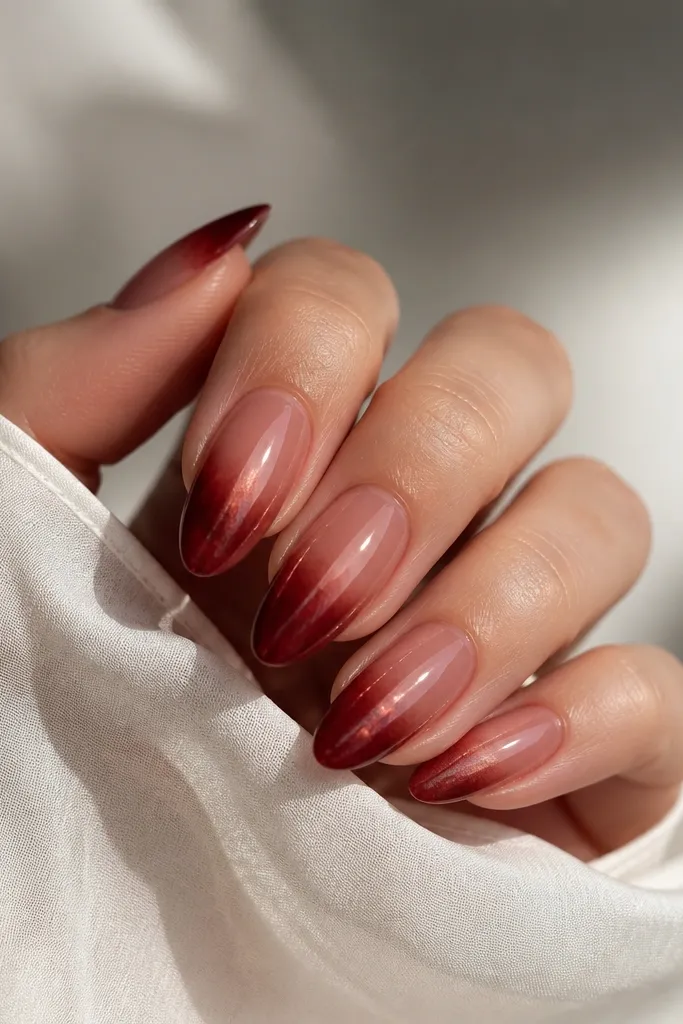
Cherry ombre looks rich without being heavy when you keep the cuticle nude and let the cherry only bloom at the tip. This flatters medium to deep skin tones because the contrast is strong but still refined. The red chrome veil is the secret: it reads like stained glass instead of a full mirror. You get that "luxury manicure" vibe for dates, holidays, and nights out.
Apply a rosy nude base and cure. Sponge cherry gel starting at the mid-nail and blend down slightly, using 2 thin passes. Cure and smooth with a very light buff if needed. For the veil, apply clear tack gel over the upper half, then apply red chrome powder lightly so it stays semi-sheer. Finish with glossy top coat and cap the tip with an extra thin layer of clear gel.
Editor's noteIf your red chrome looks too dark, mix a tiny amount of clear gel with chrome powder before applying for a softer veil.
Watch outSkip matte top coat - cherry chrome looks lifeless under it.
5. Taupe Beige to Cocoa Ombre with Bronze Chrome Melt
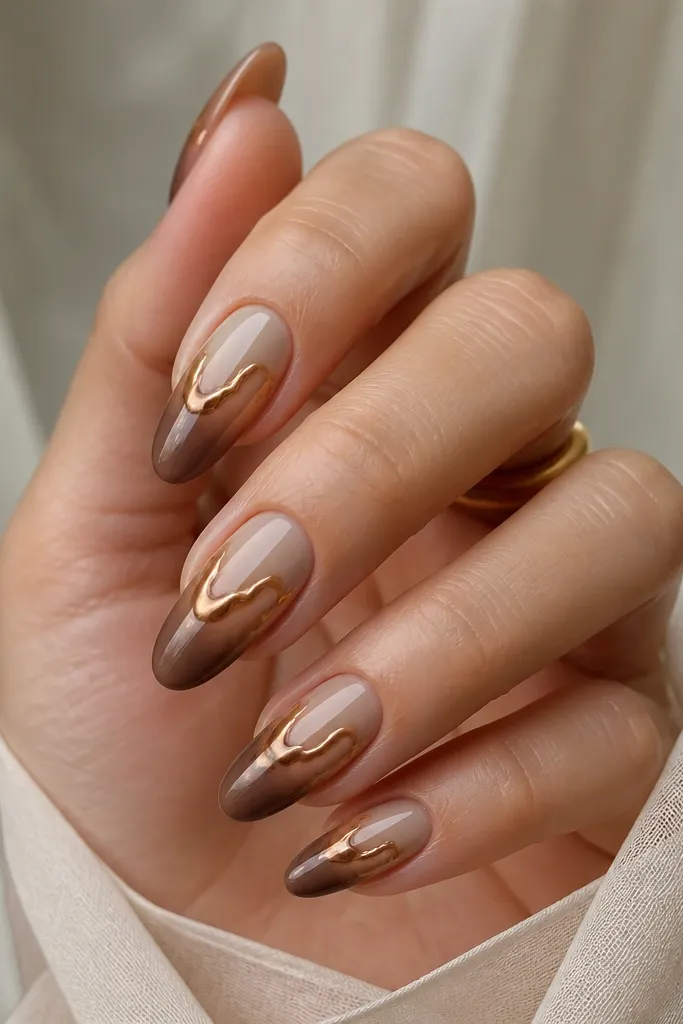
This is the "cozy but expensive" set. Taupe beige makes the nail bed look even and clean, and cocoa tips add warmth that works with every season. Bronze chrome gives a softer metal tone than silver, so it flatters warm undertones and looks great with gold jewelry. The melt effect looks intentional because the chrome is placed where the eye sees shine first.
Start with a taupe beige gel at the cuticle and blend it to the middle. Sponge cocoa brown only on the tip half, blending up to create the ombre. Cure and wipe. Apply tacky gel on the upper half and press bronze chrome powder in a few small sections, then buff lightly so it looks melted instead of stamped. Seal with a glossy top coat and cap the free edge firmly.
Editor's noteDo bronze in sections: upper left, upper right, then center so it looks like a controlled melt.
Watch outDon't over-buff chrome - it removes the reflective layer and turns it dull.
6. Sheer Nude to Emerald Ombre with Green Chrome Halo
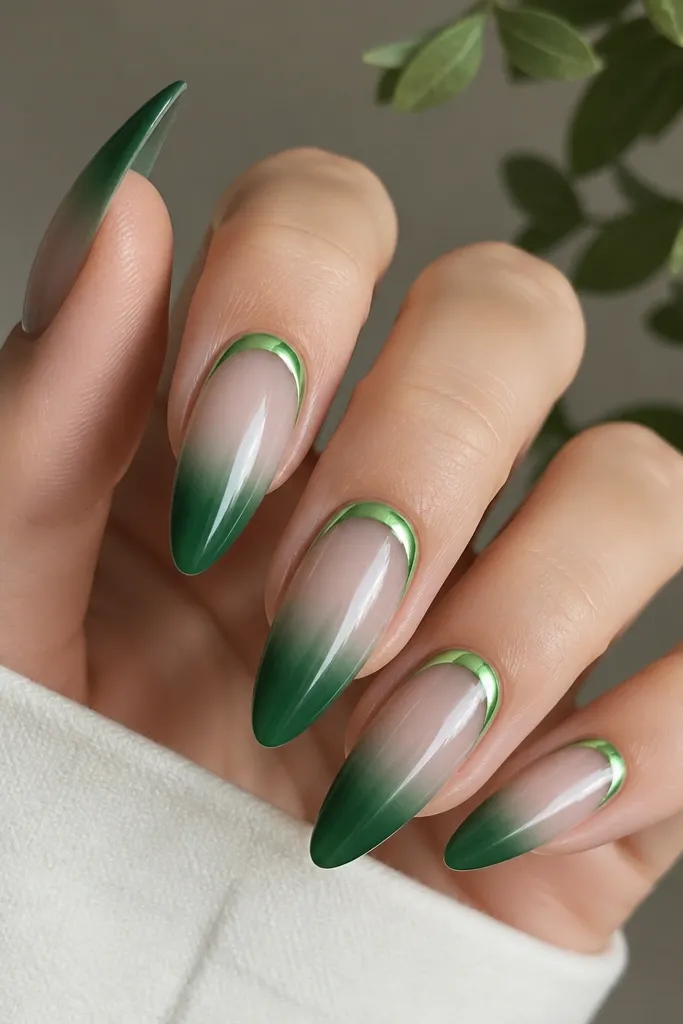
Emerald is the "statement" color that still works year round because it's deep and jewel-toned. A sheer nude cuticle keeps it classy instead of costume-like. Green chrome halo placement makes your nails look sculpted - the shine follows the curve of the nail. This set looks especially good on medium to deep skin because emerald and green undertones echo your natural warmth.
Apply sheer nude gel and cure. Sponge emerald green gel starting from the middle to the tip, leaving a soft transition so the gradient isn't striped. Cure and remove tack residue carefully. Paint a crescent of tacky clear gel on the upper half, then apply green chrome powder and press. Remove excess, then seal with glossy top coat. Keep the halo narrow - about 1.5-2 mm wide - so it doesn't cover the ombre.
Editor's noteUse a striping brush to outline the halo first, then fill with tack gel so the curve stays neat.
Watch outSkip neon green - it makes the chrome look harsh and cheap.
7. Peachy Nude Ombre to Tangerine with Gold Chrome Speckle
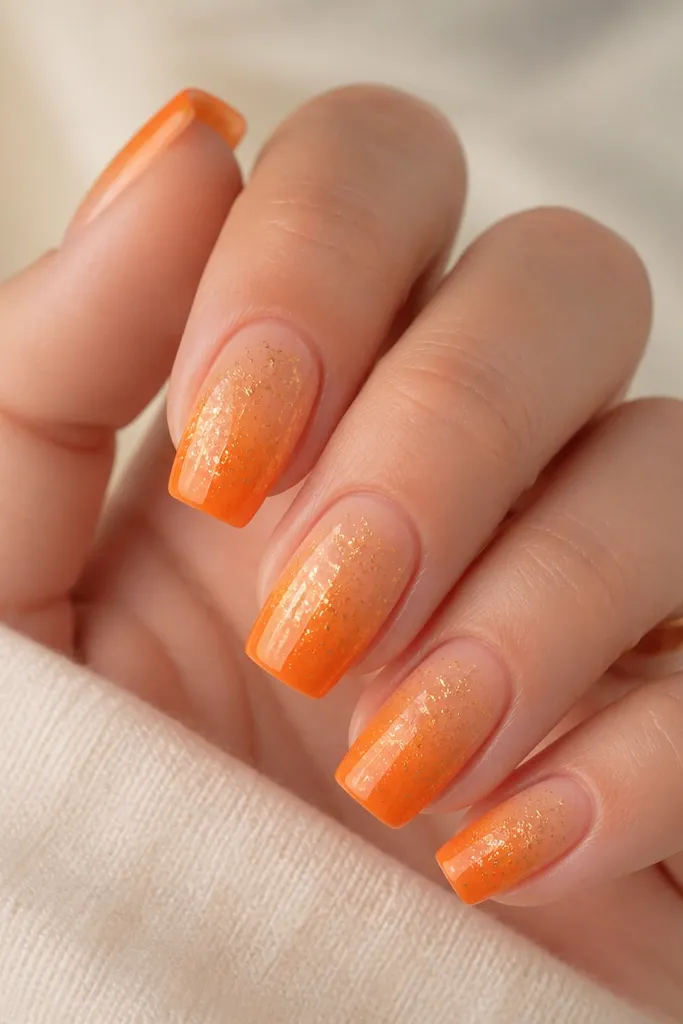
This one is for when you want something sunny but still polished. The peachy nude base keeps it flattering and wearable, and the tangerine tip gives a bright lift to your whole hand. Gold chrome speckle looks more luxe than full gold because it adds sparkle without covering the ombre blend. It also hides minor texture because the chrome dust breaks up the surface.
Start with a peachy nude gel and cure. Sponge tangerine gel from the middle to the tip in thin dabs, blending upward until it looks like it's glowing from within. Cure and smooth. For speckle, add a thin tack layer on the upper half, then tap gold chrome powder on with a small brush rather than pressing a whole patch. Seal with glossy top coat, and cap the tips to protect the gradient.
Editor's noteKeep the speckle dry - less tack under the powder gives you finer sparkle.
Watch outDon't swipe chrome across the nail - it drags and turns into streaks.
8. Rosy Nude to Mauve Ombre with Mauve-Pink Chrome Top
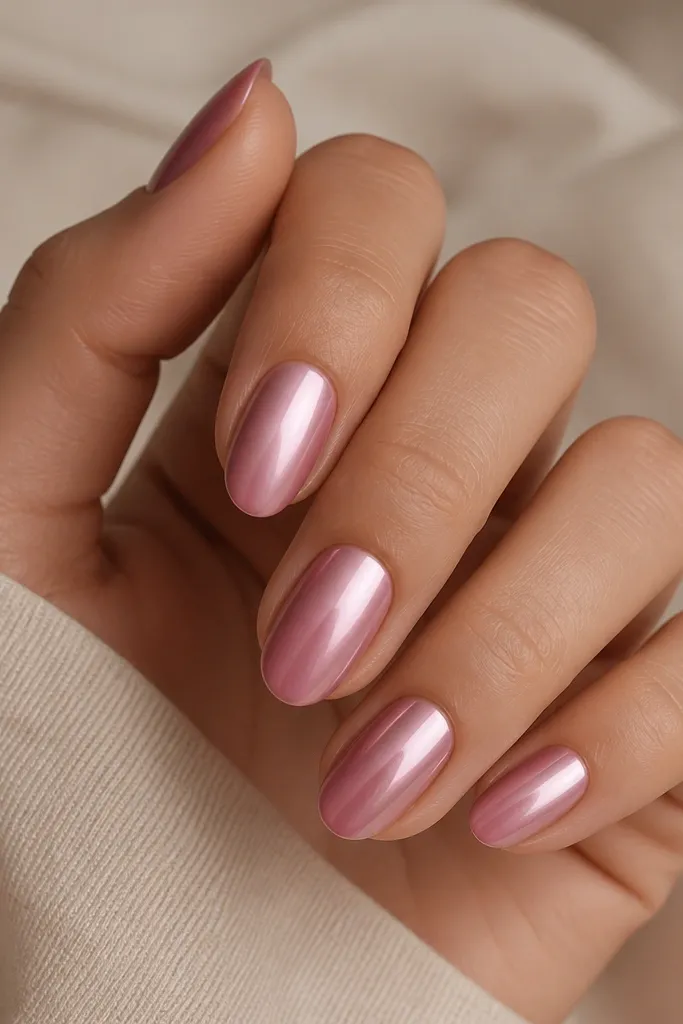
Mauve is one of those colors that always looks put-together, and the chrome top half makes it feel dressed up without going full party. This set flatters cool and neutral undertones because mauve is balanced, not too warm. The satin-mirror effect comes from how lightly you apply the chrome - it reflects but doesn't scream. It's also a great option if you want chrome but hate the super-bright mirror look.
Apply rosy nude gel at the cuticle and cure. Sponge mauve gel starting at the mid-nail and blend into the tip, building color gradually in two thin layers. Cure and wipe. Apply a tacky clear gel only on the upper half, then rub mauve-pink chrome powder gently with a soft applicator, not a hard press. Brush off excess and finish with glossy top coat, keeping the surface smooth over the blend.
Editor's noteFor the satin mirror look, press lightly and stop once it looks reflective - more pressure makes it too mirror-bright.
Watch outSkip a thick chrome layer - it can look grainy and uneven.
9. Clear Jelly Ombre to Soft Blue with Ice Silver Chrome
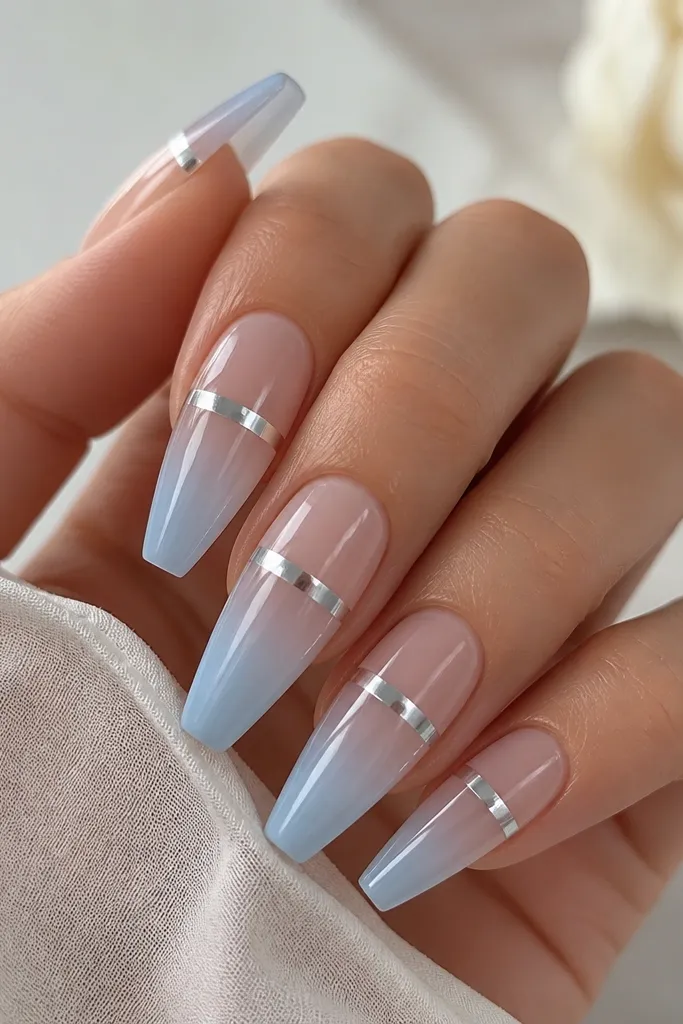
Clear jelly ombre is the clean-girl version of ombre chrome nails. The translucent base makes your nails look healthy and lets the gradient feel weightless. Soft blue flatters a wide range of skin tones because it's not too saturated, and the ice silver chrome highlight reads like winter air. The narrow chrome strip gives you shine without stealing attention from the ombre fade.
Apply a clear jelly gel at the cuticle and cure. Sponge soft sky-blue gel on the tip half, leaving a translucent mid area so the gradient looks airy. Cure and wipe. Paint tack gel as a thin horizontal strip on the upper third, then apply ice silver chrome powder and tap off excess. Seal with a glossy top coat and cap the free edge so the jelly look stays intact.
Editor's noteIf your jelly base looks streaky, thin the gel slightly before applying so it levels smoothly.
Watch outDon't make the blue opaque at once - build it in layers for a real ombre.
10. Nude Brown Ombre to Warm Chestnut with Dark Chrome Smoke
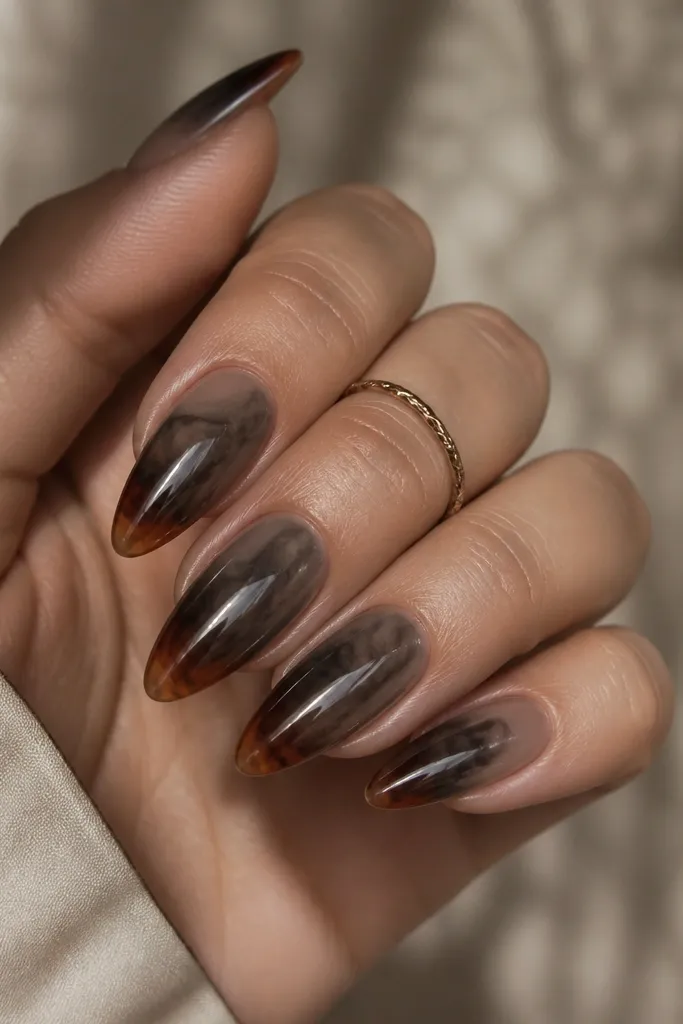
This set looks like expensive coffee-toned glass. Nude brown keeps it flattering and natural, while warm chestnut gives depth that works with fall outfits and gold rings. Dark chrome smoke is the move because it makes the manicure feel moody and editorial without being too goth. The smoky finish also hides tiny imperfections in blending.
Start with nude brown gel at the cuticle and cure. Sponge warm chestnut gel from the middle to the tip, blending upward with light dabs. Cure and wipe. Apply tacky gel over the upper half, then use dark chrome powder and buff gently to keep it smoky, not mirror. Seal with glossy top coat and cap the tip. Clean up the cuticle line with a small brush and acetone wipe.
Editor's noteUse a damp lint-free wipe to gently smooth the blend edge before top coat if it looks powdery.
Watch outAvoid bright silver on brown bases - it can look icy and disconnected.
11. Soft Pink Ombre to Rose Gold Tip with Mirror Rose Chrome
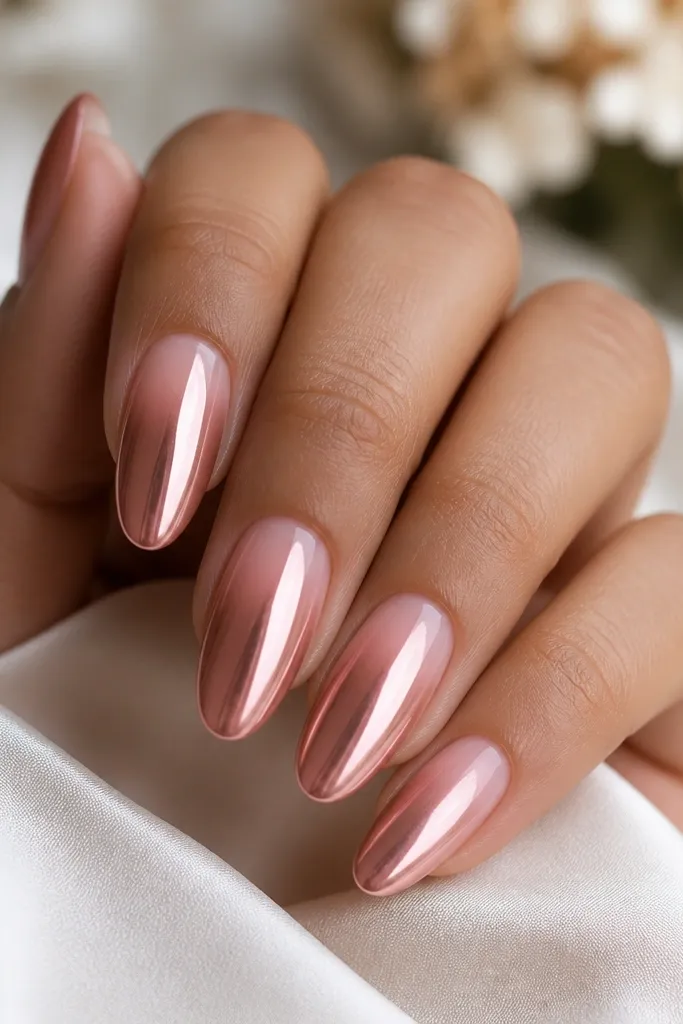
This is a crowd-pleaser because the color family matches the chrome tone. Soft pink at the cuticle makes hands look bright, and rose gold at the tip keeps it warm and flattering. Mirror rose chrome on the upper half makes the nails look sharply finished for photos and events. It also looks great on oval nails because the curve gives the ombre an extra smooth look.
Apply soft pink gel at the cuticle and cure. Sponge rose-gold toned gel from the middle to the tip, blending downward until it looks like a gradient rather than a line. Cure and wipe. Apply tack gel on the upper half and cover with mirror rose chrome powder, then buff lightly. Finish with glossy top coat and cap the edges.
Editor's noteMirror chrome likes a clean surface - wipe gel dust off before applying top coat.
Watch outSkip layering mirror chrome over a bumpy ombre - bumps show up as dull patches.
12. Nude to Burgundy Ombre with Violet Chrome Flicks
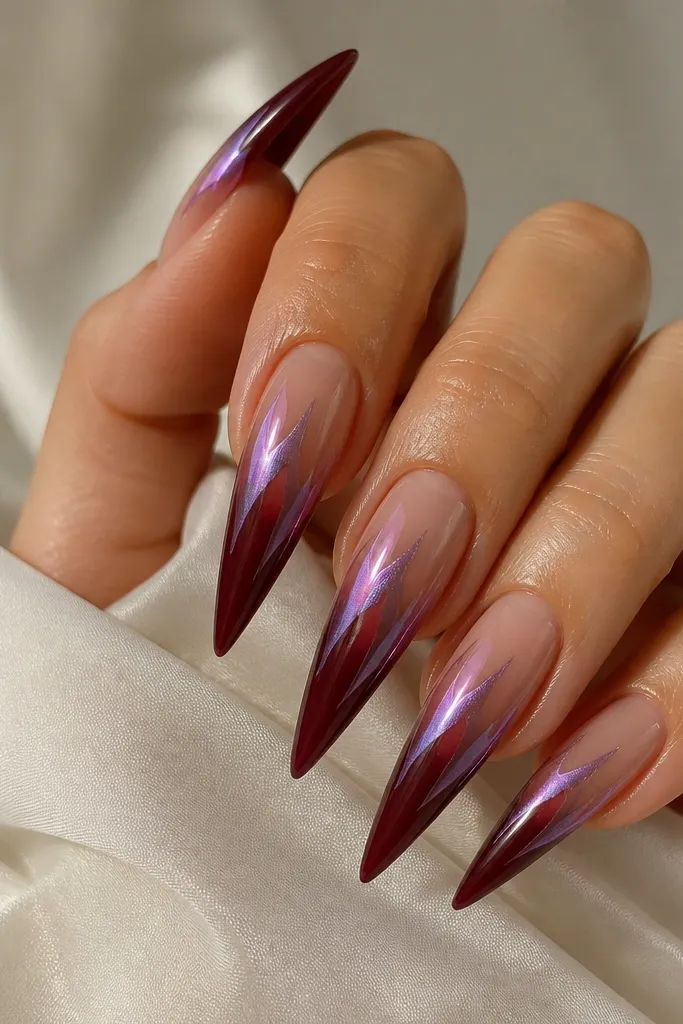
Burgundy ombre is the winter date-night color, and the nude cuticle makes it wearable. Violet chrome flicks add movement because they catch light in small bursts instead of covering everything. This flatters cool undertones and looks striking against silver jewelry. The gaps keep it from looking heavy and make the gradient feel fresh.
Start with nude gel at the cuticle and cure. Sponge burgundy gel on the tip half, blending up to the mid-nail in thin layers. Cure and wipe. Paint tiny tack gel strokes on the upper half, then press violet chrome powder onto each stroke. Leave space between strokes so the ombre stays visible. Seal with glossy top coat carefully around the edges of the flicks.
Editor's noteUse a small dotting tool to place tack strokes evenly so the flicks look intentional.
Watch outDon't cover the whole upper half with violet chrome - it turns into a flat block.
13. Milky Nude to Soft Gray Ombre with Silver Chrome Side Sweep
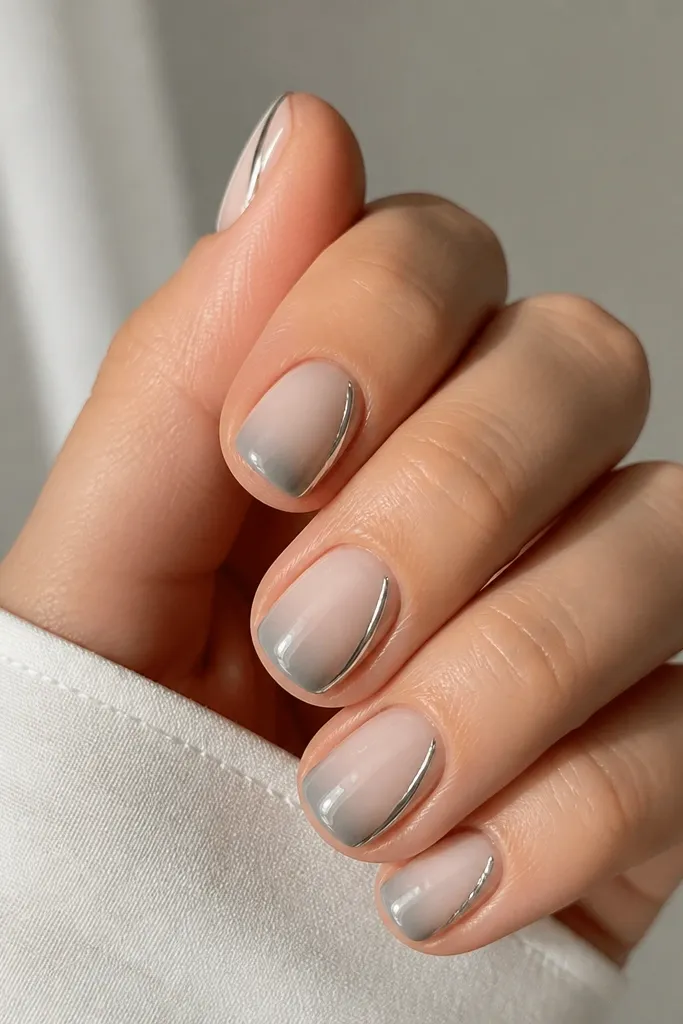
This is understated and still feels luxurious because the chrome is placed like a design detail. Milky nude makes the nail bed look smooth, and soft gray keeps the ombre cool without being harsh. The side sweep flatters hands with wider nail beds because it visually narrows the center. It also looks clean with both casual outfits and office looks.
Apply milky nude gel and cure. Sponge soft gray gel from the middle to the tip, keeping the gradient gentle and semi-sheer. Cure and wipe. Add tack gel along one side of the nail on the upper half, then apply silver chrome powder and press with a flat chrome applicator. Remove excess and seal with glossy top coat, keeping the sweep crisp by cleaning the edges with a small brush.
Editor's noteIf your side sweep looks crooked, use tape as a guide for the tack gel line.
Watch outSkip full mirror coverage - side chrome looks more expensive and less busy.
14. Warm Nude to Antique Gold Ombre with Gold Chrome Crown
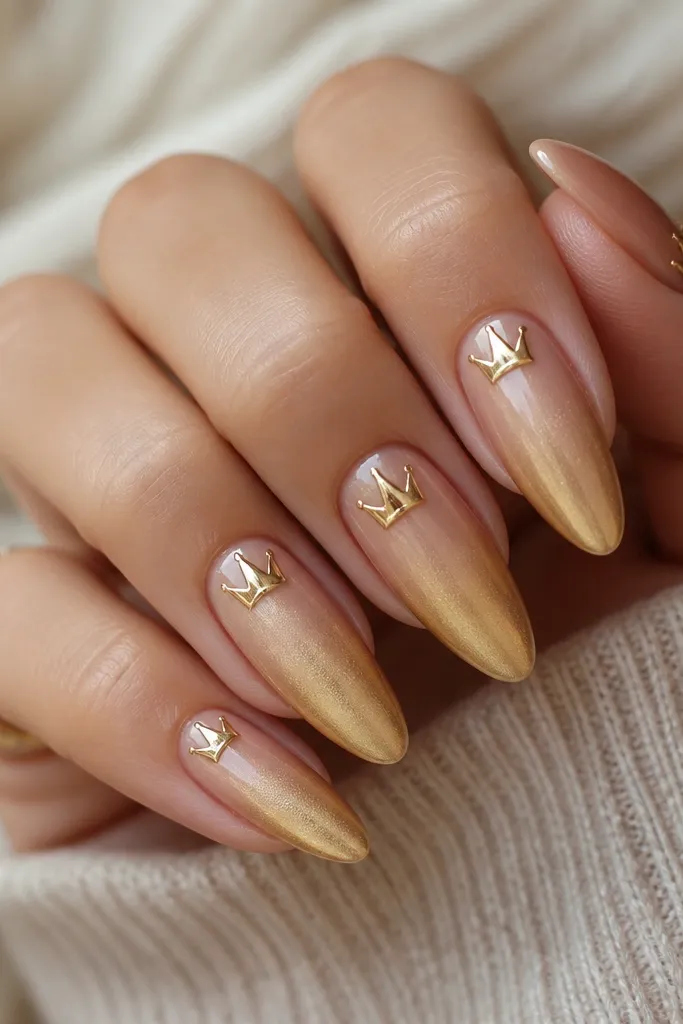
Antique gold at the tips reads old-world and flattering, especially with warm skin tones and gold jewelry. The ombre from nude keeps it from looking like a solid gold manicure. A gold chrome crown near the cuticle looks like jewelry and makes the whole nail feel styled. This is a great option for weddings, dinners, and anytime you want "pretty" without loud patterns.
Start with a warm nude gel and cure. Sponge antique gold gel from mid-nail to tip, blending so it looks like light. Cure and wipe. Add tack gel in a crown shape near the cuticle (about 2-3 mm wide), then apply gold chrome powder and press. Seal with glossy top coat, and cap the edges so the chrome crown stays sharp.
Editor's noteKeep the crown small. A tiny shape reads luxe; a big one looks costume.
Watch outDon't put the crown too close to the cuticle line if you flood your skin - it lifts faster.
15. Cool Nude to Black Licorice Ombre with Platinum Chrome Top Edge
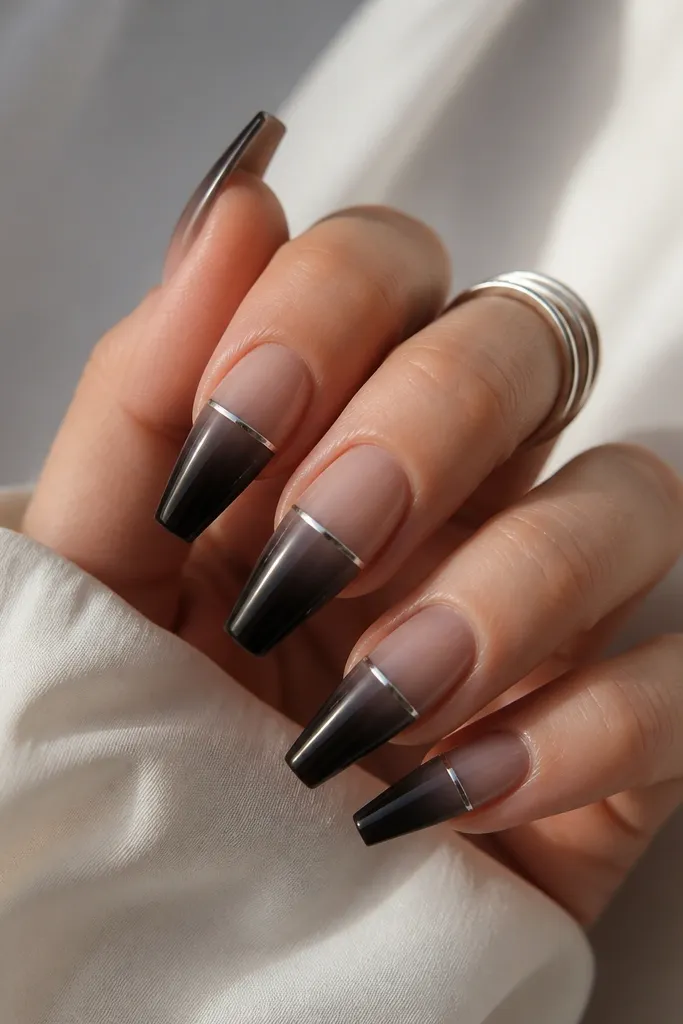
Black licorice tips make your hands look instantly sharper, and the cool nude keeps it from looking muddy. Platinum chrome on the top edge creates a crisp, high-end border without taking over the ombre. This set looks great on cool undertones and pairs well with silver rings. It also photographs clean because the chrome line gives definition.
Apply cool nude gel and cure. Sponge near-black gel on the tip half, blending upward until the gradient is smooth but still dramatic. Cure and wipe. Paint a thin tack gel strip across the upper third, then apply platinum chrome powder and press lightly. Remove excess and seal with glossy top coat, making sure the chrome strip is fully sealed on the surface but not thick.
Editor's noteUse a striping brush and a steady hand; chrome edges look best when the line is straight.
Watch outDon't over-blend into the cuticle - black creeping too high makes it heavy.
16. Peony Pink Ombre to Fuchsia Tips with Prism Chrome Twist
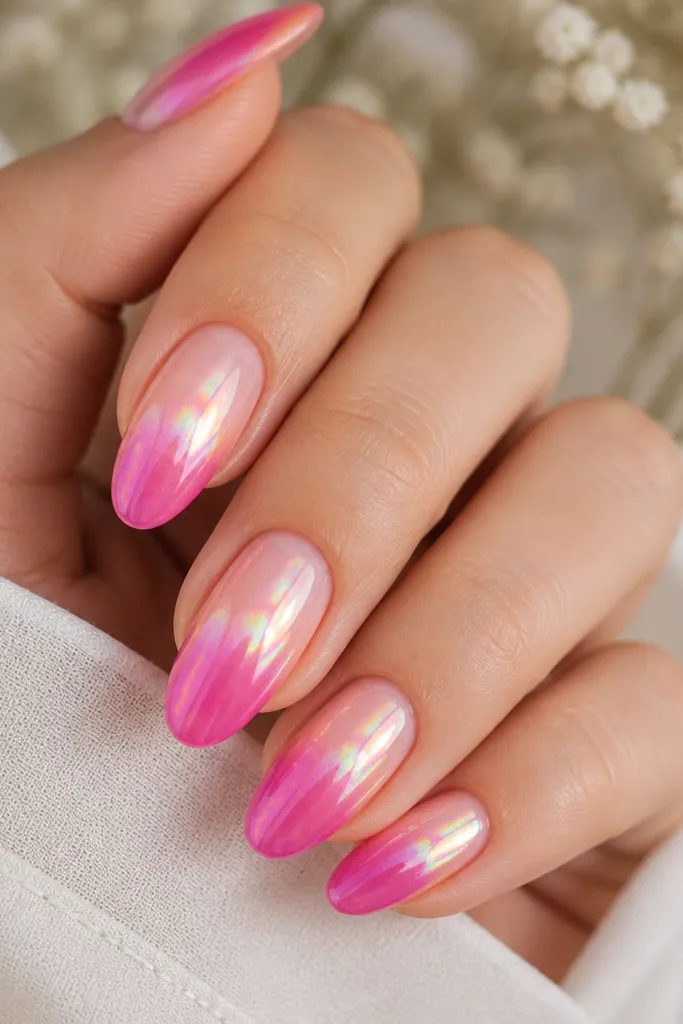
Fuchsia tips are bold, but the peony pink cuticle keeps this wearable. Prism chrome is different from standard mirror because it shifts tones - it looks like the manicure changes as you move. I love this for nights out because the chrome grabs stage lighting and makes the ombre transition pop. It flatters medium skin tones and looks amazing with bright lip colors.
Apply peony pink gel at the cuticle and cure. Sponge fuchsia gel from mid-nail to tip in thin layers, blending upward so it looks smooth. Cure and wipe. Apply tack gel on the upper half, then use prism chrome powder and press with a chrome applicator. Seal with glossy top coat and cap the free edge. If you want extra pop, add a second very thin top coat after the first cures fully.
Editor's notePrism chrome looks best when you don't overwork it - press once, then seal.
Watch outAvoid using prism chrome over a textured nail surface - it turns patchy.
17. Nude Beige to Caramel Ombre with Copper Chrome Crescent
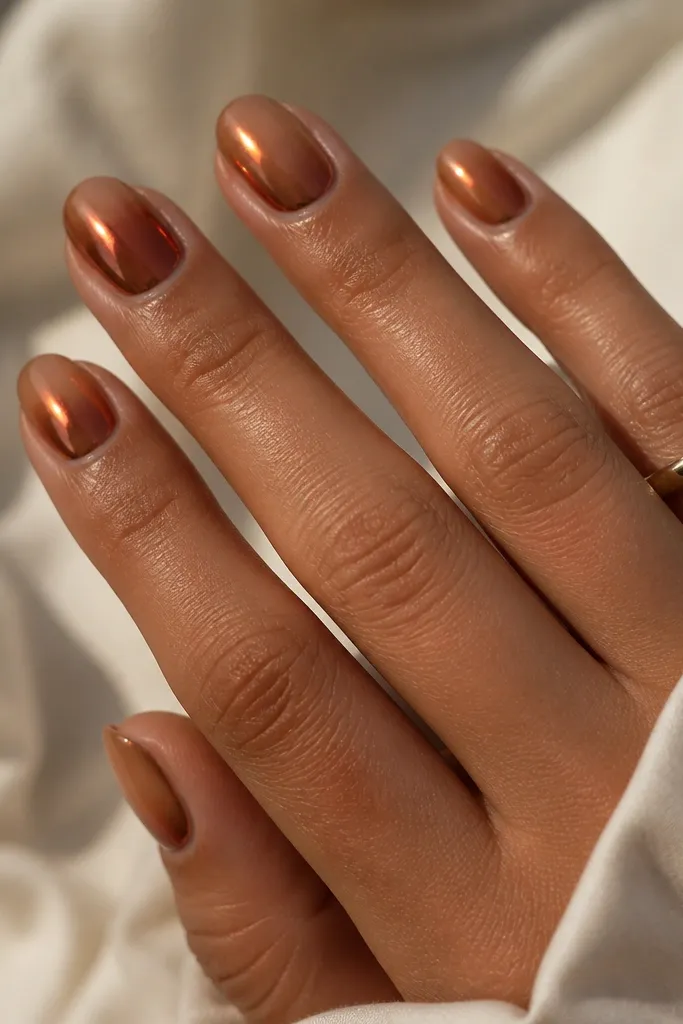
Copper chrome is my favorite for fall because it feels warm without being too orange. Nude beige makes the ombre look clean, and caramel tips add depth that looks great with sweaters and boots. The copper crescent placement makes the set feel designed, not random. This is a flattering choice for warm and neutral undertones, especially if you wear bronze or rose-gold jewelry.
Apply nude beige gel and cure. Sponge caramel gel from the middle to the tip, blending upward lightly so the transition is soft. Cure and wipe. Paint tack gel into a crescent across the upper half, centered on the nail. Press copper chrome powder onto the crescent, then brush off excess. Seal with glossy top coat and cap the tip.
Editor's noteIf copper looks too red, mix a tiny bit of clear top gel with the tack layer before applying powder for a softer reflect.
Watch outSkip silver base tones under copper - it can make the copper look dull.
18. Sheer Pink to Soft Navy Ombre with Steel Chrome Tip Glow
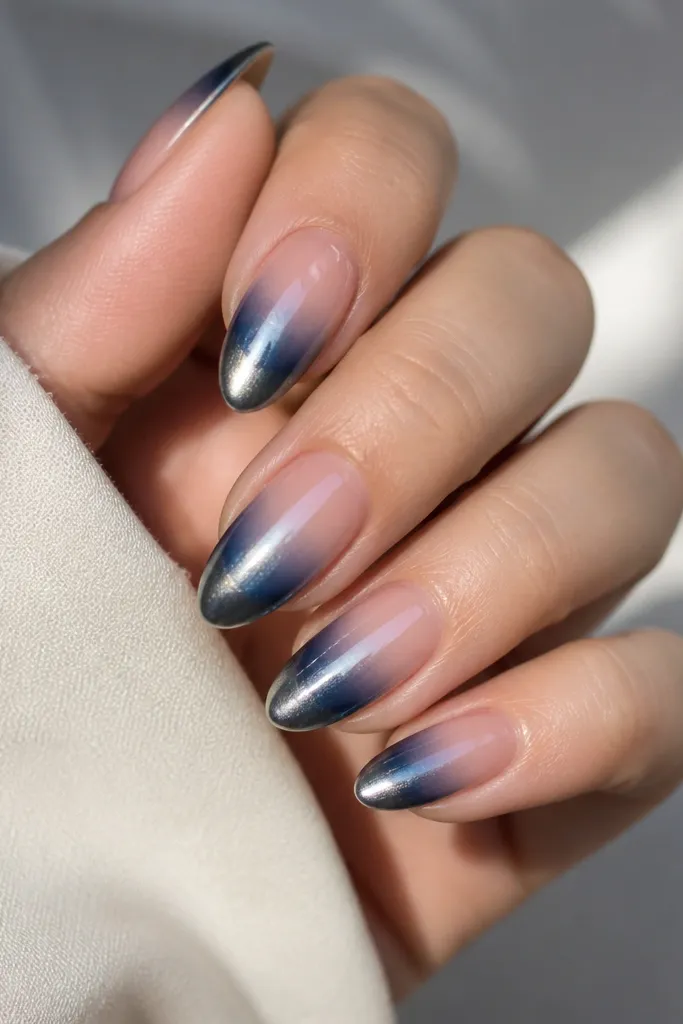
Soft navy is the grown-up alternative to bright blue, and the sheer pink cuticle keeps it romantic. Steel chrome near the tips gives a cool metallic glow that makes the navy look deeper. This combo flatters cool undertones and looks sharp with navy outfits, denim, and silver accessories. It's also great for people who want chrome but don't want it all over the nail.
Apply a sheer pink base gel and cure. Sponge soft navy gel from mid-nail to tip, blending upward in thin layers until it looks smooth. Cure and wipe. Add tack gel only on the lower tip area (upper half of the tip, not the full tip), then apply steel chrome powder and press gently. Seal with glossy top coat and cap the free edge so the chrome glow doesn't chip at the corners.
Editor's noteKeep the steel chrome slightly smaller than the navy area so the ombre edge stays visible.
Watch outDon't apply steel chrome at the cuticle - it makes the set look top-heavy.
19. Ivory Nude to Sage Green Ombre with Teal Chrome Edge
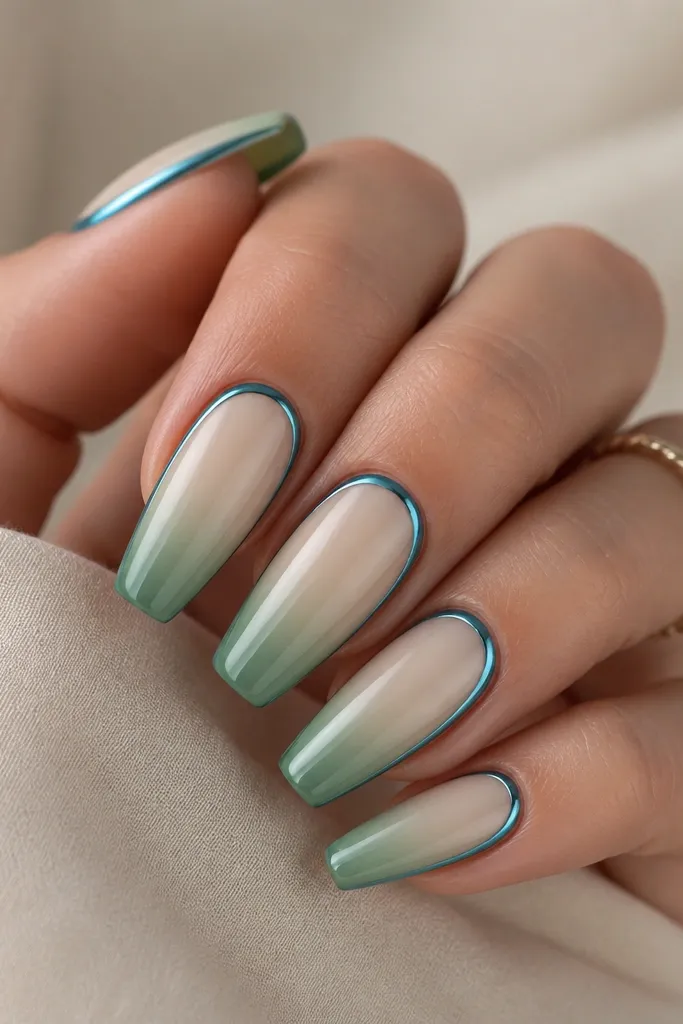
Sage green feels seasonal but it's actually wearable year round because it's muted. Ivory nude brightens the nail bed and makes the green look softer. Teal chrome edging adds a modern twist and keeps the design tied to the green family. This flatters light to medium skin tones and looks extra good with neutral outfits and gold or mixed-metal jewelry.
Apply ivory nude gel and cure. Sponge sage green gel from the middle to the tips, blending upward until the gradient looks airy. Cure and wipe. Paint a thin tack gel border along the upper edge of the nail, then apply teal chrome powder and press lightly. Remove excess and seal with glossy top coat. Cap the free edge with clear gel to prevent lifting where the chrome border meets the tip.
Editor's noteUse a thin border. A thick border makes it look like tape glitter.
Watch outSkip bright lime green - it turns the whole set into neon and clashes with chrome.
20. Beige Nude to Deep Plum Ombre with Silver Chrome Spark Veil
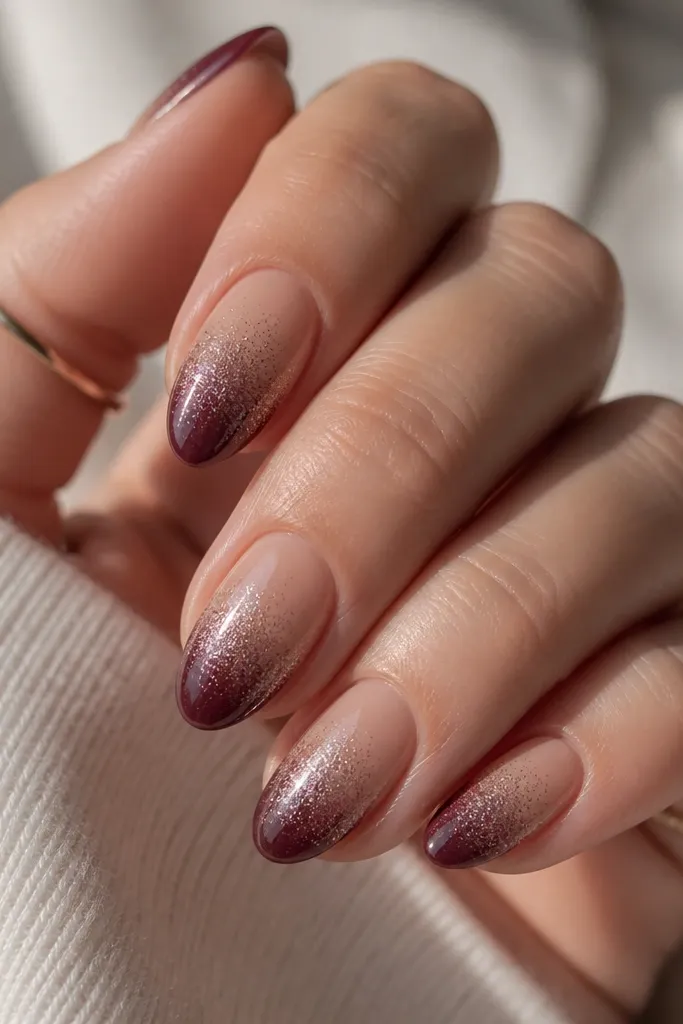
Deep plum is flattering because it adds depth without going full black, and beige nude keeps it clean and classy. Silver chrome spark veil makes the plum tips look richer by adding a cool highlight. This set is a great option if you want ombre chrome nails that still look office-appropriate. The spark veil also works on shorter nails because it doesn't require a lot of surface area.
Apply beige nude gel and cure. Sponge deep plum gel on the tip half, blending upward to create a soft ombre. Cure and wipe. Apply tack gel over the upper half lightly, then press silver chrome powder in a thin layer so it stays veiled. Brush off excess and seal with glossy top coat. Cap the free edge and check that the surface is smooth where ombre meets chrome.
Editor's noteIf your veil looks too heavy, apply top coat after curing the chrome, then buff lightly once it's set.
Watch outDon't pack on silver chrome - thick chrome over plum looks gray and cheap.
21. Clear Nude Jelly Ombre to Soft Rose Tips with Pink Chrome Pop
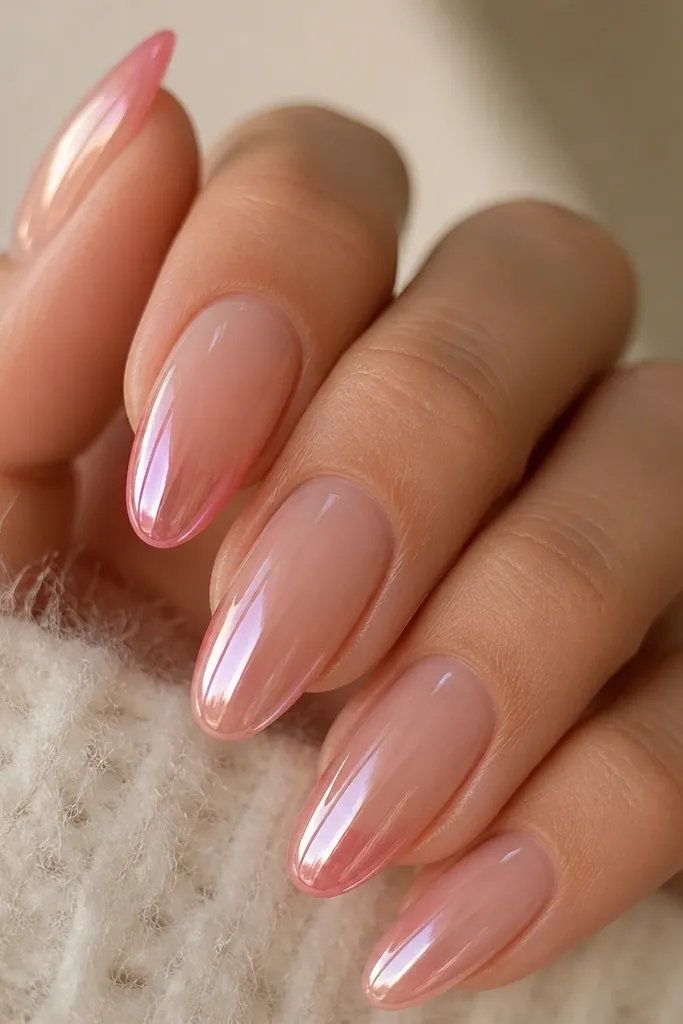
This is the "glossy, juicy" look that still counts as ombre chrome nails. Clear nude jelly makes your nails look hydrated, and soft rose tips are flattering on every undertone because the color is gentle. Pink chrome pop gives you a bright focal point without needing complex art. It's especially good for events because the chrome patch catches flashes from phones and cameras.
Apply clear nude jelly gel at the cuticle and cure. Sponge soft rose gel from the mid-nail to the tips in thin layers until the ombre is smooth. Cure and wipe. Apply tack gel on the upper half, but keep it in a patch shape rather than covering the entire area. Press pink chrome powder onto the patch, then seal with glossy top coat and cap the free edge. Clean up around the cuticle so the jelly base stays clean.
Editor's noteMake the chrome patch slightly off-center - it looks more natural than a perfect stripe.
Watch outSkip matte jelly - it kills the "juicy" look and makes chrome look flat.
22. Nude to Bronze Ombre with Dual-Color Chrome Split
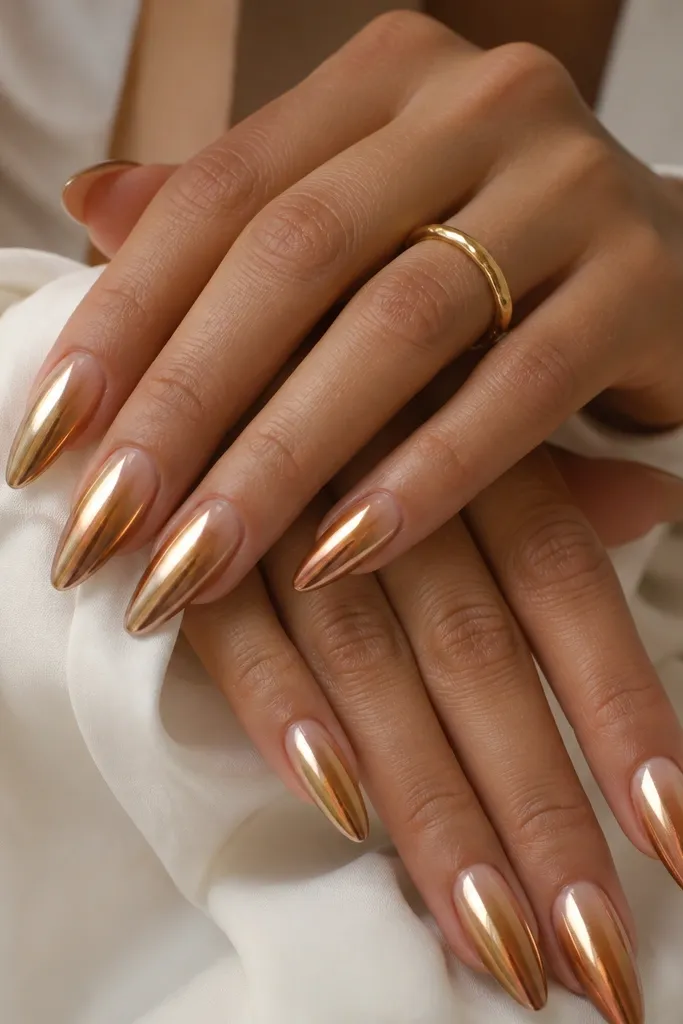
This set looks like custom jewelry because it mixes two warm metals. Nude-to-bronze keeps the gradient grounded, and the diagonal chrome split gives a design moment without needing gems. Gold and copper together flatter warm undertones and look amazing next to layered necklaces. The split also makes chrome feel intentional, not random.
Apply nude gel and cure. Sponge bronze gel on the tip half, blending upward until it's smooth. Cure and wipe. Paint tack gel on the upper half, then use a thin strip of tape as a guide for a diagonal split. Apply gold chrome powder on one side and copper chrome powder on the other, then remove tape carefully. Seal with glossy top coat and cap the free edge so both chrome sides stay locked.
Editor's noteUse tape only for the chrome split - remove it right after pressing powder so the edge stays crisp.
Watch outDon't mix the two powders together - you want a clean diagonal separation.
23. Rosy Nude to Warm Red Ombre with Red-Orange Chrome Fade
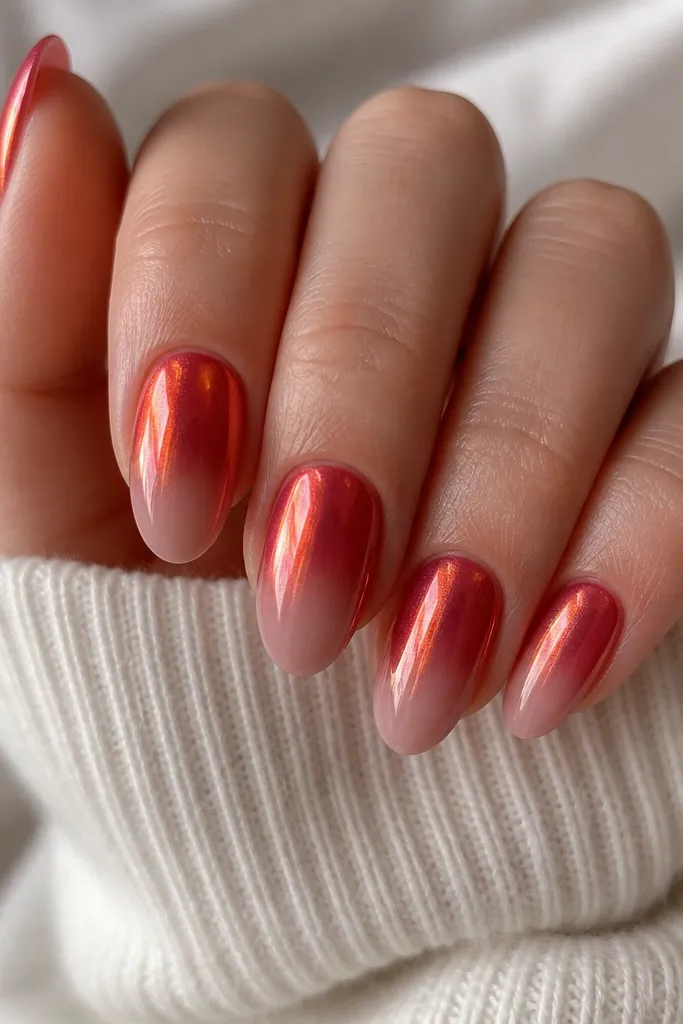
This set is bold but still wearable because the ombre starts soft. Warm red tips look flattering on medium to deep skin tones, and the rosy nude base keeps it from looking too harsh. Red-orange chrome fading over the upper half makes the manicure look like it has a second gradient layer. It's a great choice when you want chrome that feels warm and romantic instead of icy.
Apply rosy nude gel and cure. Sponge warm red gel from mid-nail to tip, building color in thin layers for a smooth blend. Cure and wipe. Apply tack gel on the upper half, then add red-orange chrome powder and lightly brush downward so it fades toward the center instead of stopping abruptly. Seal with glossy top coat and cap the free edge. Check the surface - the chrome fade should look smooth, not gritty.
Editor's noteIf chrome looks grainy, press with a clean applicator for 3-5 seconds before sealing.
Watch outSkip thick gel layers under chrome - they create texture and dull shine.
24. Neutral Beige Ombre to Soft Black Ombre with Graphite Chrome Strip
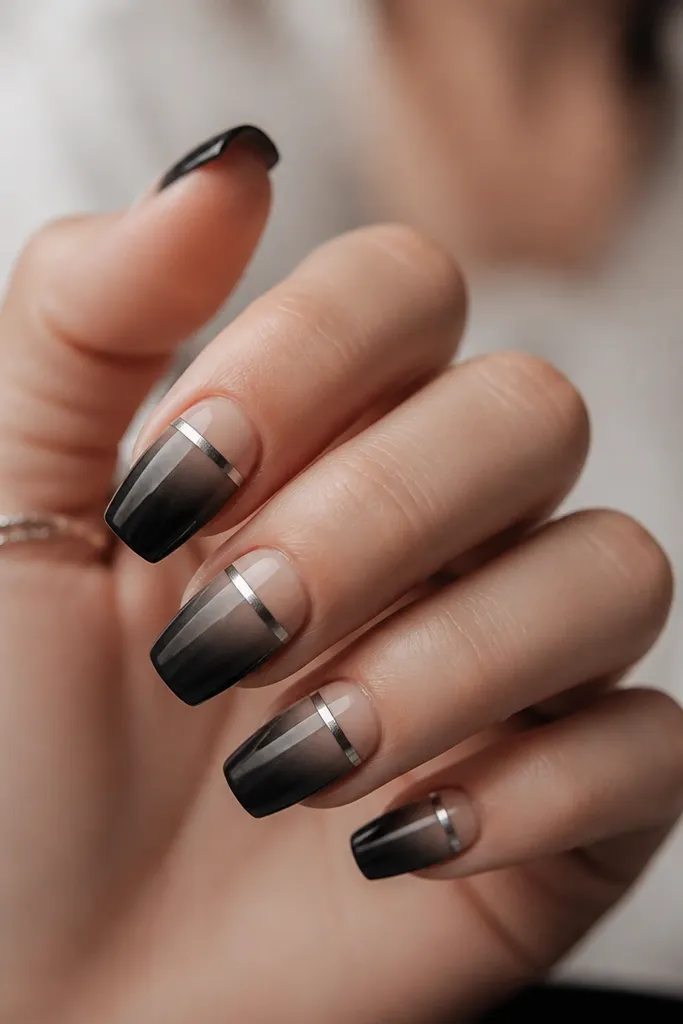
This is the edgy minimalist look that still feels luxe. Neutral beige keeps it wearable, and soft black tips look sophisticated instead of goth. Graphite chrome strip gives you a metallic detail that reads expensive because it's narrow and controlled. This set flatters hands that look best with clean lines and works with both casual and work outfits.
Apply neutral beige gel and cure. Sponge soft black gel on the tip half, blending upward so the ombre looks smooth and not stripey. Cure and wipe. Paint a thin tack gel strip across the upper third and apply graphite chrome powder, then press gently. Seal with glossy top coat and cap the free edge. Clean the strip edges with a small brush so the line stays crisp.
Editor's noteUse a striping brush to keep the chrome strip straight - crooked lines make it look DIY.
Watch outDon't make the strip too wide - wide graphite chrome reads heavy.
25. Pearl Nude Ombre to Lavender Tips with Iridescent Chrome Glaze
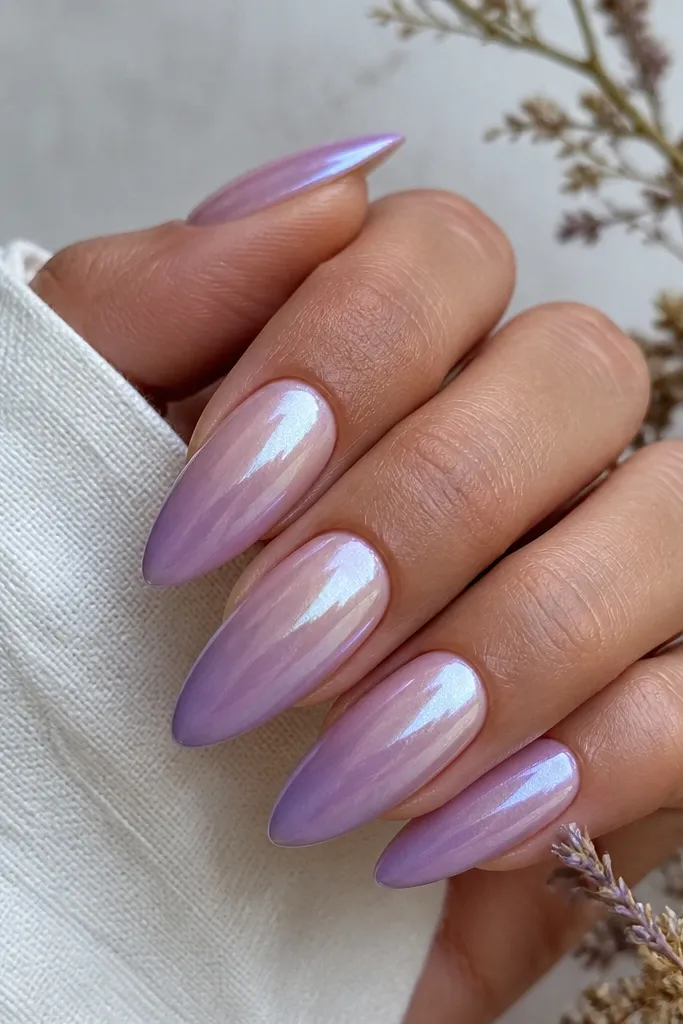
Pearl nude is a cheat code for year round ombre chrome nails because it makes the base look glowing even when you're not wearing heavy makeup. Lavender tips keep the set soft and pretty, and the iridescent chrome glaze adds dimension like a thin prism overlay. This flatters fair to medium skin tones and looks stunning with cool-toned outfits. It also photographs beautifully because the glaze shifts color under light.
Apply pearl nude gel and cure. Sponge lavender gel from mid-nail to tip in thin layers, blending upward for a smooth fade. Cure and wipe. Apply tack gel on the upper half, then use iridescent chrome powder and press lightly so it stays like a glaze. Seal with glossy top coat, and cap the free edge. If you want more shift, add a second ultra-thin tack layer and press again only on the topmost area.
Editor's noteDon't overpress iridescent chrome. Gentle pressure keeps the shift looking soft.
Watch outSkip thick top coat right after chrome - it can bury the shimmer.