1. Milk-Chocolate Half-Moon Cuticle
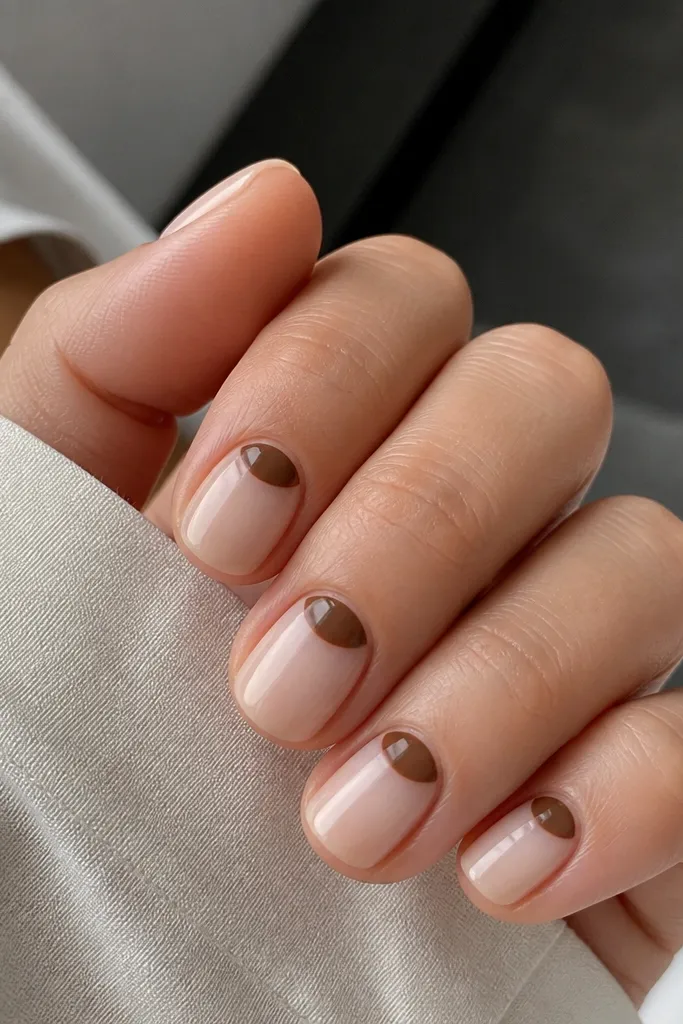
This is my go-to when I want classy brown nails with zero complicated drawing. The nude base makes the nail look clean, and the half-moon adds contrast without taking up length. Milk-chocolate brown also flatters warmer skin tones and looks natural next to gold rings. The glossy top coat makes the half-moon look like it was painted in one pass.
Start with a nude base that matches your skin depth (think pink-beige, not white). Use a small detail brush or a half-moon stencil to paint the chocolate shape. Keep it about 1/6 of the nail width on each side, and make the curve follow your cuticle line.
Editor's noteUse tape to mask the edges for one nail first, then repeat the same curve width across the rest.
Watch outDon't let the half-moon creep into the center - it looks messy on short nails.
2. Espresso French Tip with Soft Fade
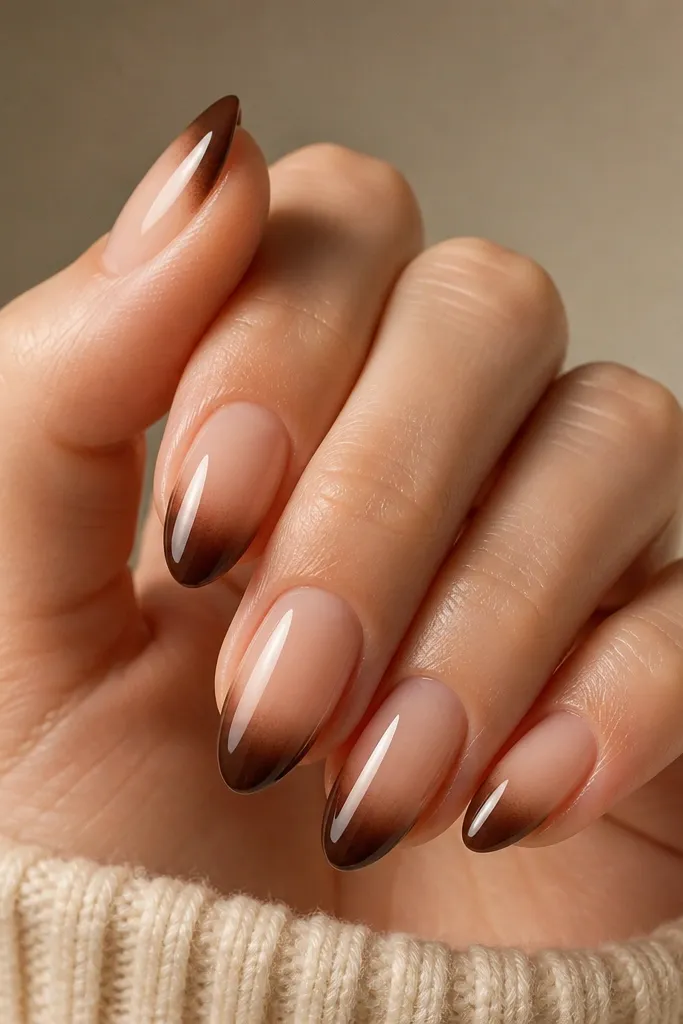
French tips usually look best when they're clean, and this one looks expensive because the edge is softened. Espresso brown is deep enough to define the nail, while the fade prevents the design from looking like a sticker. It also works on tiny nails because the gradient doesn't add extra bulk. When light hits the glossy top, the fade looks like a salon airbrush.
Paint a nude base, then use a makeup sponge (cut into a small wedge) to dab espresso at the tip. Blend upward lightly with the sponge edge so the brown turns translucent near the middle. Seal with a thick top coat to smooth any sponge texture.
Editor's noteFor a smoother fade, wipe excess polish off the sponge on a paper towel before you touch the nail.
Watch outAvoid a straight, hard tip line - it makes short nails look stubby.
3. Caramel Dot Confetti
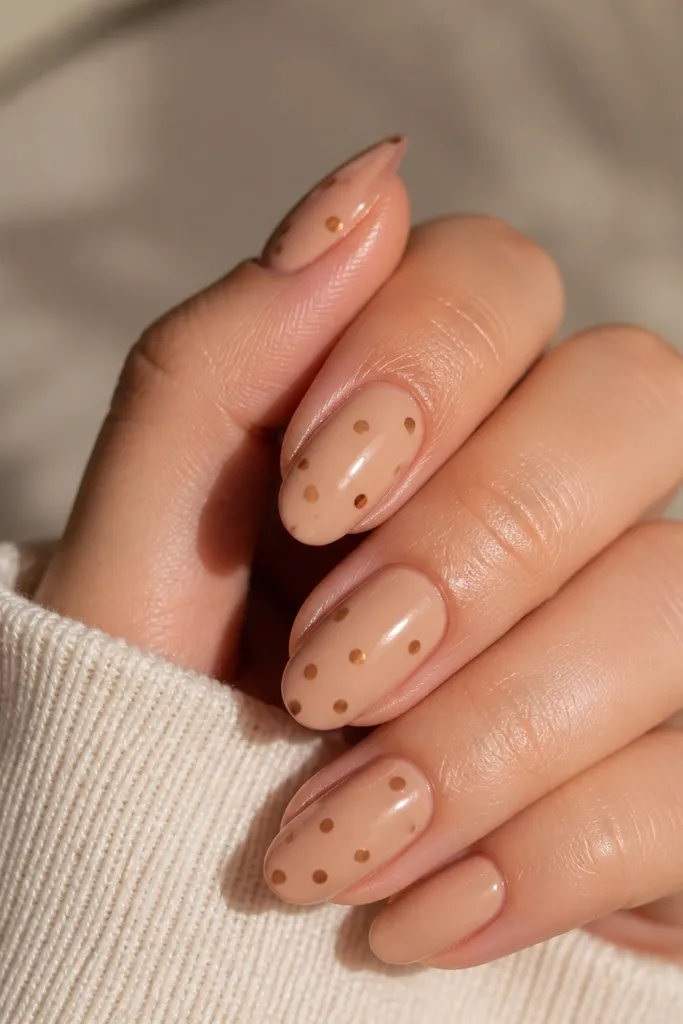
Dots are the fastest nail art that still looks intentional. Caramel brown dots read warm and "cozy," and the sheer base keeps everything light. Because the dots are clustered, the nail looks fuller without increasing length. It's also forgiving if your dots aren't perfectly round - the repetition makes it look designed.
Use a sheer nude as the base. With a dotting tool or bobby pin tip, place one larger dot in the center third of the nail, then add 2-4 smaller dots around it. Mix caramel and light taupe for one accent nail if you want extra depth.
Editor's noteKeep your dot size consistent by loading less polish on the tool each time.
Watch outDon't spread dots across the whole nail - it makes the design feel chaotic on short lengths.
4. Toffee Diagonal Micro-Line
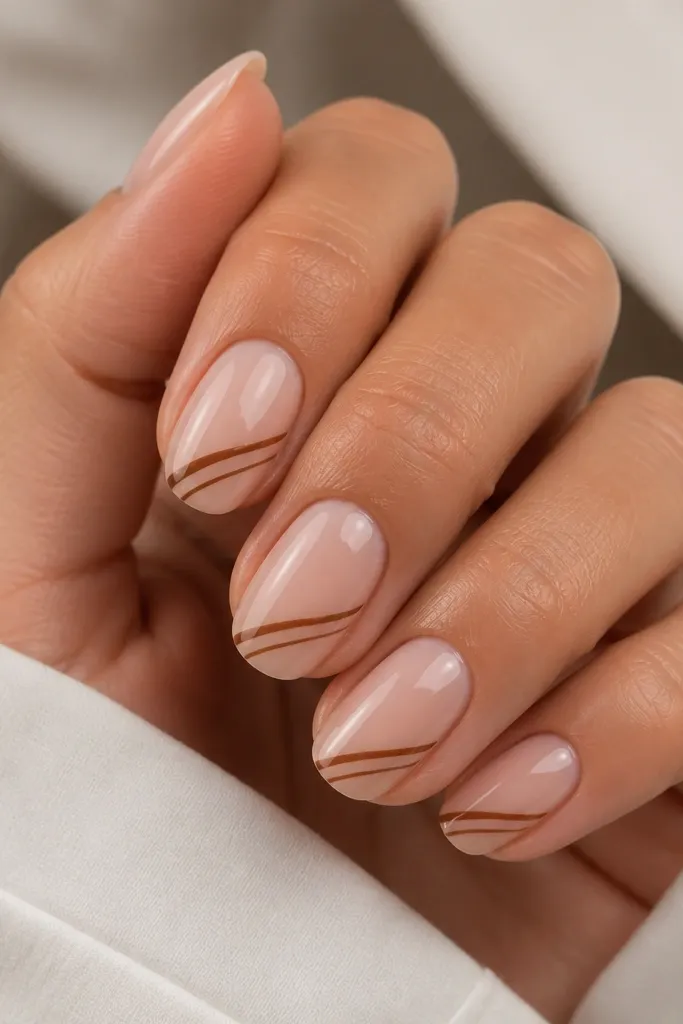
This design looks sharp because it uses one thin element. The diagonal line pulls the eye and makes the nail look longer, which matters for small space brown nails ideas when you're working with short lengths. Toffee brown is slightly lighter than espresso, so it reads soft instead of harsh. The single-line approach also means you can do it without striping tape.
Paint a creamy nude base. Use a liner brush to draw a straight diagonal line across the center third - leave equal space above and below it. Keep the line off the cuticle area by at least 1 mm.
Editor's noteIf your brush drags, dip the brush in top coat first, then pick up the brown pigment.
Watch outDon't make the line thick - thick lines make the nail look shorter.
5. Espresso Marble Swipe
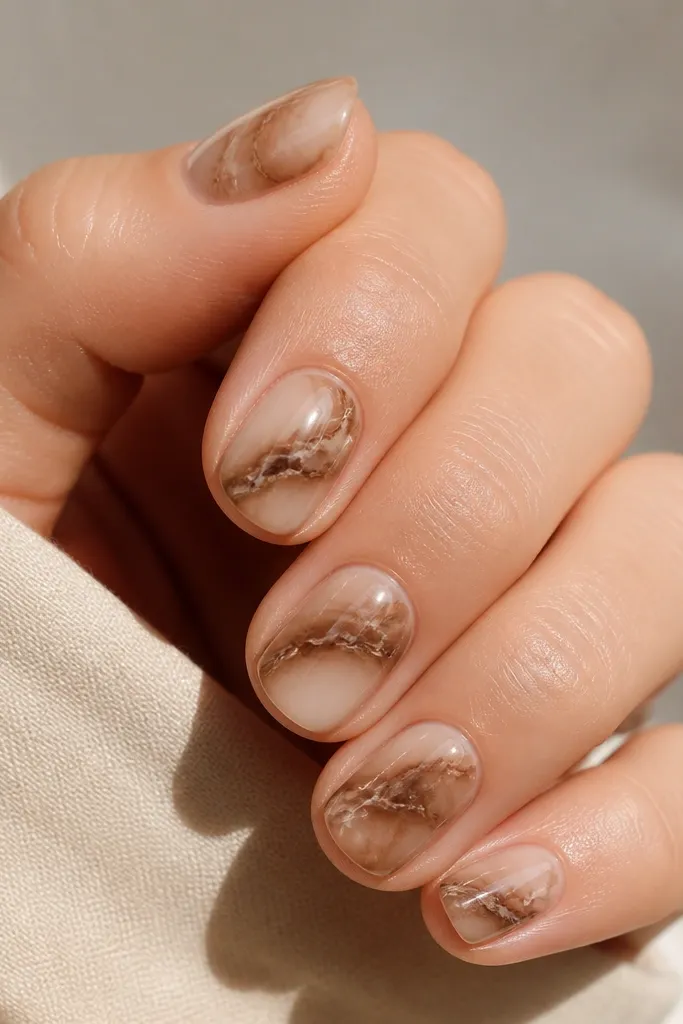
Marble looks fancy, but you don't need a whole kit. Espresso swipes create depth, and the lighter streaks keep it from looking like a muddy brown blob. On short nails, marble should be concentrated in the center so it doesn't overpower. The glossy top coat makes the swipes look like glass.
Base coat in nude-beige. On a plastic palette, thin espresso-brown polish with a couple drops of top coat so it spreads. Use a sponge tip or thin brush to drag cloudy swipes across the center third, then add a few lighter taupe streaks.
Editor's notePractice one swipe on a foil scrap first - marble looks right when the motion is fast.
Watch outAvoid heavy layering of dark polish - it turns marble into flat patches.
6. Hazelnut Negative Space V
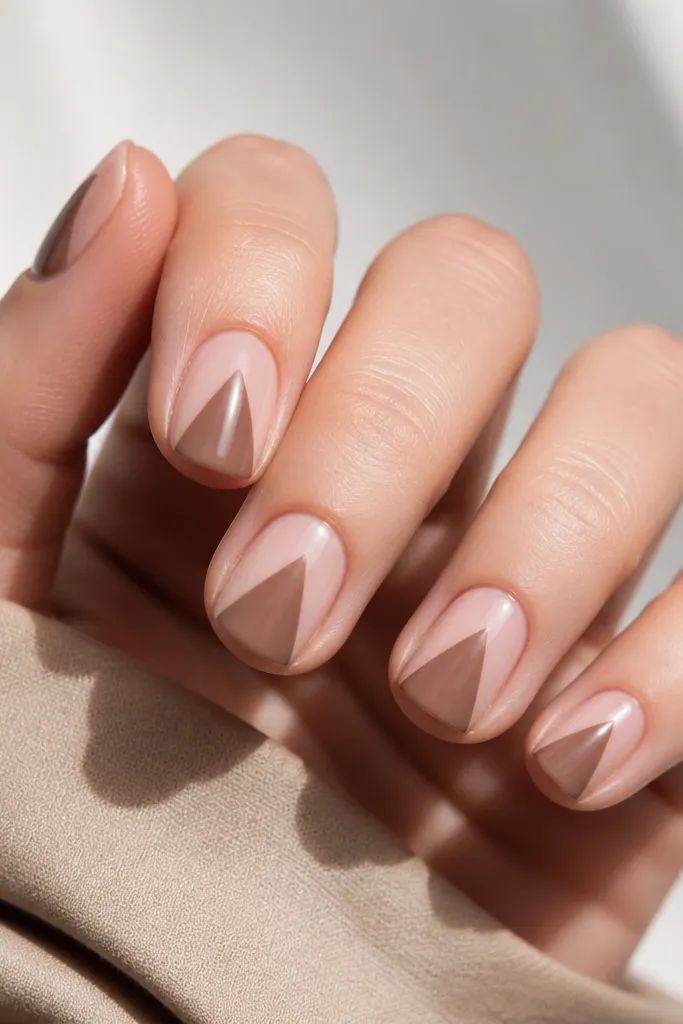
Negative space is your best friend when you're trying to keep things neat with limited tools. The V shape creates a lift and makes nails look longer, and the hazelnut brown adds warmth. Leaving the rest bare keeps the design light, not heavy. This one looks good on every nail because the shape is easy to repeat.
Start with sheer nude or a nude base that matches your nail. Use a small brush to paint the two sides of the V, starting near the middle third and meeting at a point around 1-2 mm below the tip. Keep the V narrow so it stays elegant on short nails.
Editor's noteUse a dot at the meeting point first, then draw two lines up to it.
Watch outDon't fill the V all the way to the cuticle - it can look crowded on small nails.
7. Cocoa Glazed Donut Topcoat
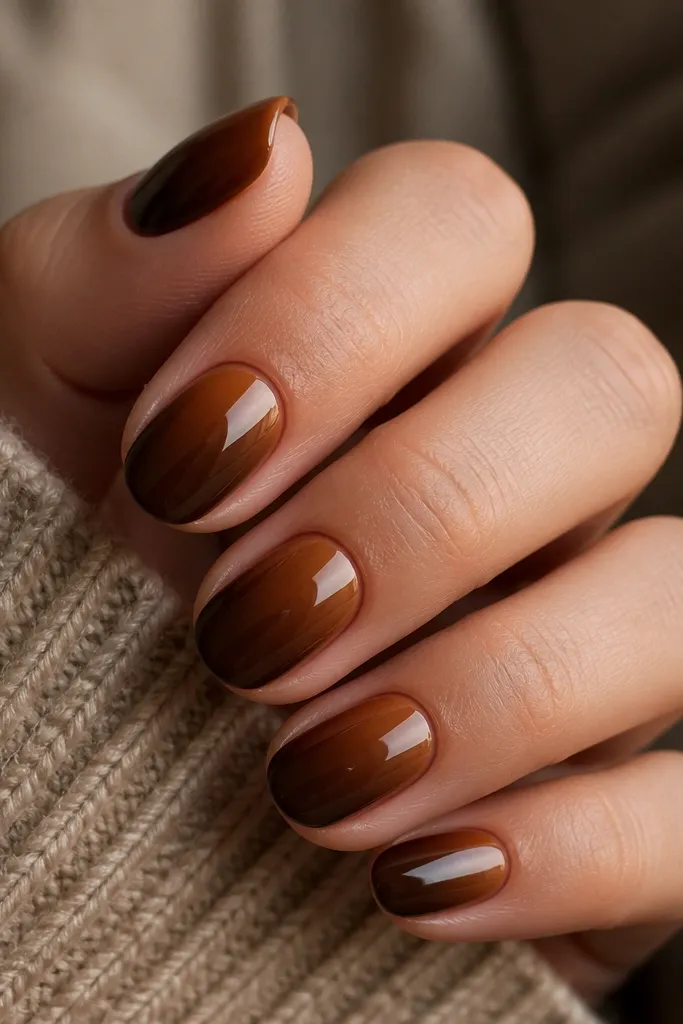
This is for days you want brown nails that look expensive but don't require precision. The "glazed" effect comes from using a lighter brown highlight over a deep base. It reads like a manicure photo filter even in real life. When the top coat is glossy, the highlight catches light and gives dimension.
Base coat in deep cocoa brown. After curing or drying, add a lighter caramel-brown glaze in a curved band across the top third of the nail, leaving the lower part darker. Blend the edges with a soft brush or sponge so it looks like a smooth gradient.
Editor's noteSeal with a thick top coat so the glaze has that smooth, donut-sheen look.
Watch outAvoid matte top coat - glazed styles need shine.
8. Chestnut Scallop Tip
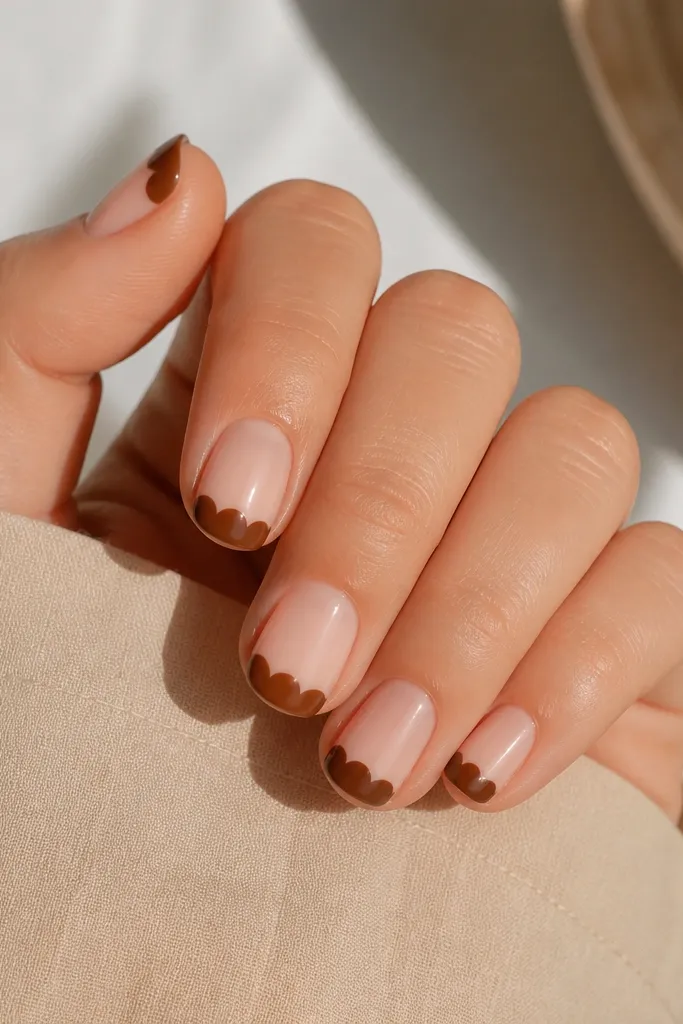
Scallops look cute and polished because they mimic lace-like edges. Chestnut brown keeps it warm and wearable, and the scalloped border adds texture without needing gems. On short nails, keep scallops small so the tip stays in proportion. The glossy top makes the scallop curve look crisp.
Use a nude base. With a dotting tool, stamp tiny half-moons across the tip edge, then connect them lightly with the brush if needed. Plan for 5-7 scallops per nail depending on width.
Editor's noteStamp on one nail slowly, then speed up once your spacing looks right.
Watch outDon't make the scallops too large - they swallow the nail on short lengths.
9. Espresso Striped Tape Accent
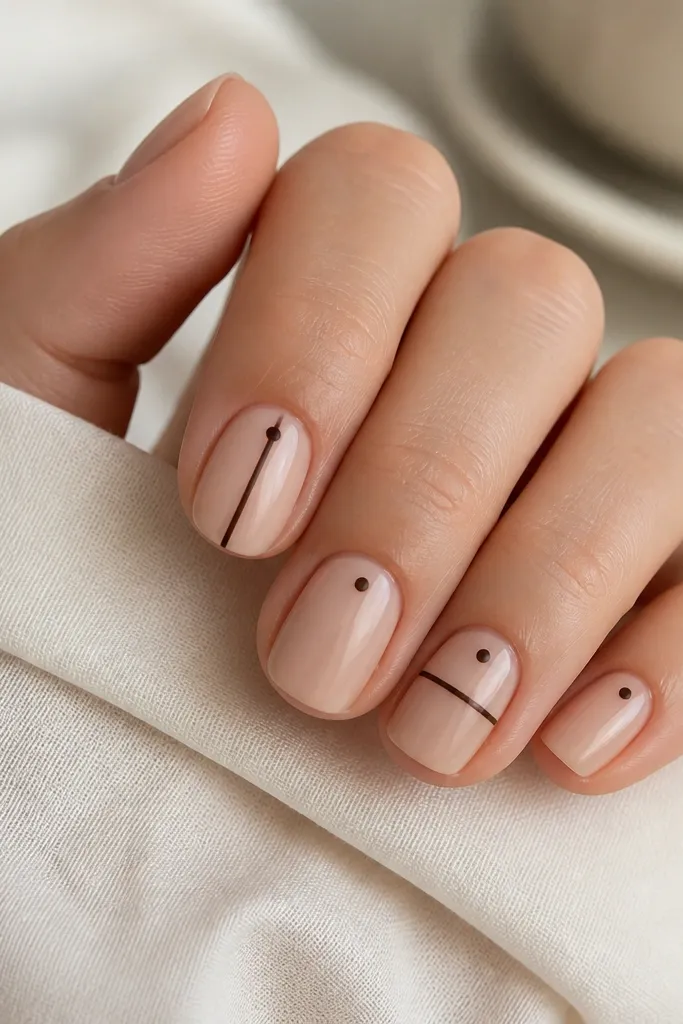
Striping tape makes clean lines possible even in a small apartment where you don't want to fight a liner brush. Espresso stripes look crisp against nude and make your nails look "styled," not random. The mix of stripe and dot keeps it from feeling too graphic. It's also easy to match to your outfit because brown stripes go with everything.
Base coat nude. Press striping tape onto one nail in a vertical center stripe, then add a thin horizontal stripe crossing it. Paint espresso over everything, remove tape while polish is still tacky, and top coat.
Editor's noteUse tweezers to pull tape straight up so you don't peel the nail polish underneath.
Watch outDon't leave tape on after it fully dries - you'll tear the edge.
10. Caramel Ombré Tip Fade
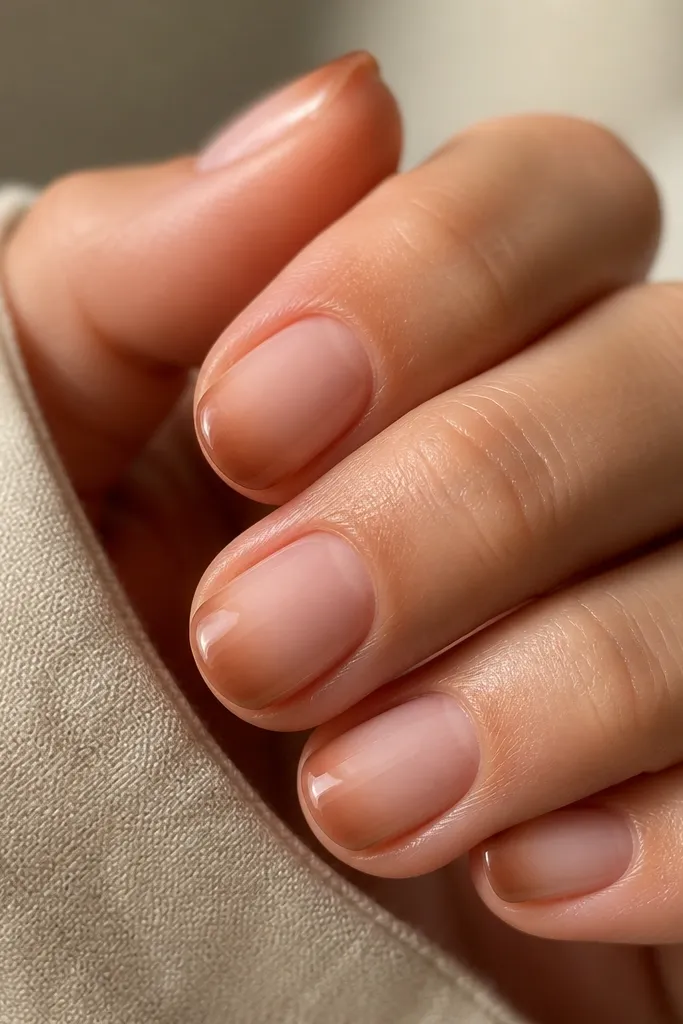
A caramel ombré tip is the brown version of a soft latte. It flatters short nails because the darkest part sits at the tip, and the fade makes the rest look clean. The caramel tone feels lighter than espresso, so it looks fresh instead of heavy. Glossy top coat makes the blend look like a salon airbrush.
Base nude. Sponge caramel brown at the tip first, then blend upward with a clean sponge edge. If you see harsh spots, add one more thin layer of nude over the fade and blend again.
Editor's noteUse a makeup wedge sponge and rotate it each nail - it prevents repeated sponge marks.
Watch outAvoid thick layers of brown at the tip - they dry lumpy on short nails.
11. Mocha Half-Side Nail Art
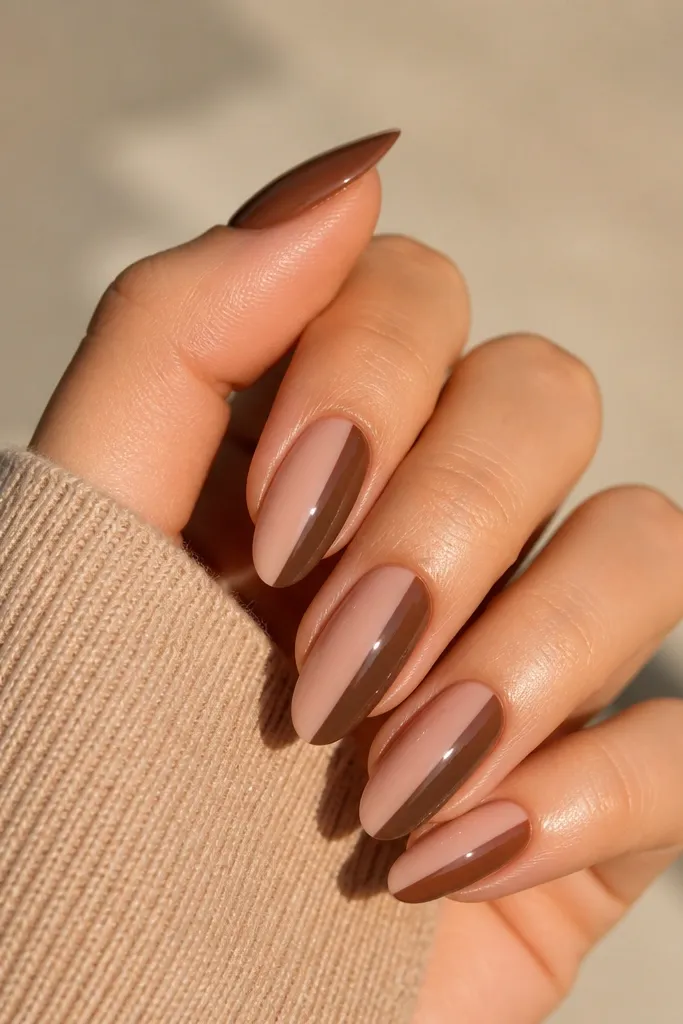
Half-side panels look bold without needing long nail length. Mocha brown has enough depth to look intentional, and the sharp vertical line gives a sleek, modern look. This design also hides small imperfections because the boundary line is your guide. Keep it glossy so the panel looks smooth and high-end.
Base with nude. Paint mocha brown on one side from near the cuticle to just before the tip edge, then keep the vertical line straight using the sidewall as a reference. Do it on every nail or alternate one plain nude nail for variation.
Editor's noteUse a thin brush loaded lightly so the brown line stays crisp.
Watch outDon't paint the brown over cuticle skin - clean edges make half-panel designs look expensive.
12. Espresso Dot Frame
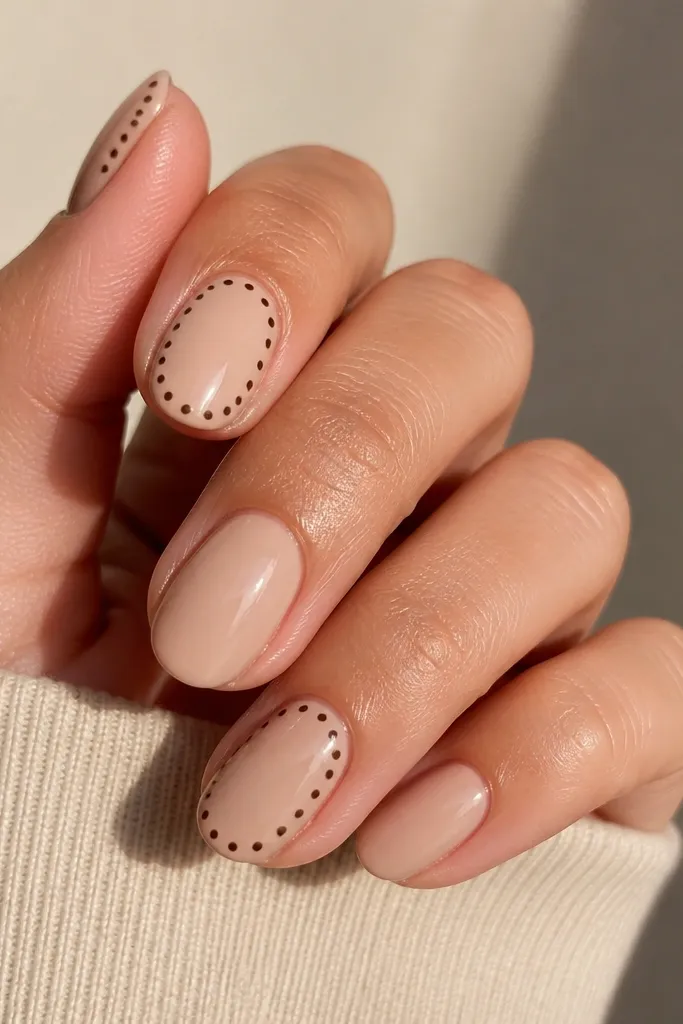
A dot frame adds structure and makes the nail look "designed" without filling the whole surface. Espresso dots are dark enough to show contrast, and leaving the center nude keeps it airy. On short nails, a small frame in the center third elongates visually. It also hides uneven base coverage because the frame is the focus.
Base nude. With a dotting tool, place dots to form a rounded rectangle in the center of the nail. Connect the dots lightly with a tiny brush if you want a more defined frame, but keep most of it dot-only for texture.
Editor's noteMake the frame slightly wider than the nail bed so it feels balanced, not cramped.
Watch outDon't make the frame too big - big frames dominate short nails.
13. Toffee Micro French Corners
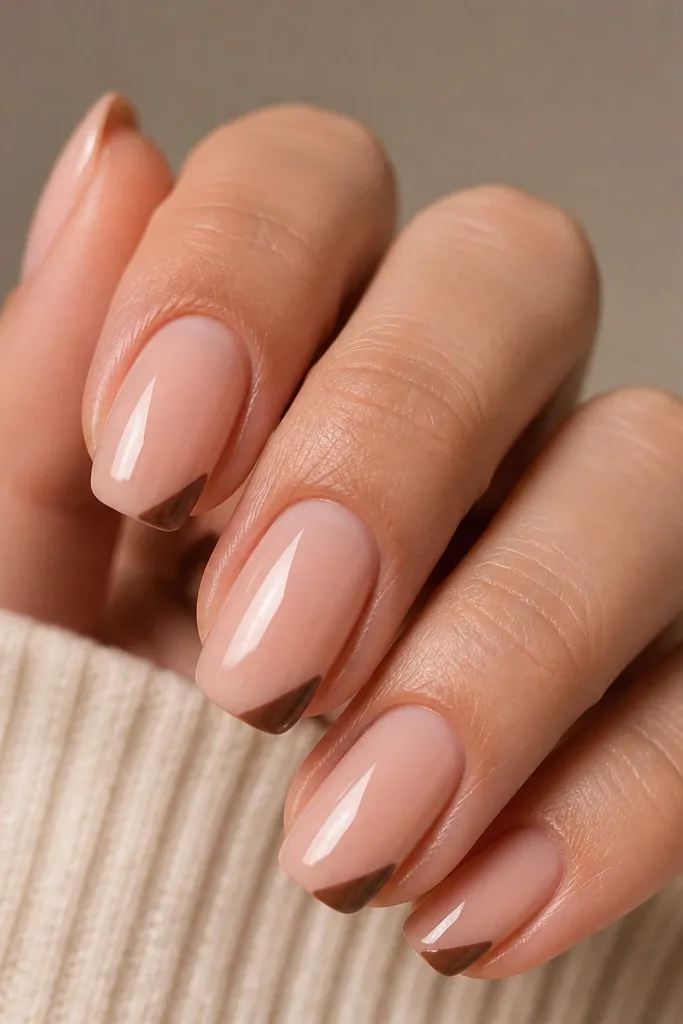
This is a clever way to do French tips without covering much nail area. The corners define the shape and make the nail look neatly finished. Toffee brown is softer than espresso, so the design stays wearable. It's also great for chipped nail edges because the corners camouflage uneven tip wear.
Base nude. Paint two tiny angled toffee tips at each side of the nail, stopping before the center tip. Keep the angles about 1-2 mm from the sidewall and align them across nails.
Editor's noteUse a strip of tape as a guide for the angle, then remove it right away.
Watch outAvoid painting a full tip - it defeats the "micro" look on short nails.
14. Cinnamon Ombre Side Swoosh
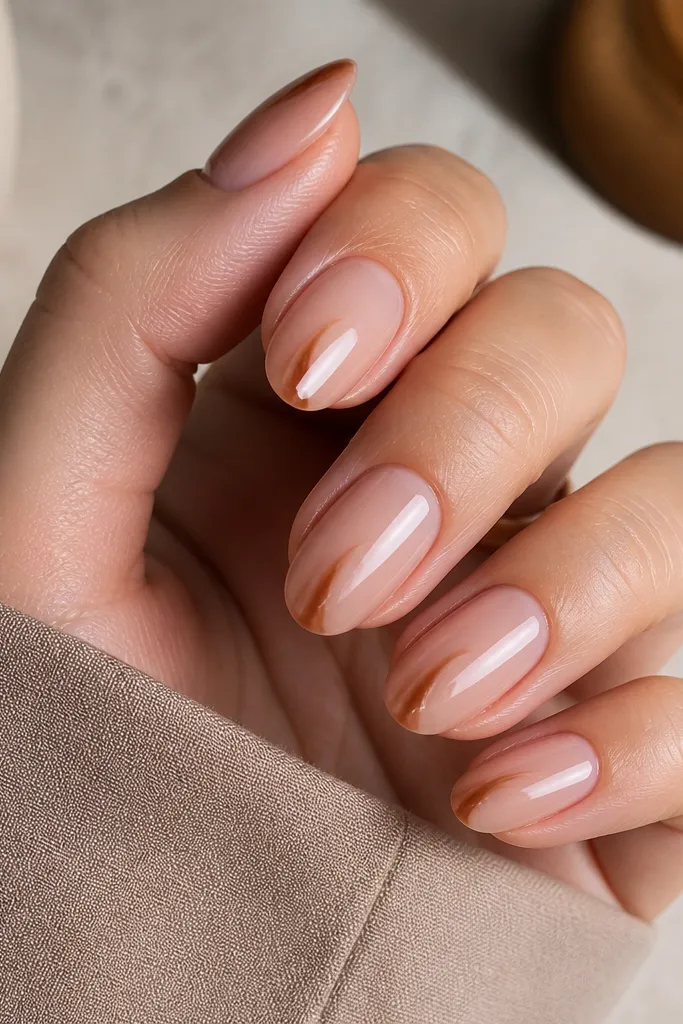
Side swooshes look artsy but still clean. The cinnamon tone adds warmth, and fading the swoosh keeps it from looking like a thick stripe. Because it curves, it visually follows the nail shape and makes the nail look longer. This one is also forgiving if your curve isn't perfect since the fade softens edges.
Base nude. Use a liner brush to place cinnamon near the sidewall, then blend it inward with a sponge tip so the center is lighter. Keep the swoosh about 1/4 of the nail width at its thickest point.
Editor's noteDo the swoosh on your dominant side first so you can mirror the curve on the other nails.
Watch outDon't make the swoosh reach the cuticle - it can look like a smear.
15. Espresso Velvet Matte with Glossy Dot
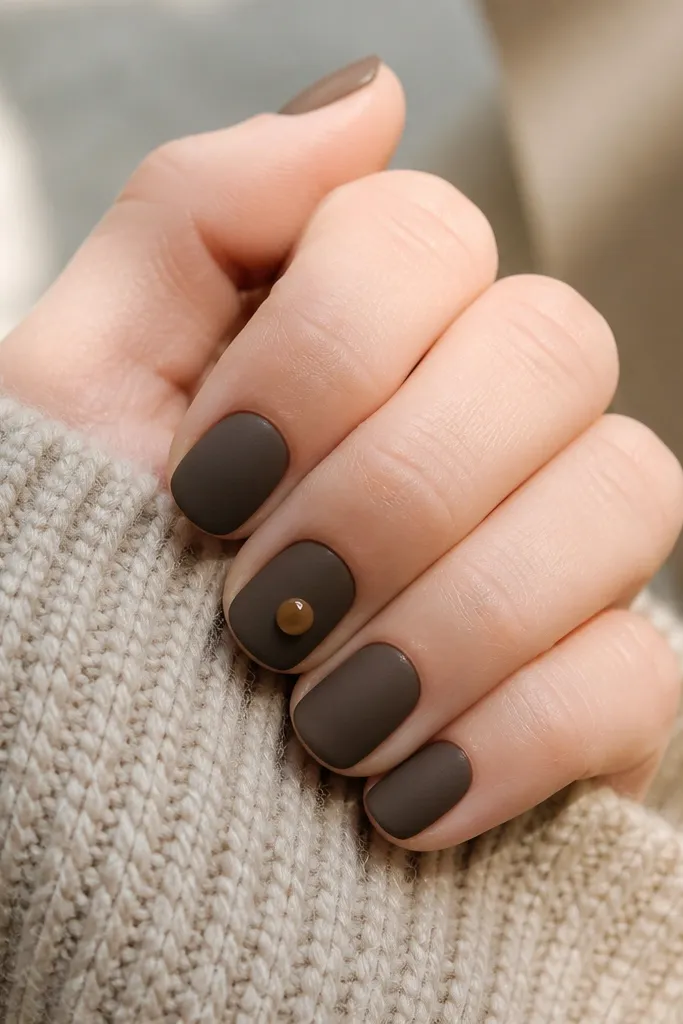
Matte espresso looks chic on its own, and the glossy dot adds a point of light that makes it feel intentional. The contrast between matte and gloss makes the manicure look higher-end even with minimal art. Caramel dot keeps the palette warm and stops the espresso from looking flat.
Apply espresso brown and finish with a matte top coat on most nails. On one nail, skip matte top for the dot area, then place a caramel dot and seal with glossy top only on that dot. Keep the dot about the size of a small pea.
Editor's noteIf you accidentally matte the dot, repaint the dot and re-top-coat just the dot area.
Watch outAvoid matte on every nail plus detailed art - it gets messy fast.
16. Brown Sugar Glitter Fade
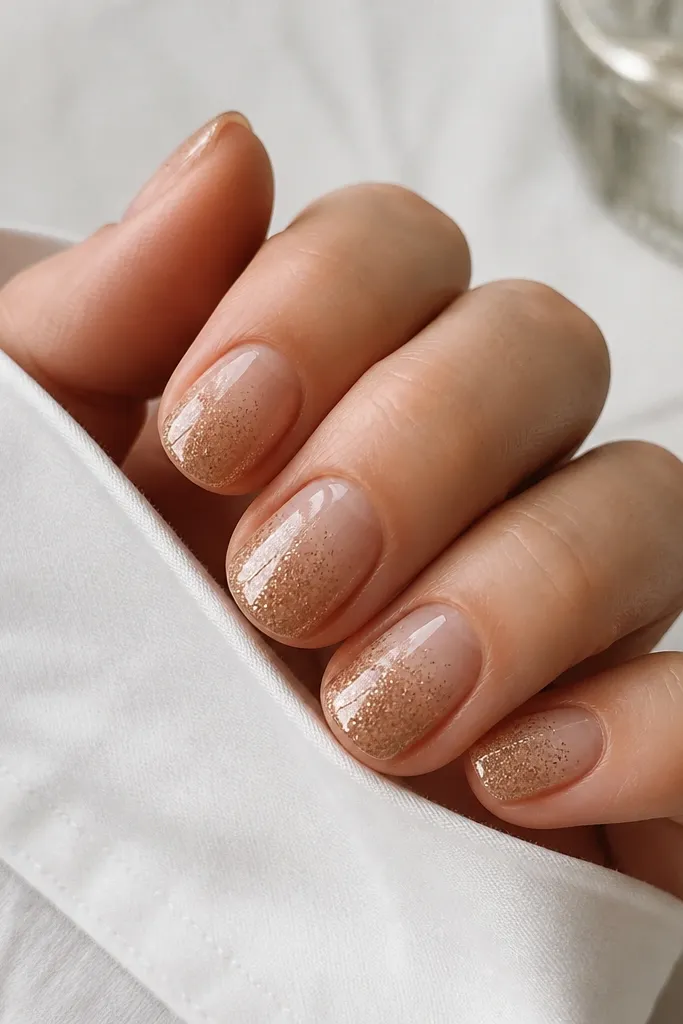
Glitter fades look great on short nails because they concentrate sparkle at the tip, where light hits. Brown sugar glitter is kinder than silver because it stays warm. The fade prevents the "holiday" look from feeling too loud. Glossy top keeps the shimmer smooth rather than gritty.
Base nude. Use a fine brown glitter polish or loose fine glitter with a sponge to dab at the tip. Blend upward lightly so it turns sheer in the center. Seal with a top coat that's thick enough to smooth texture.
Editor's notePress the sponge gently for 2 seconds per nail - it deposits glitter without streaks.
Watch outDon't use chunky glitter - it catches on fabric and lifts faster.
17. Espresso Crosshatch Accent
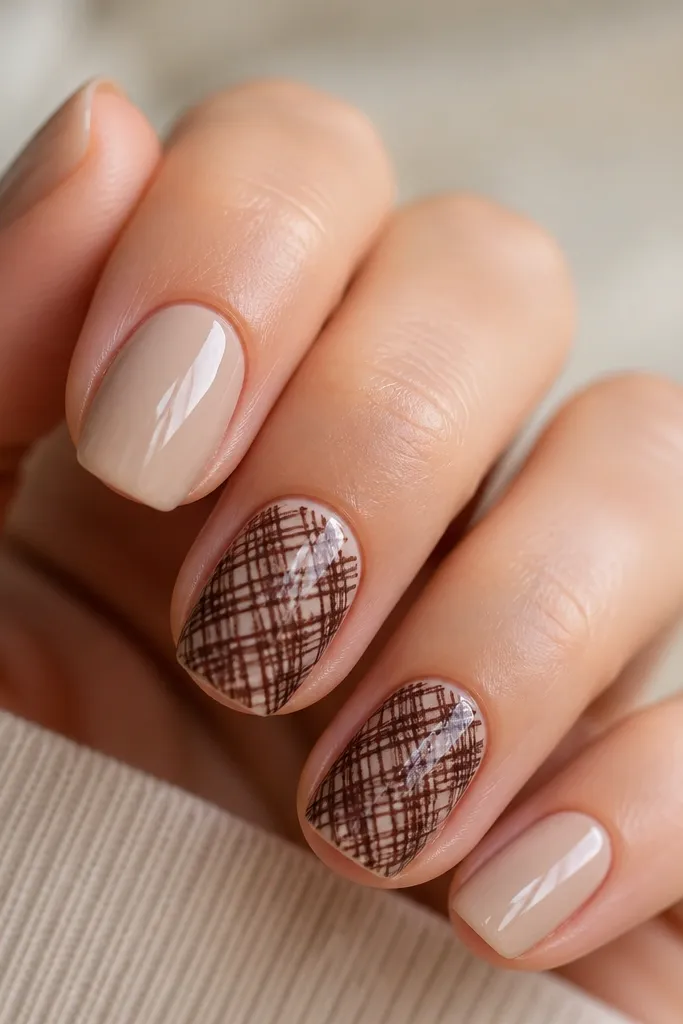
Crosshatch looks like knit fabric when it's small and concentrated. Espresso lines give contrast, and leaving most of the nail nude keeps it classy. This is a good option when you want nail art but you don't want to cover the whole nail with paint. It also looks great in photos because the lines catch light.
Base nude. On one or two nails, draw a few vertical lines with a liner brush, then add horizontal lines crossing them. Keep the grid area small - about the width of the nail bed and centered.
Editor's noteLet the first set of lines dry fully before the second set so you don't smear.
Watch outAvoid dense grids - they look messy and thick on short nails.
18. Caramel Aura Center Glow
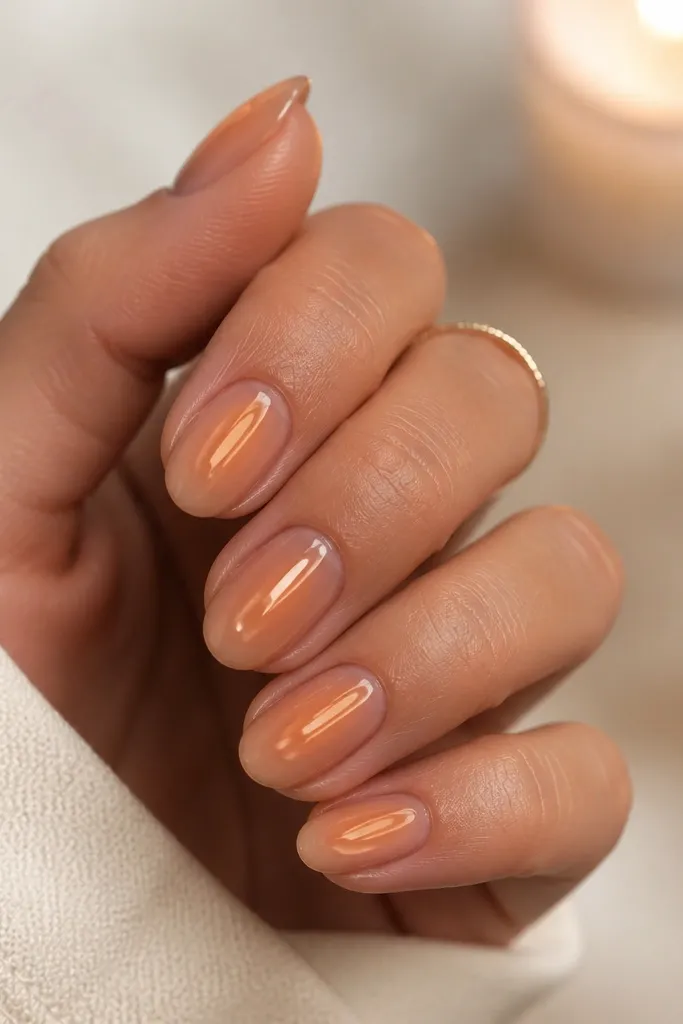
Aura nails are flattering because they create a soft halo that draws attention to the center of the nail. Caramel brown makes the glow warm and wearable. The fade outward keeps it from looking like a blob. This works in small space because you can do it with a sponge and you don't need to trace shapes perfectly.
Base sheer nude. Dab caramel brown in the center using a small sponge dot, then blend outward with an even lighter touch. Keep the aura circle about 1/3 of the nail width and centered.
Editor's noteUse a sponge with a flat edge so your aura edge stays smooth.
Watch outDon't put the glow too close to the cuticle - it shrinks the nail visually.
19. Mocha Lace Dot Overlay
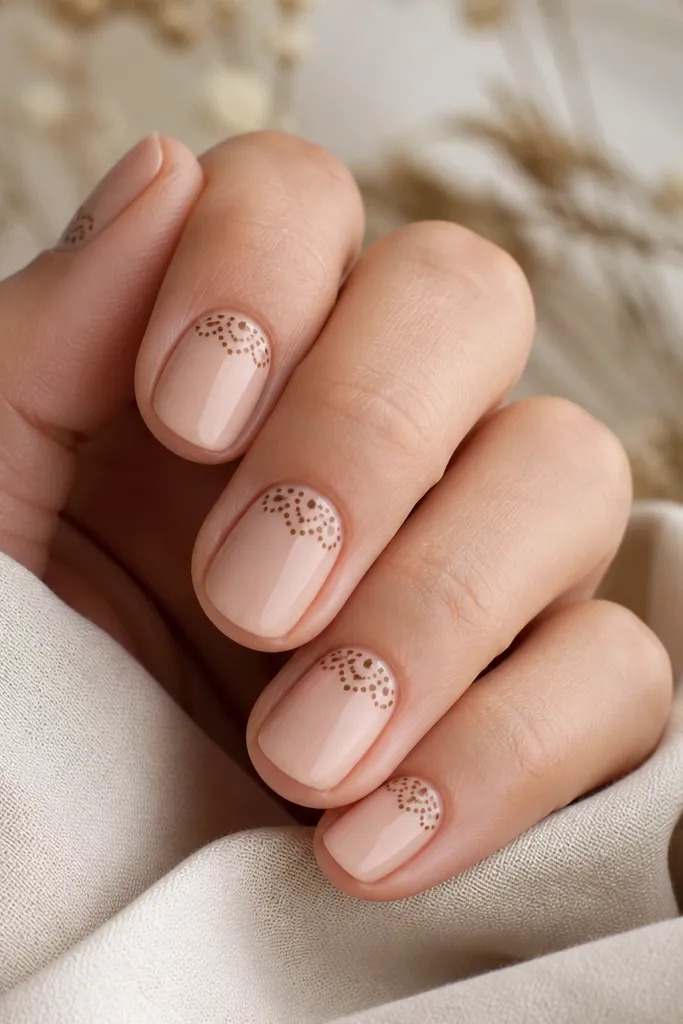
This lace-style dot pattern looks delicate without needing a stamping plate. Mocha dots near the cuticle add a decorative frame and make your nail look finished at the base. The nude base keeps it light, and the dot texture is forgiving if your dots vary slightly in size. It reads "romantic" but still fits brown nails ideas for everyday wear.
Base nude. Use a dotting tool to place dots in curved arcs near the cuticle, starting from the sidewalls and moving toward the center. Add a few dots to connect arcs into a loose half-lace shape.
Editor's noteKeep the lace pattern within the first third of the nail so it stays airy.
Watch outDon't overfill the lace area - too many dots look like a smudge.
20. Espresso Line Art Leaf
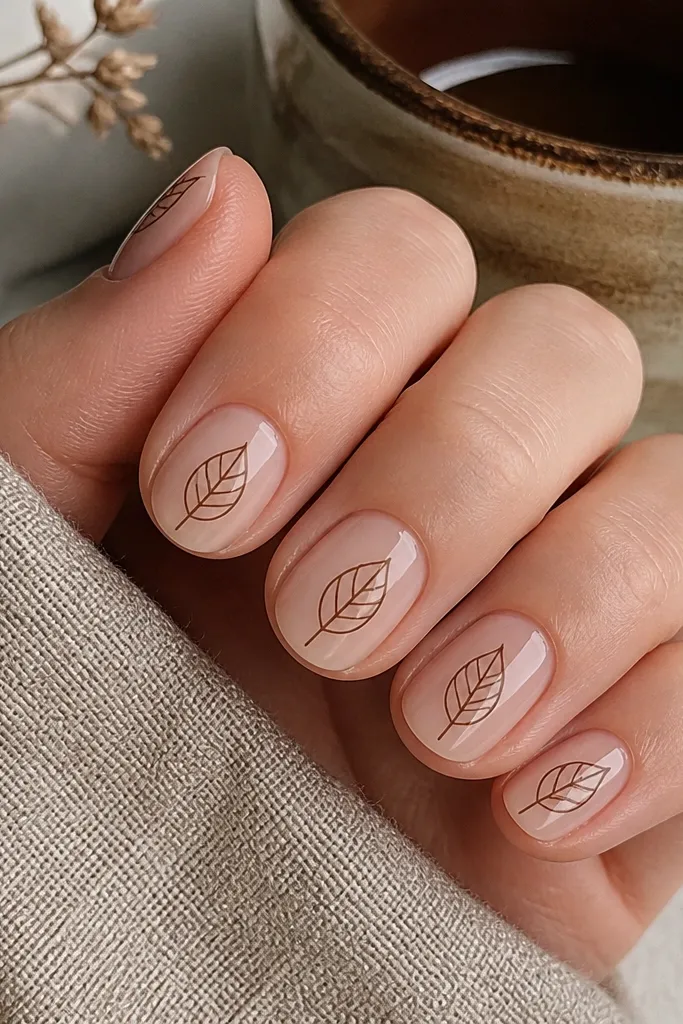
Line art looks clean when it's thin, and leaf shapes pair perfectly with brown tones. Espresso line art gives a classy botanical vibe without turning into a full painting. Because it's outline-only, it's easy to keep the nail looking neat even when you're rushing. It also gives your nails a "theme" without needing multiple colors.
Base nude. Use a fine detail liner brush to draw one leaf per nail near the center, angled slightly. Add 2-3 short vein lines and a tiny stem. Keep lines thin so the outline stays crisp after top coat.
Editor's noteIf your brush is too thick, wipe it on a paper towel until the line becomes hair-thin.
Watch outAvoid filling the leaf in dark - outline-only looks more expensive.
21. Caramel and Nude Checker Accent
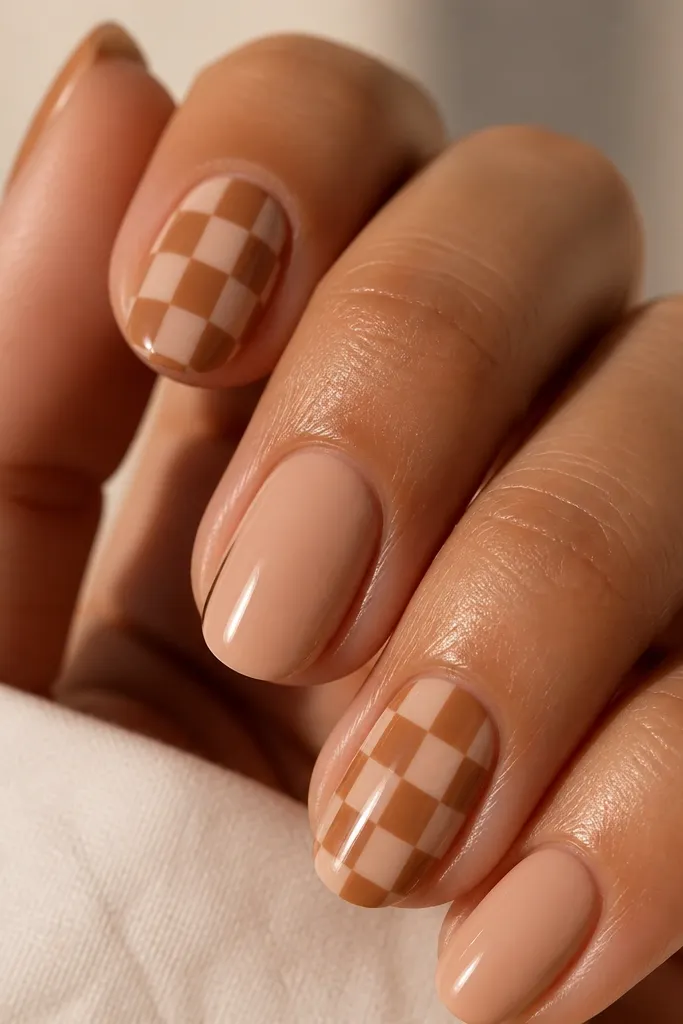
Checker accents look playful but still polished when the squares are small. Caramel brown squares create warm contrast without feeling harsh. Keeping the pattern on one or two nails keeps it classy and prevents the manicure from looking too busy. The grid also looks great on short nails because each square fits neatly within the nail bed.
Base nude. On an accent nail, draw a light guide grid with a pencil-thin liner, then fill alternating squares with caramel brown. Use a steady hand and keep squares equal size - around 2-3 mm each depending on your nail width.
Editor's noteUse a nail art dotter to place square corners, then connect with thin lines.
Watch outDon't make squares uneven - mismatched squares read cheap fast.
22. Chocolate Chrome Edge
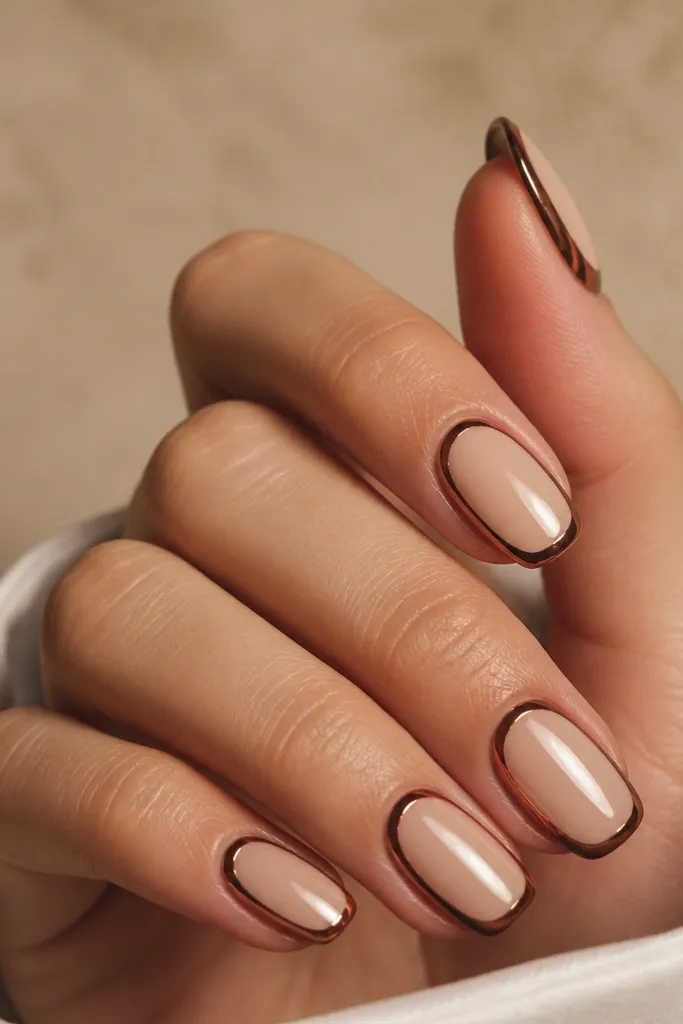
Chrome edges look like jewelry for your nails. The thin metallic trim defines the tip without covering the whole nail. Chocolate brown is the perfect base because it makes the chrome look warmer, not icy. This design looks clean in close-ups because the trim line is so precise.
Base chocolate brown. Use a striping brush to paint a tiny line along the tip edge, then apply chrome powder or chrome gel along that line and seal. Keep the trim width around 0.5-1 mm so it stays delicate.
Editor's noteSeal chrome with a thicker top coat - thin top coats can dull it.
Watch outAvoid covering the entire nail in chrome - it looks bulky on short lengths.
23. Taupe Brown Watercolor Wash
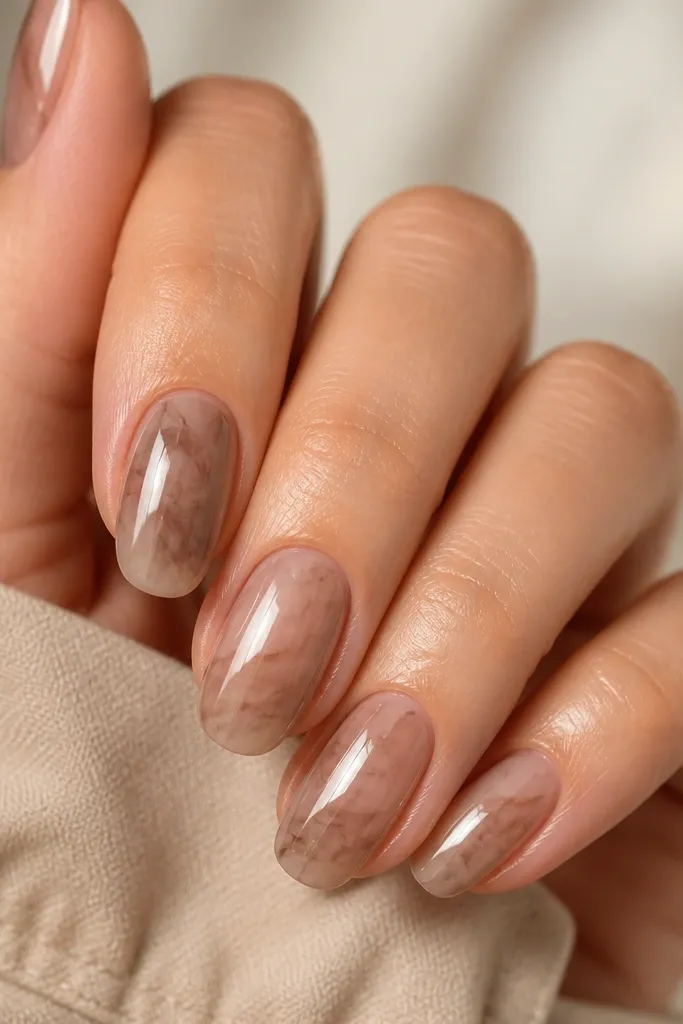
Watercolor wash nails look artsy without requiring perfect symmetry. The taupe and light brown blend gives a softer look than solid brown and still keeps the theme. I love this for apartment life because you can "fix" mistakes by blending rather than scrubbing. The glossy top makes the wash look smooth instead of streaky.
Base nude. Add a few small drops of thin taupe and light brown polish onto a palette, then pick up with a sponge and dab lightly on the nail. Blend edges with a clean sponge corner, then seal with top coat.
Editor's noteUse thin polish - thick polish makes watercolor look like paint, not wash.
Watch outDon't overbuild layers - too many swipes turn it muddy.
24. Espresso Dot Gradient Tips
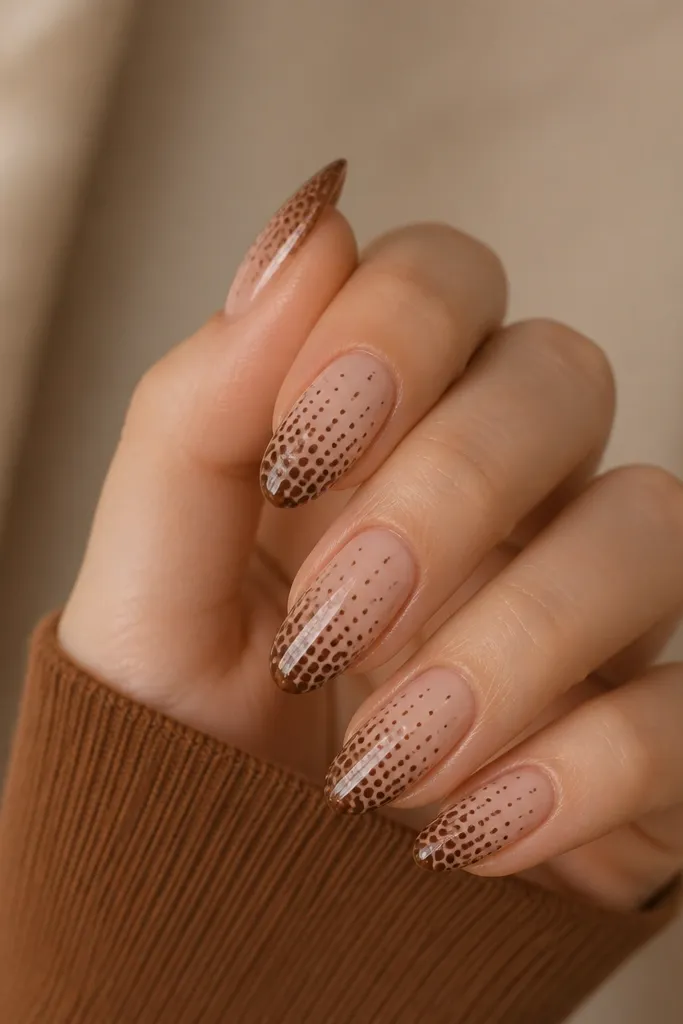
Dot gradients look like tiny pearls clustered at the tip. Espresso dots create a strong contrast, and the gradient makes the nail look dimensional instead of flat. This is easy to control because you're repeating one action: dot, dot, dot. Brown tones also look classy compared to black glitter gradients.
Base nude. Starting at the tip edge, place the largest dots along the center line, then add smaller dots moving upward. Keep the dot area to the top third of the nail so it doesn't overwhelm.
Editor's noteLet dots dry just 30-60 seconds before adding more so they don't smear.
Watch outAvoid uneven dot spacing - it makes the gradient look accidental.
25. Caramel Outline Frame on One Nail
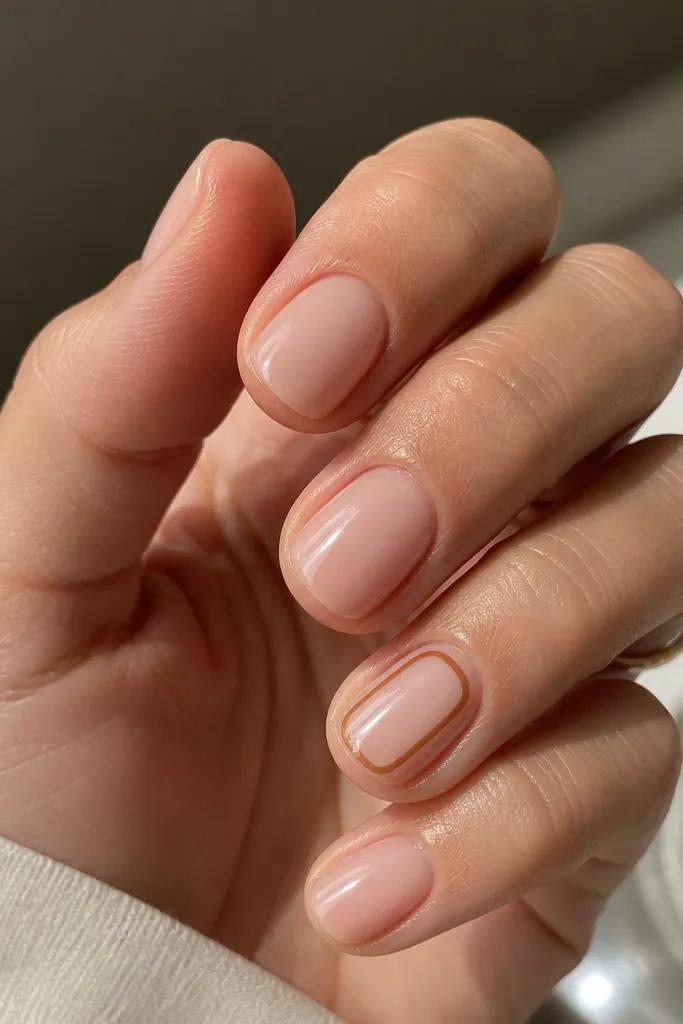
An outline frame gives a clean, architectural feel without filling the nail. Caramel-brown is warm and looks good next to both silver and gold jewelry. Because it's only one thin border, it works on tiny nails where full art can feel crowded. Glossy top coat makes the border look sharp and smooth.
Base nude. Draw a rounded rectangle inset by 1 mm from the sidewalls and about 1 mm from the tip curve. Use a liner brush and a steady hand. Seal with top coat, then check the edges for any roughness and smooth with one more thin top coat.
Editor's noteMake the border slightly thicker at the corners - it hides tiny brush wobbles.
Watch outDon't place the frame too close to the cuticle - it can make nails look messy.
26. Mocha Marble French Reverse
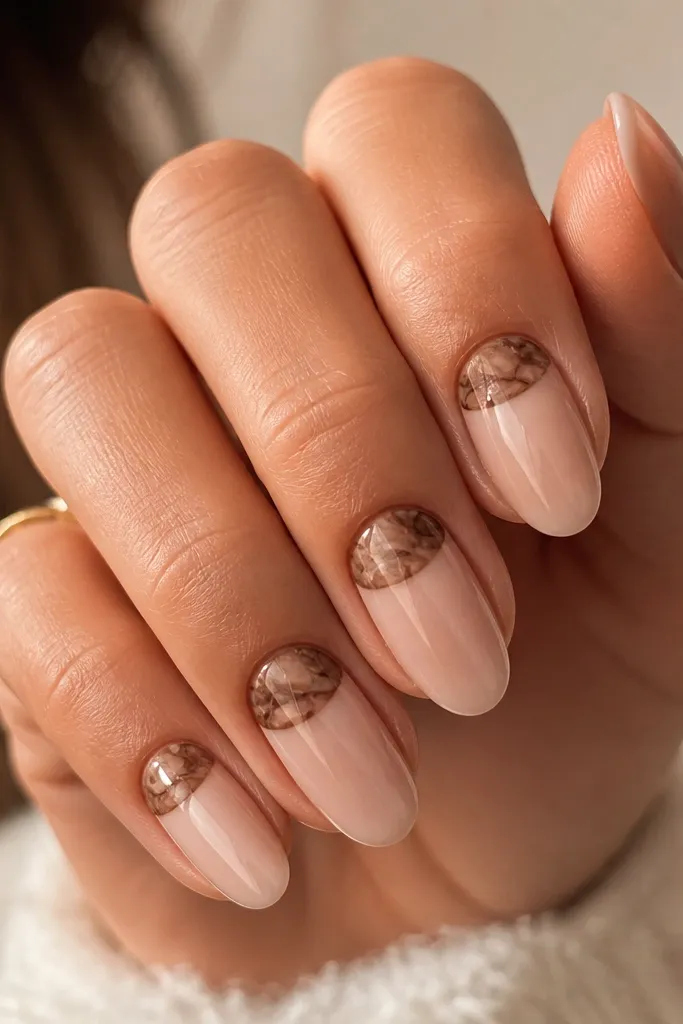
Reverse French concentrates the design at the base and makes the nail look styled even when you only have a little time. The marble panel in taupe and milk brown adds movement so the look doesn't feel flat. Mocha base is deep and grounding, which helps the lighter panel pop. It's also great if your nail beds are slightly uneven - the design draws the eye to the center area.
Paint mocha all over. Then add a lighter taupe/milky brown marble curve at the cuticle area using a thin brush and a couple cloudy swipes. Keep the curve about 1/4 of the nail height and centered.
Editor's noteUse a makeup sponge to soften the marble edges so it blends into the mocha base.
Watch outAvoid a hard straight line between colors - it looks like a sticker.
27. Espresso Dot Cuticle Halo
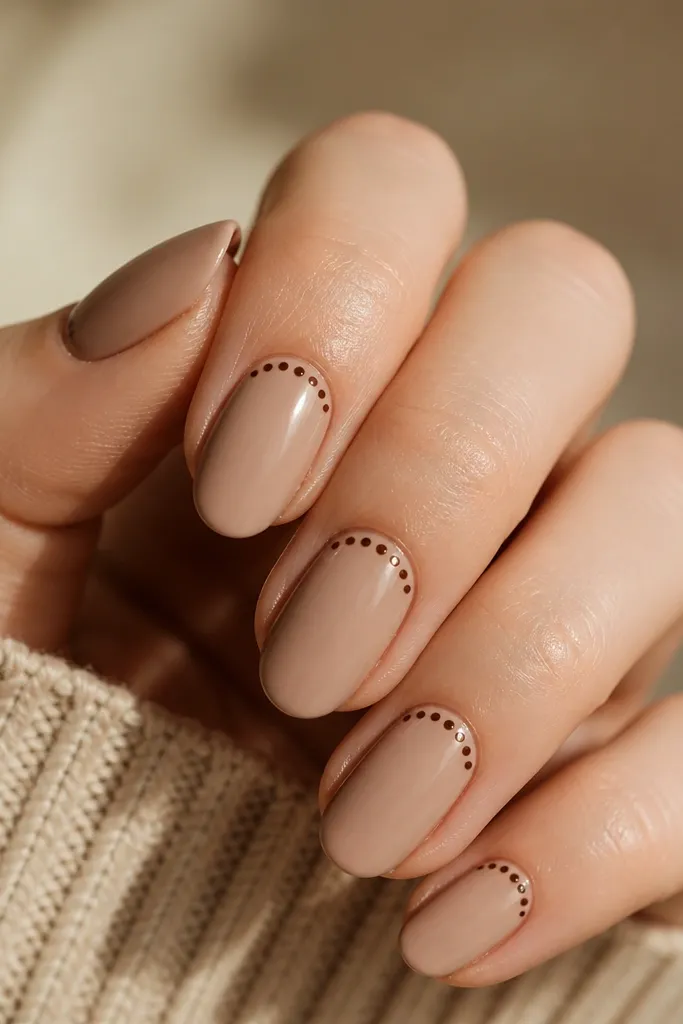
This halo design looks like jewelry around your nail bed. The dot ring is subtle, but the contrast makes it visible without covering the whole nail. Espresso dots are classic, and the halo placement is perfect for short nails because it stays close to the cuticle. Glossy top makes the dots look raised and polished.
Base nude. Place a line of tiny espresso dots along the cuticle curve, leaving a small gap in the center so it looks like a halo not a thick border. Connect the dots with a thin brush if needed, then seal.
Editor's noteWork one finger at a time so the dots don't smear while you place the rest.
Watch outDon't make the halo too thick - it turns into a dark band.
28. Caramel Foil Fleck Accent
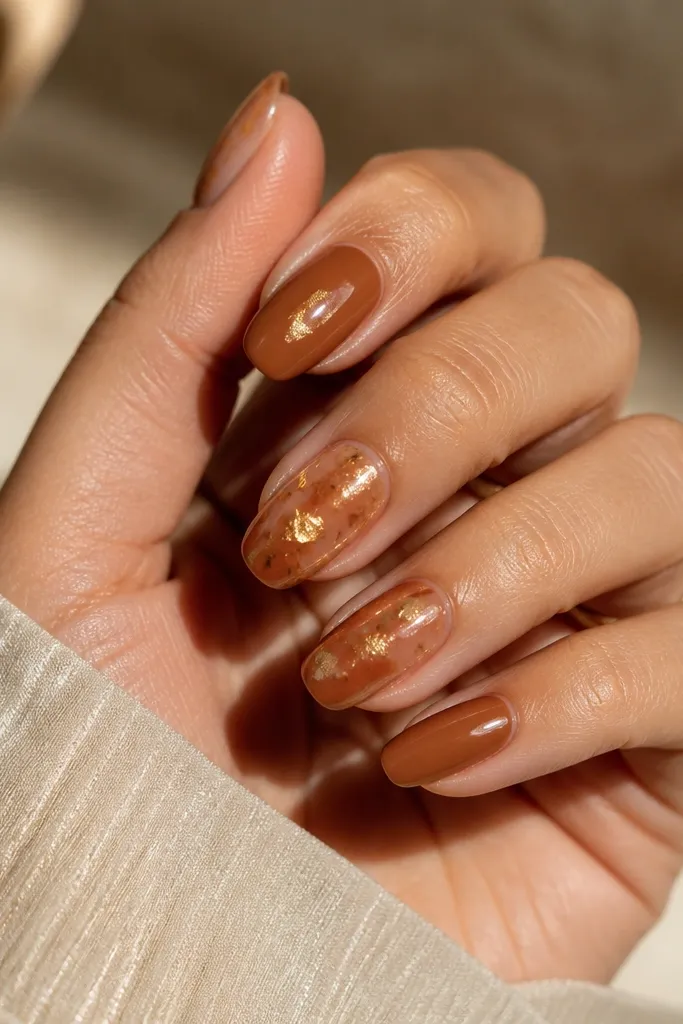
Foil flecks add sparkle without needing glitter coverage. Caramel-brown foil looks warmer than silver, so it blends with brown nail themes instead of competing. Scattering flecks near the center and tip gives a "sunlit" effect. It also works well if you want something different but still apartment-friendly because you're placing pieces, not painting details.
Base nude. Apply foil glue or sticky gel where you want flecks, then press small pieces of caramel-toned foil onto the nail. Tap off excess after it grabs, then top coat carefully so you don't smear the foil shape.
Editor's noteUse small foil pieces - big pieces lift and wrinkle on short nails.
Watch outAvoid heavy foil placement on every nail - it looks too intense for everyday.
29. Toffee Striped Center Channel
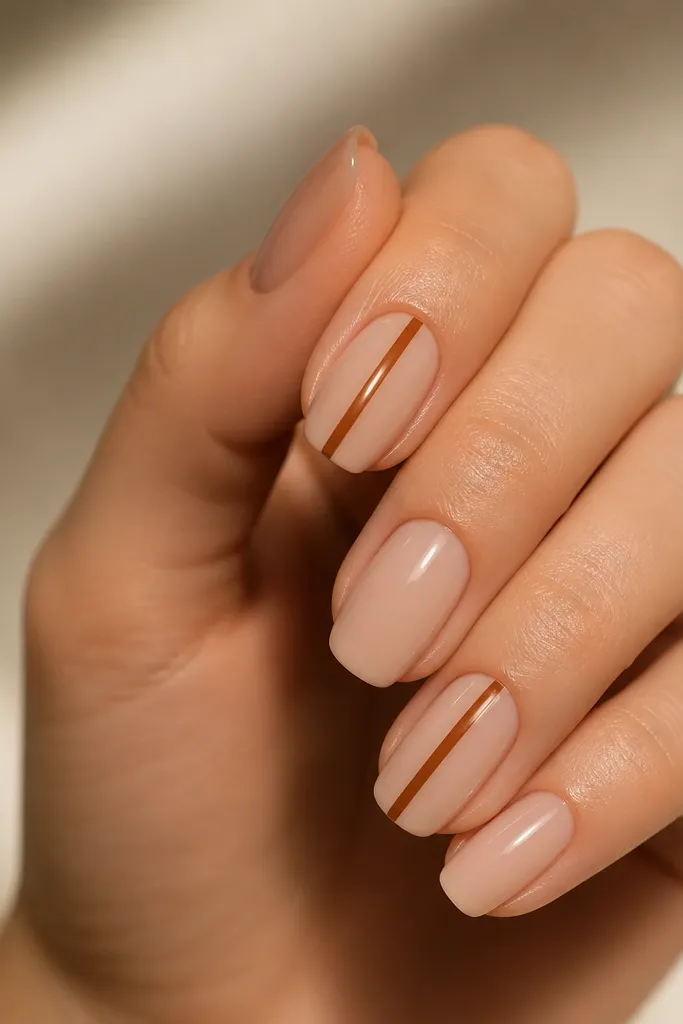
Center channels make nails look longer because the eye has a clear path. The narrow trench effect looks clean and modern, and toffee brown is warm enough to feel cozy. This design also hides small nail surface texture because the stripes act like structure. Glossy top coat keeps the lines crisp.
Base nude. Use a striping brush to draw three vertical lines: the center line plus two thinner lines on each side, leaving a narrow gap between them. Keep the channel width around 1/6 to 1/5 of the nail width. Seal with top coat.
Editor's noteIf your lines drift, correct before top coat - after top coat they look harder to fix.
Watch outAvoid thick stripes - wide channels make short nails look squat.
30. Espresso and Nude Side Swirl
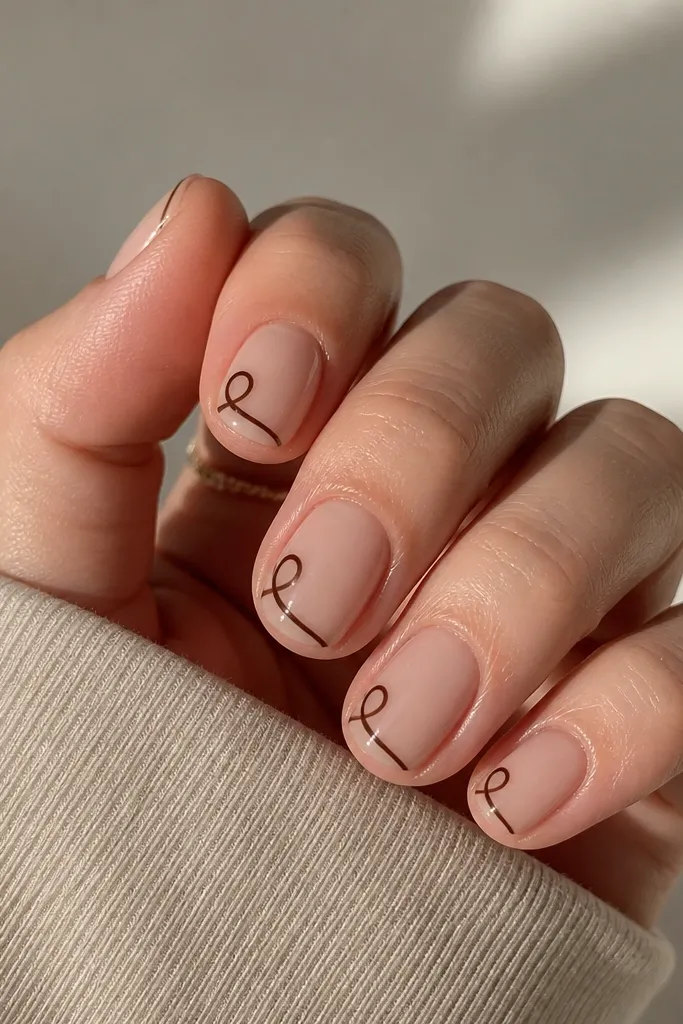
A side swirl gives movement and looks artsy without taking over the nail. Espresso is strong, so the swirl reads clearly on short lengths. Keeping the base nude keeps the swirl from feeling heavy. The shape also balances your nail - it adds interest on one side, so the nail doesn't look flat.
Base nude. Use a liner brush to draw a thin swirl starting near the lower sidewall, curving toward the center third and stopping before the tip edge. Add a second thin line to outline the swirl if you want a more defined look.
Editor's noteUse a liner brush with a pointed tip, not a flat nail art brush - it draws cleaner curves.
Watch outAvoid filling the swirl completely dark - outline keeps it elegant.